Setting up integration to store data into Pega using realtime REST JSON
8 Tasks
1 hr
Scenario
MyOrg has decided to partner with Pega to better support their ability to sell their software by introducing a new integration component that will allow for the consumption of real-time data from MyOrg into Pega applications. The goal is that this data can then be used for predictive and adaptive analytical models that drive personalized decisions, as well as for defining eligibility criteria. The data that MyOrg sends is real-time data that does not map to existing properties in the Pega xCAR (extended customer analytical record).
Note: The goal of this exercise is to demonstrate the required artifacts that need to be built on the Pega side to support a real-time data integration service. In a real-life scenario, the rules and configurations depend on the project requirements. For this exercise, an implementation application of Customer Decision Hub has been built for you, in which you can do the development.
As a system architect, you build the artifacts required for the integration between MyOrg, an independent software vendor, and the Pega application.
After the creation of the artifacts, as a system architect, test that the data can be ingested and used within the Pega application. Then, package the developed artifacts as a component so that they can be shared and deployed through Pega Marketplace.
Use the following credentials to log in to the development system:
| Role | User name | Password |
|---|---|---|
| System architect | SystemArchitect | rules |
| Database administrator | [email protected] | enablement |
Caution: The development system hibernates after 2 hours of inactivity and terminates after 7 days of inactivity.
Your assignment consists of the following tasks:
Task 1: Define a ruleset
As a system architect, create a new ruleset for saving integration artifacts and include the ruleset in the application definition. For this exercise, the name of the organization is MyOrg, and the ruleset is MyOrgInt.
Task 2: Create a new database table
As a database administrator, create the table required to save your data. Then, as a system architect, create a database table rule to connect to the database table from the Pega side. For the purposes of this exercise, the database table is named sample and has the following structure:
| Table | Column | Type | Primary Key? |
|---|---|---|---|
|
sample |
customerid |
character varying(255) |
True |
|
sample |
sampledecimal |
numeric(3,2) |
False |
|
sample |
sampleinteger |
integer |
False |
Task 3: Define the data class
As a system architect, define a data class and the properties that will be saved into the Pega application to support the Pega xCAR. For the purposes of this exercise, the data class is MyOrg-Data-Sample.
For this exercise, create two properties.
| Field Name | Field ID | Type |
|---|---|---|
|
Sample Decimal |
sampledecimal |
Decimal |
|
Sample Integer |
sampleinteger |
Integer |
Tip: The customerid property exists in the inheritance path. In this case, there is no need to create a new property for customerid in the data class.
Task 4: Define the integration class
As a system architect, define the integration class and the properties required to support your service. For the purposes of this exercise, the integration class is MyOrg-Int-Sample.
Task 5: Create the service
As a system architect, create a service package rule to group service rules that are designed to be developed, tested, and deployed together. For the purposes of this exercise, the service package is Sample, the Service REST rule is SampleService and the service activity is SampleServiceActivity.
Tip: The service package determines the security scheme and access for the services in the package. When you create a service package, you define a package name. Create the service package data instance before creating any service rules with that package name.
Task 6: Mark properties relevant for decisioning
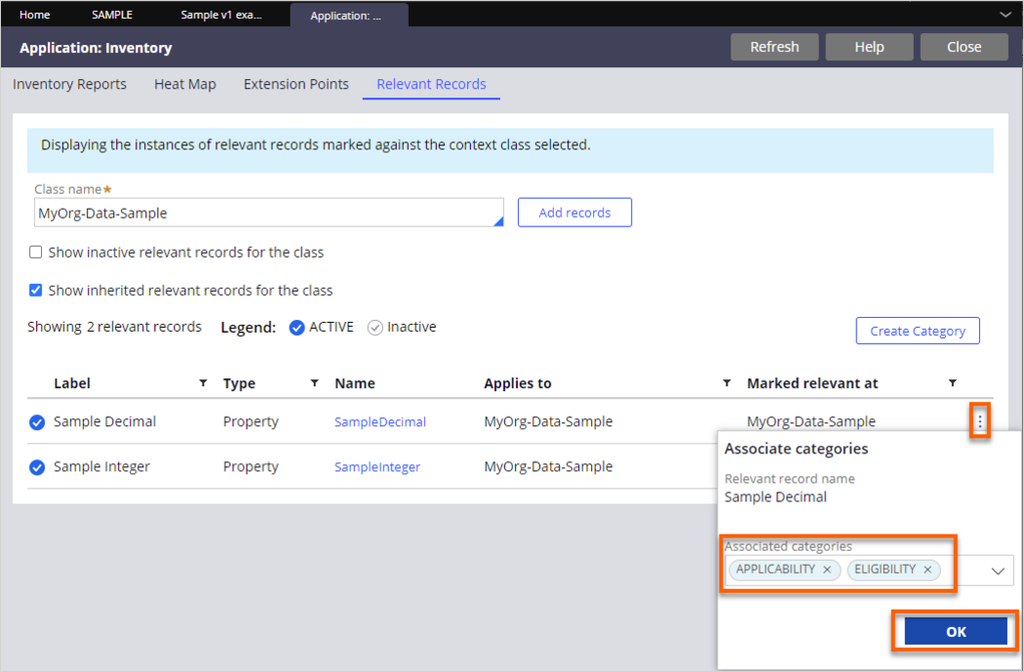
As a system architect, mark your properties as relevant and define categories for them so that they can be used for decisioning.
Task 7: Test the service
As a system architect, test the service.
Tip: Use a 3rd party API testing tool, such as Postman, to test the service.
Task 8: Package the artifacts
As a system architect, package the created artifacts as a new component to support feature reuse in another system or applications, and publish the package on the Pega Marketplace. For the purposes of this exercise, the component name is SampleComponent.
Tip: You can control which rulesets define your component and whether your component has dependencies on other rulesets or applications.
Detailed Tasks
1 Define a ruleset
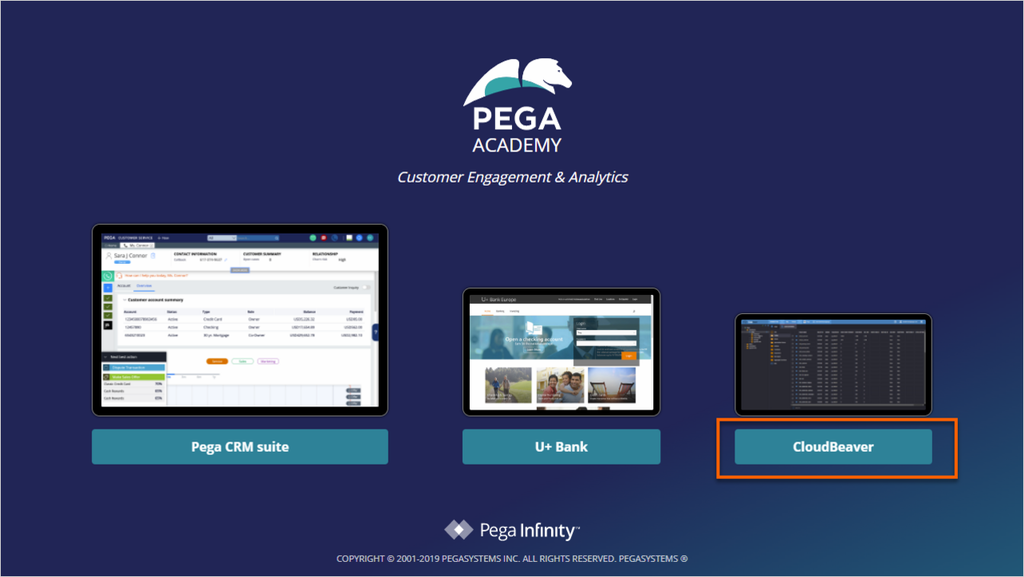
- On the exercise system landing page, click Pega CRM suite to log in to Customer Decision Hub.
- Log in to Dev Studio as the system architect with User name SystemArchitect and Password rules.
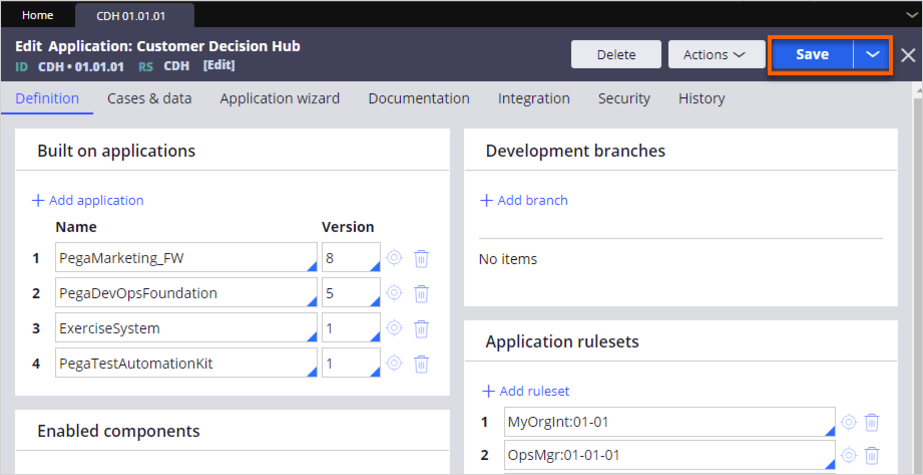
- In the header of Dev Studio, click Application: Customer Decision Hub > Definition to open the application definition.
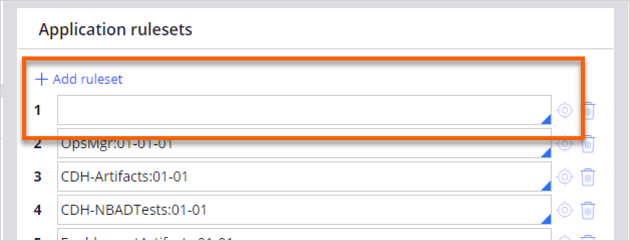
- On the Edit Application: Customer Decision Hub rule form, in the Application rulesets section, click + Add ruleset.
- Click and hold the empty row then drag it from the bottom to the top of the ruleset stack.
- Enter the name of the ruleset as MyOrgInt:01-01, then click the target icon to create a new ruleset version.
Tip: As best practice, use the name of your organization or the name of the tool within your organization that you are integrating with the Pega side, followed by the letters Int (short for integration). Follow the name of the ruleset with :01-01 which indicates the version of the ruleset.
- In the upper-right corner, click Create and open.
- On the Edit Ruleset: MyOrgInt tab, click Save.
- Close the Edit Ruleset: MyOrgInt tab and on the Edit Application: Customer Decision Hub tab, click Save to save your application definition rule with the newly defined ruleset.
2 Create a new database table
- On the exercise system landing page, click CloudBeaver to log in to the CloudBeaver web application.
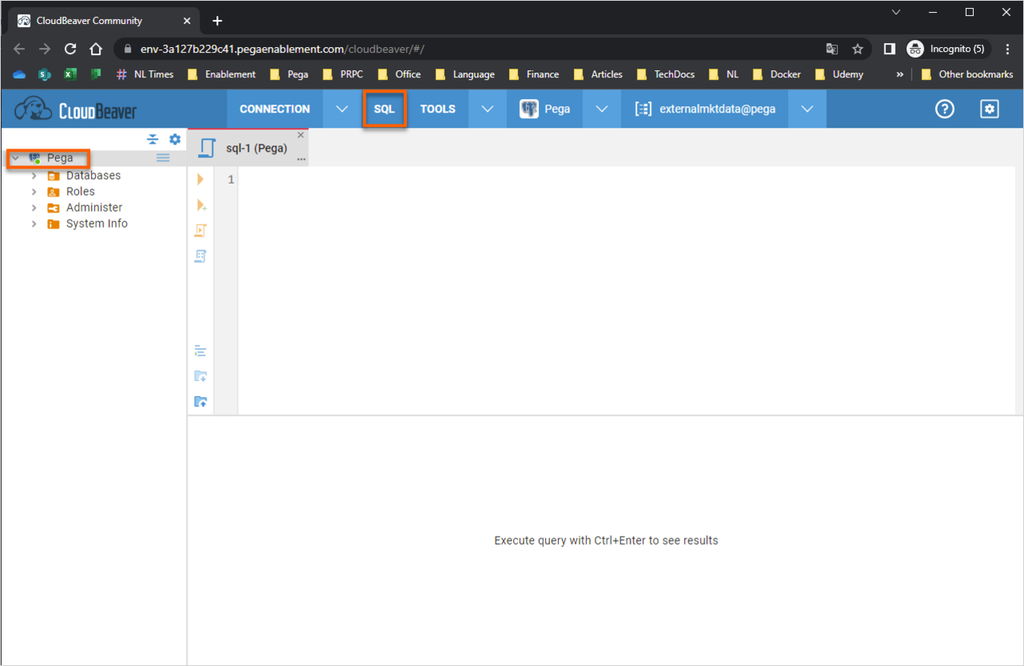
- In the navigation pane of CloudBeaver, click Pega, and then, in the header of CloudBeaver click SQL to open a new tab.
- Define a new table in the database to store the integration data. The table must be created in the ExternalMKTData schema of Customer Decision Hub. For the purposes of this exercise, use the following SQL script:
-- Table: externalmktdata.sample
-- DROP TABLE externalmktdata.sample;
CREATE TABLE externalmktdata.sample
(
customerid character varying(255) COLLATE pg_catalog."default" NOT NULL,
sampleinteger integer,
sampledecimal numeric(3,2),
CONSTRAINT sampletable_pkey PRIMARY KEY (customerid)
)
WITH (
OIDS = FALSE
)
TABLESPACE pg_default;
ALTER TABLE externalmktdata.sample
OWNER to pega;
- Press CTRL + ENTER on your keyboard to run the query and see the results.
- Log in to Dev Studio as the system architect with User name SystemArchitect and Password rules.
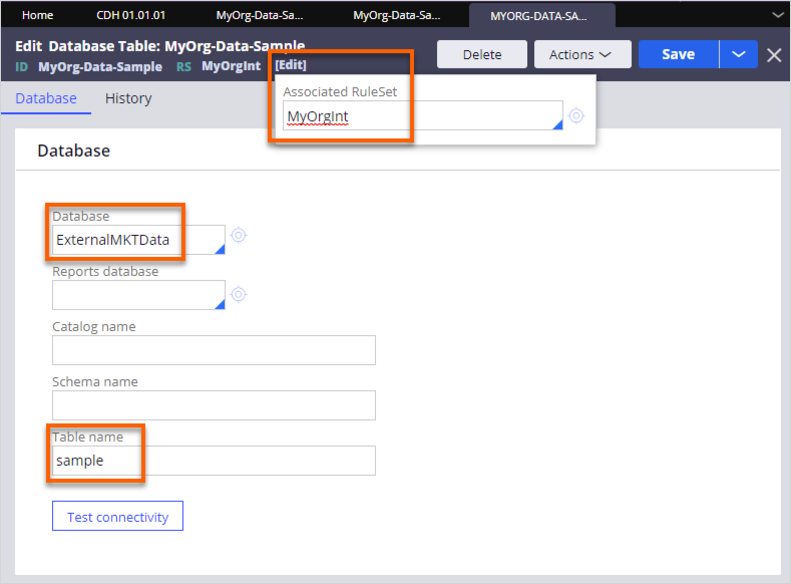
- Create a Database Admin Table instance rule to map your class to the table that you created in Task 2, step 3.
- In the header of Dev Studio, click Create > SysAdmin > Database Table.
- In the Database Table short description, enter MyOrg-Data-Sample as a description for the table.
- In the Class Name, enter MyOrg-Data-Sample as the name of the data class.
Tip: The Class name should be named with the following convention: OrgName-Data-TypeOfData
- Click Create and Open.
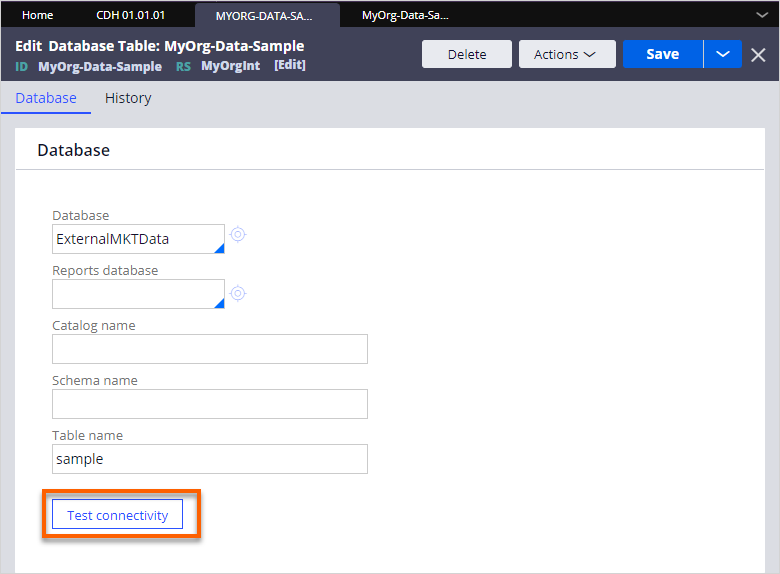
- In the Database field, enter ExternalMKTData.
- In the Table name field, enter sample as the name of the table that was created for you.
- On the header of the rule form, click [Edit] to update the Associated RuleSet to the MyOrgInt rule set that you created in Task 1, step 6, and then click OK.
- In the upper-right corner, click Save.
Caution: Do not click the Test Connectivity button until you create the data class. This helps to automatically configure the class and database table mapping.
3 Define the data class
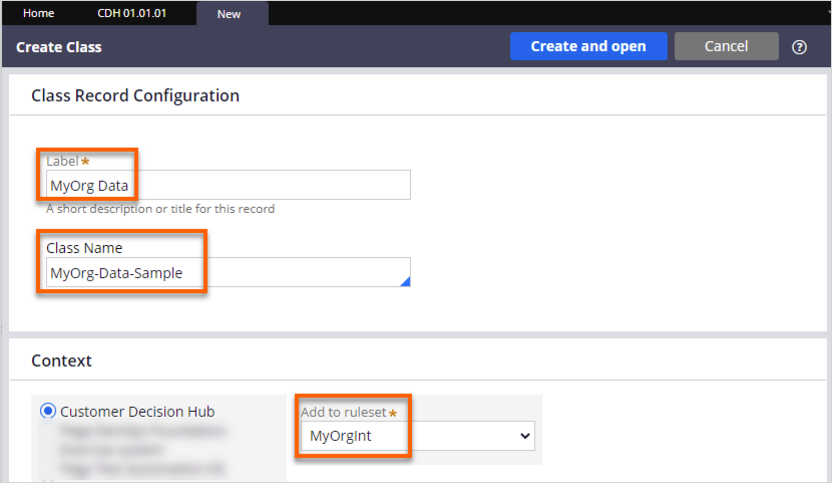
- In the header of Dev Studio, click Create > SysAdmin > Class to create a new class.
- In the Class Record Configuration section, in the Label field, enter MyOrg Data as a short description for your class.
- In the Class Name field, enter MyOrg-Data-Sample as the unique name for your class.
Tip: Use the following convention: OrgName-Data-TypeOfData
- In the Context section, select the Customer Decision Hub radio button.
- In the Add to ruleset list, select the MyOrgInt ruleset that you created in Task 1, step 6.
- In the upper-right corner, click Create and open.
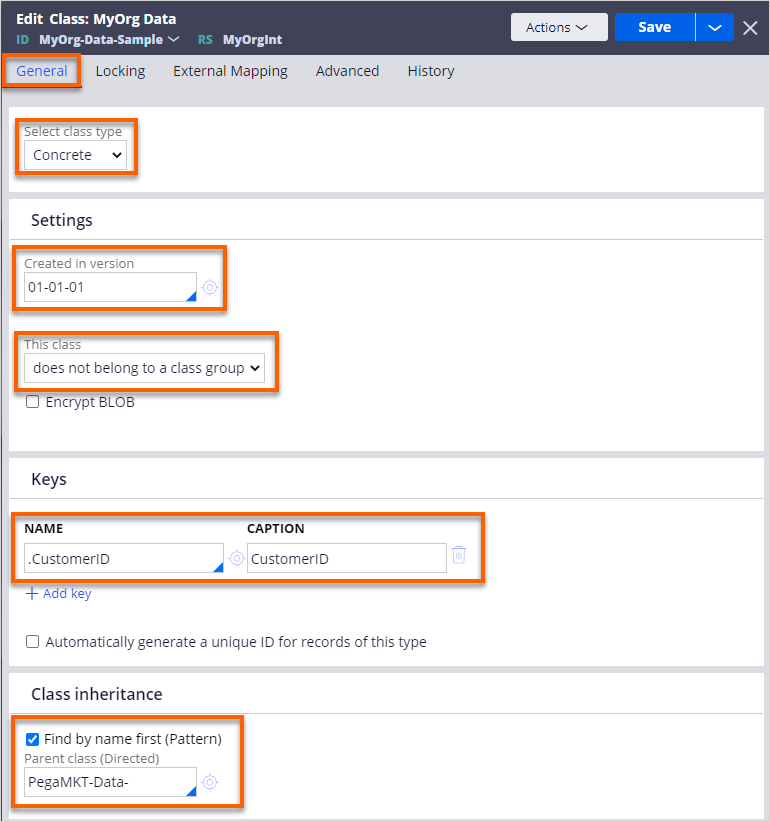
- On the General tab of the class form, select the class type, and then define the class settings for the new class:
- In the Select class type list, select Concrete.
- In the Settings section, in the Created in version field, enter 01-01-01.
- In the Settings section, in the This class list, select does not belong to a class group.
- In the Keys section, in the Name field enter .CustomerID
- In the Caption field, enter CustomerID.
- In the Class inheritance section, in the Parent Class (Directed) field, enter PegaMKT-Data-.
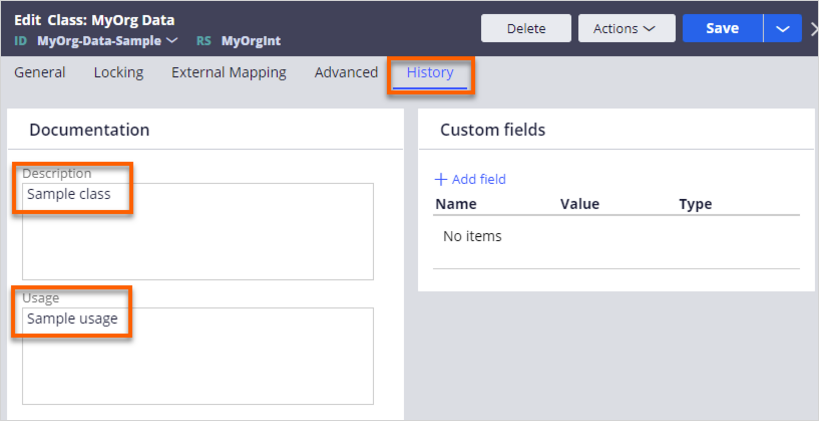
- On the History tab, in the Description field enter Sample class, and in the Usage field, enter Sample usage.
- In the upper-right corner, click Save.
- In the header of Dev Studio, click the tab for the Database Table rule that you created in Task 2, step 6.
- In the upper-right corner, click Save.
- In the Database section, click Test connectivity.
- Confirm that the data class is mapped to the correct database table.
Caution: Issues with the connection are resolved when the properties are created.
- In the header of Dev Studio, switch between the open tabs to the data class that you created in Task 3.
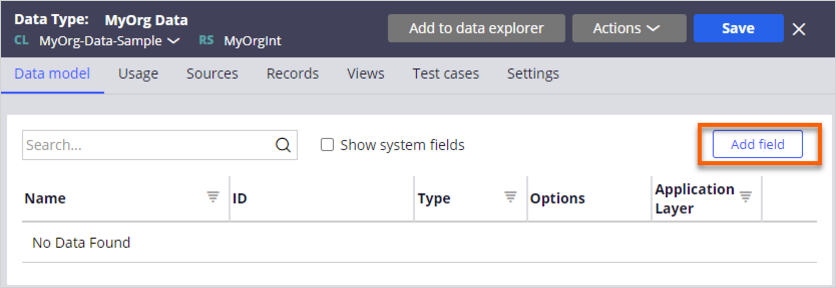
- At the top of the Edit class rule form, click the down arrow and then select View in data designer to define the data model that reflects the data that you want to store in the Pega application.
- In the upper-right corner, click Add field to define a new property.
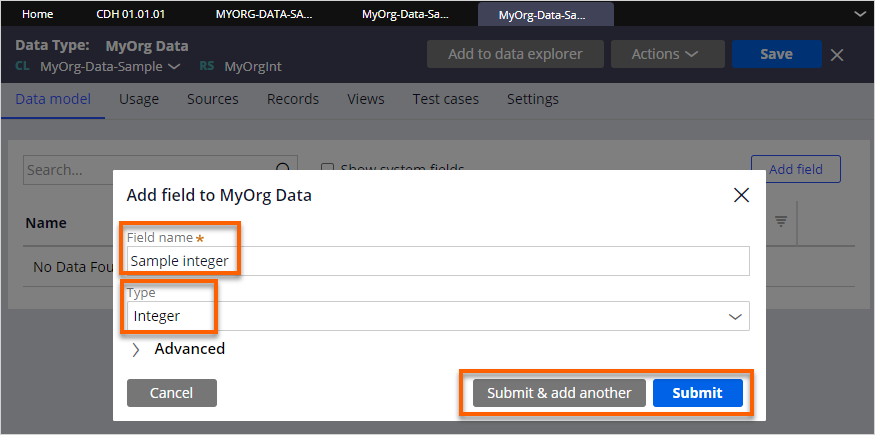
- In the Field name field enter the name of the property as Sample integer.
Tip: As best practice, use sentence case when naming fields: capitalize the first letter of the first word, and then lowercase for the rest of the words. For example, Sample integer.
- In the Type list, select Integer as the type of field.
- Optional: To add additional fields, click Submit & add another.
Caution: You do not need to create the CustomerID, as this property already exists in the data model.
- Optional: To create additional fields, repeat steps 6a to 6b.
For this exercise, add another field with Field name Sample decimal and Type Decimal. - Click Submit.
- On the Data Type: MyOrg Data page, click Save.
- In the Field name field enter the name of the property as Sample integer.
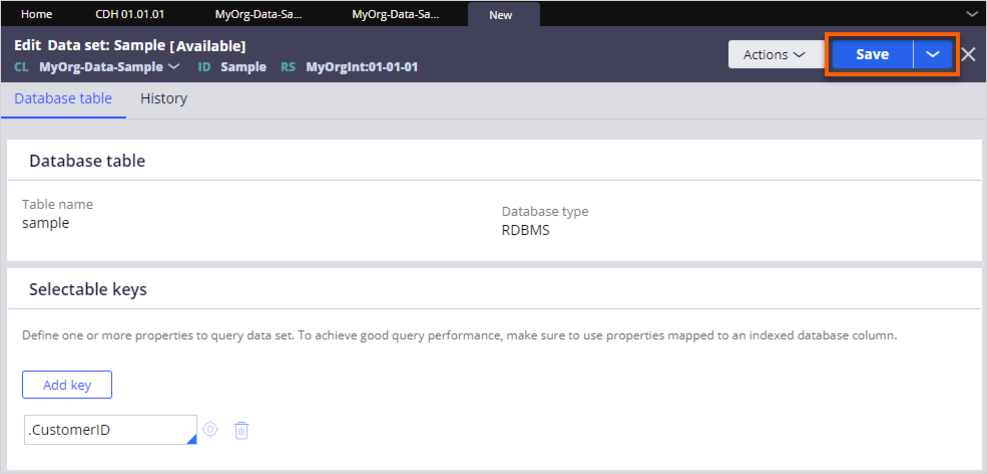
- Create a new data set rule to connect to the database table:
- In the header of Dev Studio, click Create > Data model > Data set.
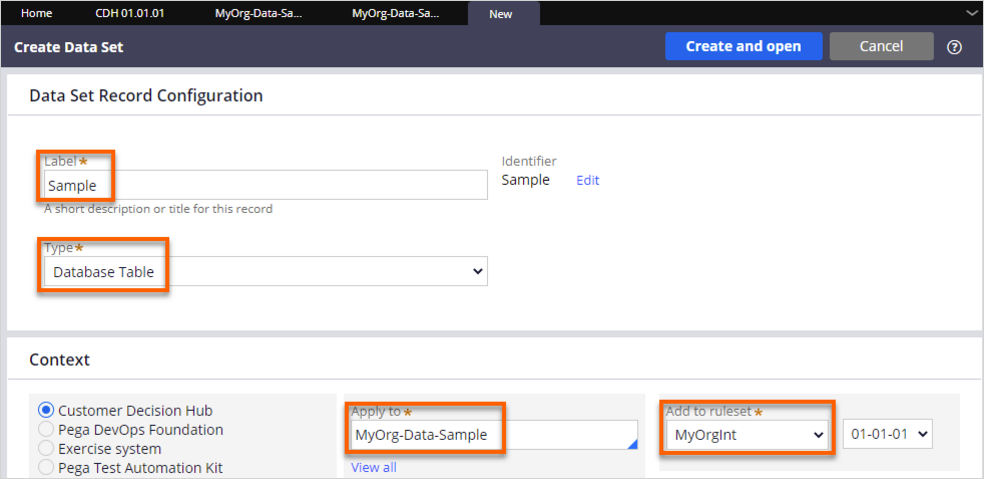
- On the Create Data Set form, in the Label field, enter Sample as the name for the data set.
- In the Type list, select Database table.
- In the Context section, in the Apply to field, enter or select MyOrg-Data-Sample as the data class.
- In the Context section, in the Add to ruleset list, select MyOrgInt as the ruleset.
- Click Create and open.
- In the upper-right corner, click Save.
Tip: This data set can be used to query the records stored in the database table. Currently, there are no records in the database table.
4 Define the integration class
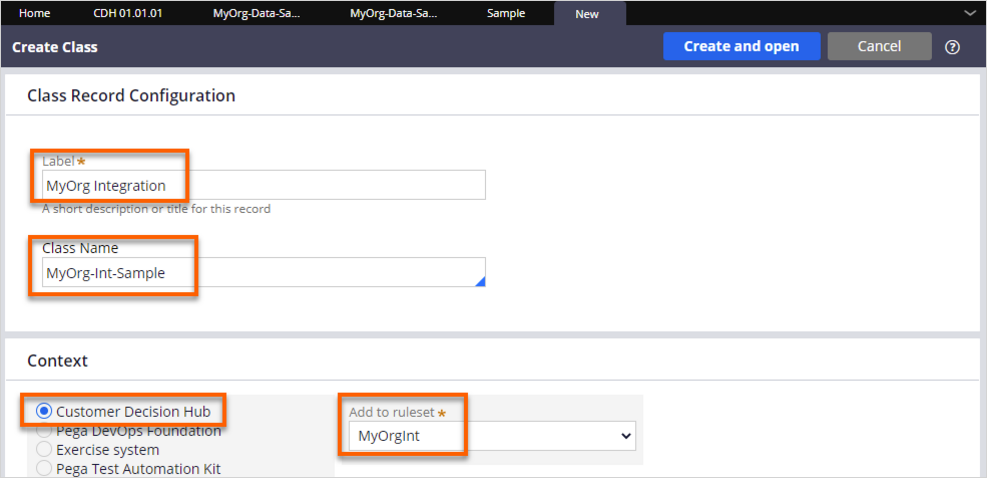
- In the header of Dev Studio, click Create > SysAdmin > Class to create a new integration class.
- In the Class Record Configuration section, in the Label field, enter MyOrg Integration as a short description.
- In the Class Name field, enter MyOrg-Int-Sample as a unique name for your integration class.
Tip: Use the following naming convention for integration class names: OrgName-Int-TypeOfData
- In the Context section, select the Customer Decision Hub radio button.
- In the Add to ruleset list, select the MyOrgInt ruleset that you created in Task 1, step 6.
- Click Create and open.
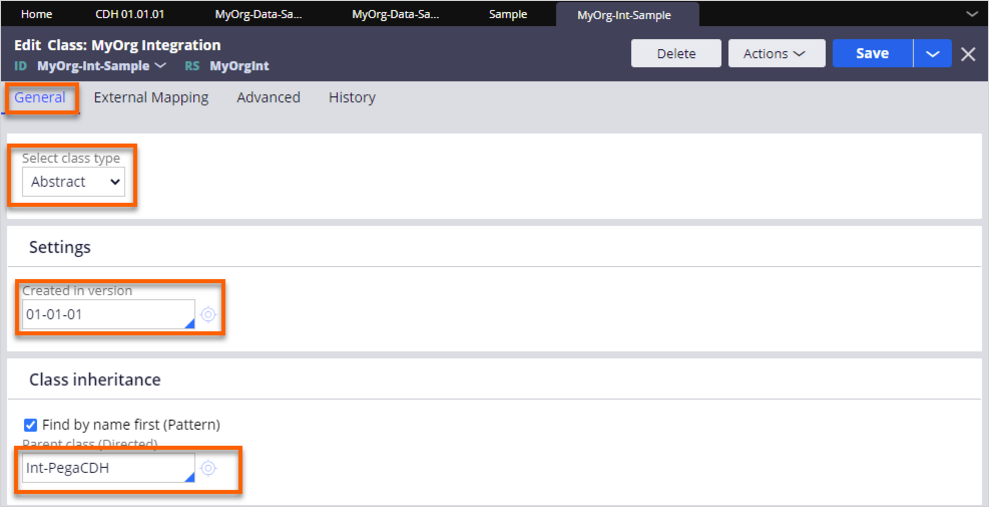
- On the General tab of the class form, select a class type, and then define the class settings for the new class:
- In the Select class type list, select Abstract.
- In the Settings section, in the Created in version field, enter 01-01-01.
- In the Class inheritance section, in the Parent Class (Directed) field, enter Int-PegaCDH.
- On the History tab, in the Description field enter Sample class, and in the Usage field, enter Sample usage.
- In the upper-right corner, click Save.
- At the top of the Edit class rule form, click the down arrow and then select View in data designer to define the data model that reflects the data you want to store on the Pega side.
Caution: As a best practice, the fields should map letter-for-letter to the attributes that are passed in through the service call to the Pega application as part of the integration.
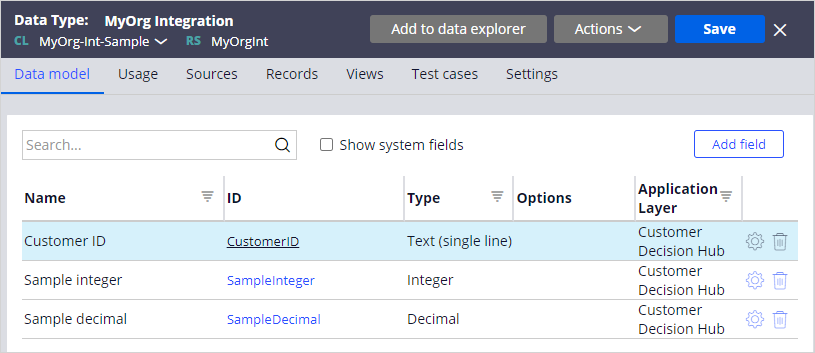
- In the upper-right corner, click Add field to define properties according to the data model.
- Add the following fields:
Field Name Field Type Customer ID
Text
Sample integer
Integer
Sample decimal
Decimal
- Click Submit.
- On the Data Type: MyOrg Integration page, click Save.
- Add the following fields:
- Create a page property in the integration class that maps to the data class that you created in Task 3, step 2.
- In the header of Dev Studio, click Create > Data Model > Property.
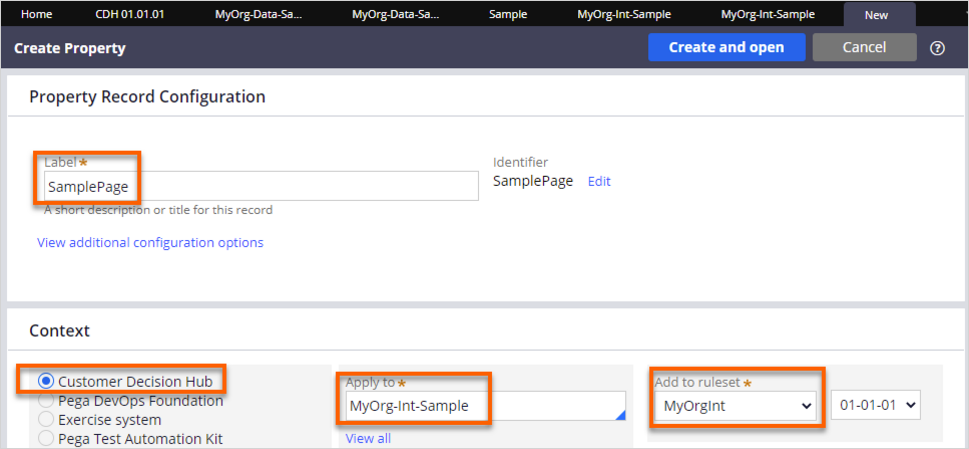
- In the Label field, enter the name of the page property as SamplePage.
Tip: As a best practice, the name of a property should start with the type of data that the property represents and end with the word Page.
- In the Context section, select the application.
- In the Apply to field, enter MyOrg-Int-Sample as the integration class.
- In the Add to ruleset list, select the ruleset that you created in Task 1.
- Click Create and open.
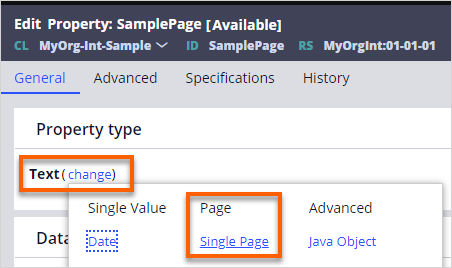
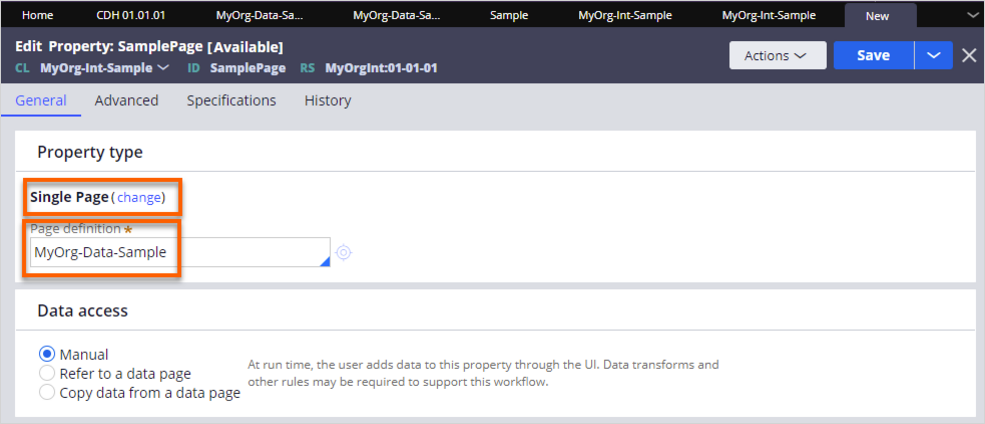
- In the Property type section, click change, and then select Single Page.
- In the Page definition field, enter the MyOrg-Data-Sample data class that you created in Task 3.
- In the upper-right corner, click Save.
Caution: If the JSON structure coming into your REST service is not flat and contains nested structures, you must create multiple integration classes with corresponding page or page list properties in your top-most integration class, so that when you look at the structure of your clipboard page and properties inside the integration class, it matches the structure of the JSON. For example:
{
"CustomerID" : "12345",
"FirstName" : "John",
"LastName" : "Doe",
"AddressDetails" :
[
{"AddressLine1" : "30 Milk St",
"City" : "Boston",
"State" : "MA",
"Country" : "US"}
],
"CommunicationDetails":
[
{ "HomePhoneNumber" : "7812224321",
"CellphoneNumber" : "7810807654",
"Email" : "[email protected]" }
]
}
For this JSON, you create 3 integration classes. One for the Customer, one for AddressDetails, and one for CommunicationsDetails. Inside the Customer integration class, you define a page property that has the Applies to class of your AddressDetails integration class and another page property with the Applies to class of your CommunicationDetails integration class.
The names of the page properties should have the same name as your embedded complex data structure. In this exercise, these are AddressDetails and CommunicationDetails respectively. Each of your integration classes then needs corresponding properties that map one-to-one to the fields defined in the embedded data structure. Because you are flattening everything into your Data class, all the properties in each of these integration classes must be flattened into your data class.
5 Create the service
- In the header of Dev Studio, click Create > Integration-Resources > Service Package, to create a service package.
- On the Create Service Package page, in the Service Package short description field, enter Sample Service to describe the purpose of your service package.
- In the Service Package Name field, specify Sample as the name of your service package.
- Click Create and open.
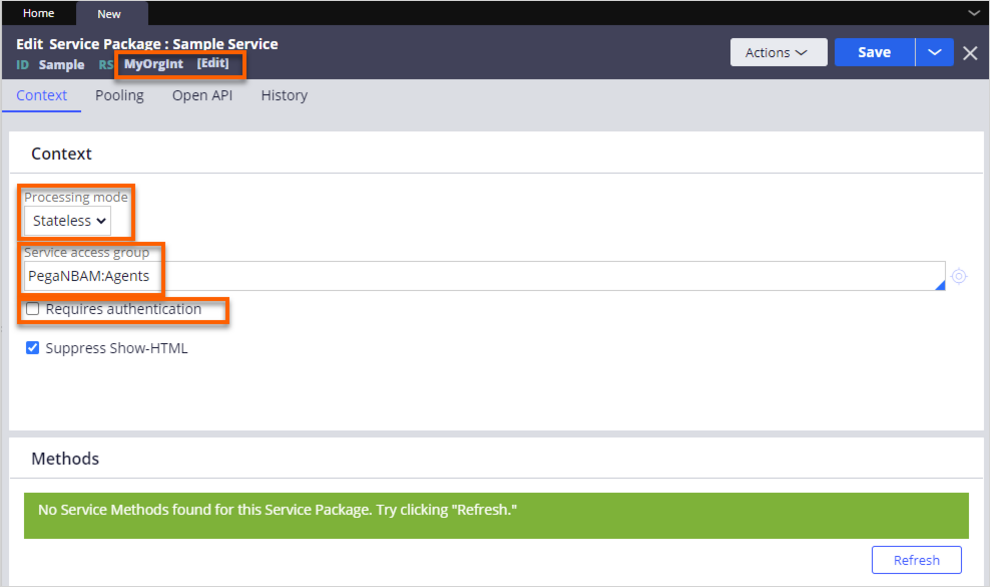
- On the Edit Service Package page, on the Context tab, configure the following settings:
- In the Processing mode list, select Stateless.
- In the Service access group list, enter or select PegaNBAM:Agents.
- Clear the Requires authentication checkbox.
- In the header of the rule form, click [Edit] to update the Associated RuleSet to the MyOrgInt rule set that you created in Task 1, step 6, and then click OK.
- In the upper-right corner, click Save.
Caution: Customers using this integration service in production will need to enable authentication and set up either Basic authentication or OAuth 2.0 authentication.
- In the header of Dev Studio, click Create > Integration-Services > Service REST to create a new REST service.
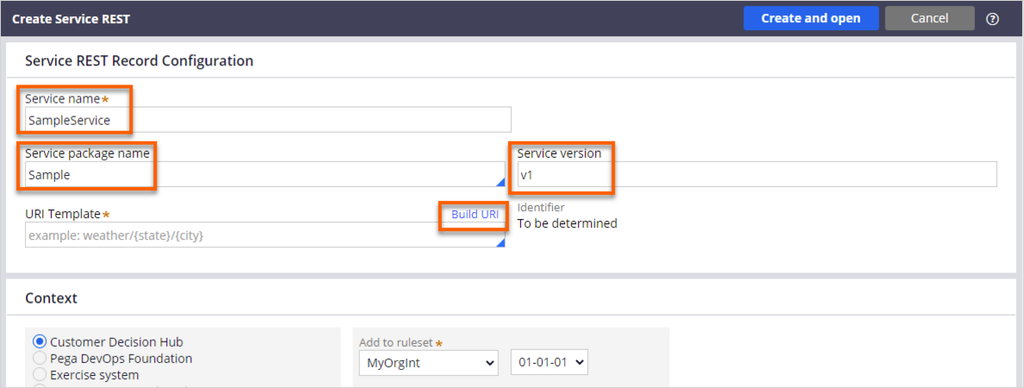
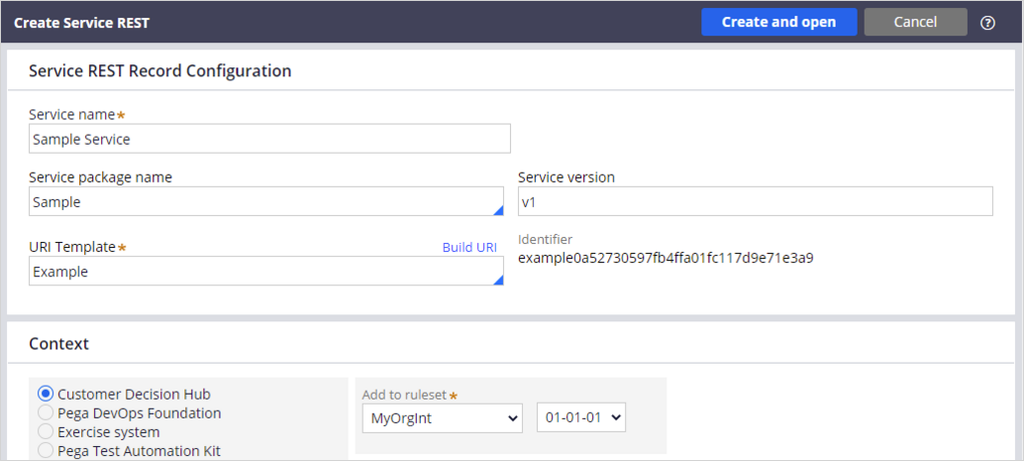
- In the Service REST Record Configuration section, configure the following settings:
- In the Service name field, enter SampleService as a label for the Service REST rule.
- In the Service package name list, enter or select the Sample service package that you created in Task 5, step 2.
- In the Service version field, enter v1.
- To the right of the URI Template field, click Build URI to create a new URI template.
Tip: You use Build URI to map a resource URI to a service REST rule. Use a URI template to define multiple URIs with similar structures. Templates contain a path and a query.
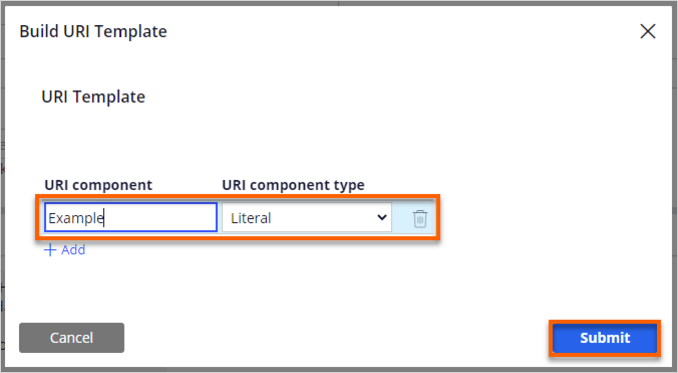
- In the Build URI Template window, click + Add.
- In the URI component column, enter Example as the name of the URI component.
- In the URI component type list, select Literal.
Tip: Literal: A literal value does not change. For example, if you are configuring a service endpoint URL to fetch the next stage of a case, the literal value could be /cases.
Variable: A variable value can change depending on the information that the service is fetching. For example, for a service endpoint that is fetching the next stage of a case, {caseID} is a variable value. The case ID can change based on the case for which you are fetching the next stage. - Click Submit.
- Click Create and open.
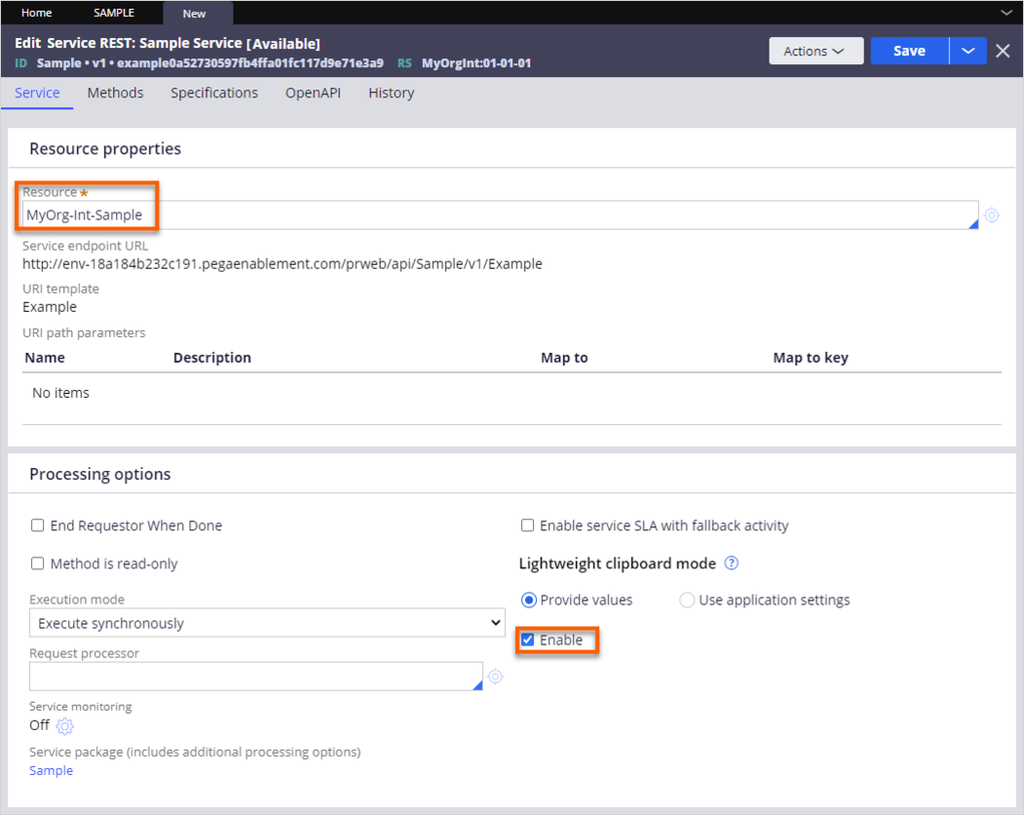
- On the Edit Service REST rule form, on the Service tab, configure the following settings:
- In the Resource properties section, in the Resource list, enter or select MyOrg-Int-Sample, the integration class that you created in Task 4, step 2.
- On the Service tab, select the Enable checkbox to enable the Lightweight clipboard mode.
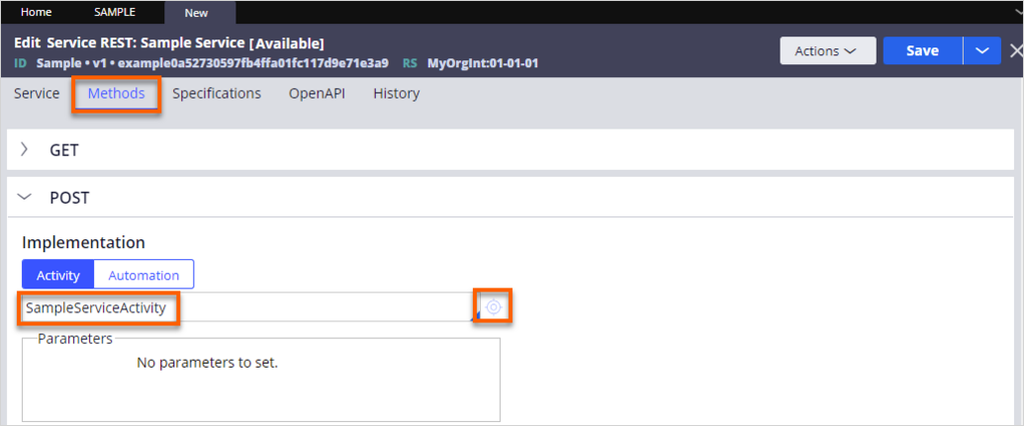
- On the Methods tab, configure the following settings:
- Expand the POST section to define a service activity to run when the POST method is called.
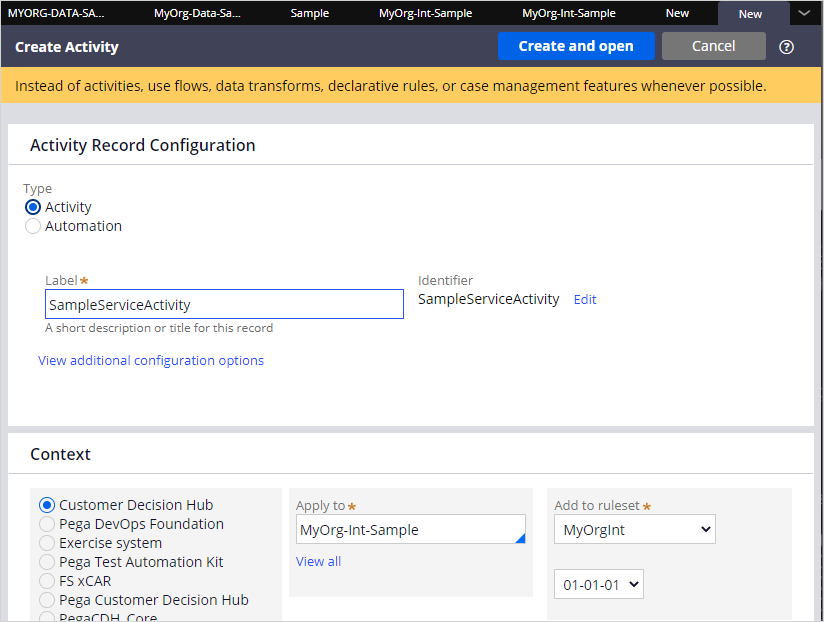
- In the Implementation field, enter SampleServiceActivity as the name for the service activity, and then click the target icon.
- In the upper-right corner, click Create and open to create the new service activity.
- On the Edit Activity rule form, configure the following settings:
- On the Pages & Classes tab, add .SamplePage in the Page name field, and MyOrg-Data-Sample in the Class field, which you defined in Task 3, step 2.
Tip: If the service request JSON is not flat, flatten all the data onto the page that you defined above in Task 5, step 8.a by copying the data from the embedded structures onto that page.
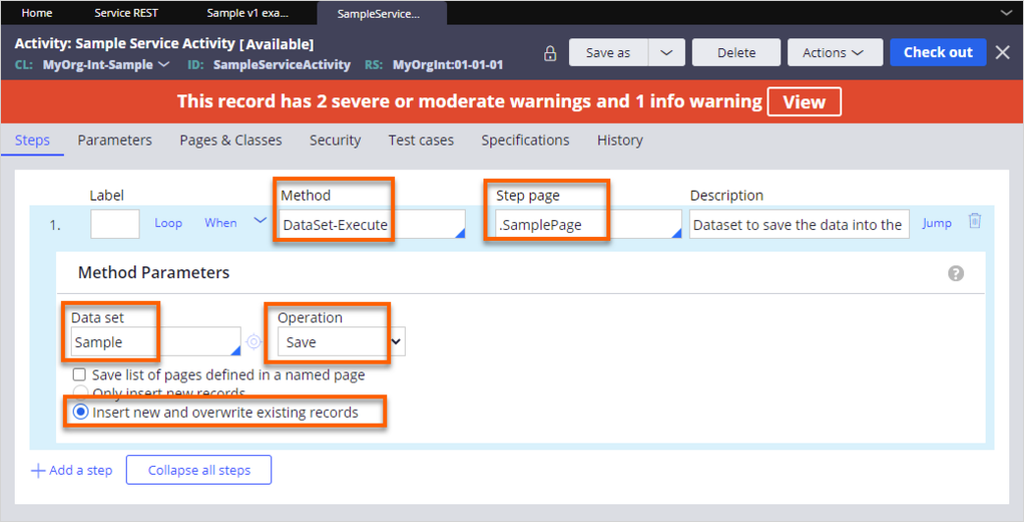
- On the Steps tab, in the Method list, enter or select DataSet-Execute.
- In the Step page list , enter or select the page .SamplePage, that you defined on the Pages & Classes tab.
- Expand the Method field to display its properties.
- In the Method Parameters section, in the Data set list, enter Sample, the data set that you defined in Task 3, step 7.
- In the Operation list, select Save.
- Select Insert new and overwrite existing records.
- In the upper-right corner, click Save.
- In the upper-right corner, click Close to return to the Service REST rule.
- On the Pages & Classes tab, add .SamplePage in the Page name field, and MyOrg-Data-Sample in the Class field, which you defined in Task 3, step 2.
- On the Methods tab, in the Message data section, configure the following settings:
- In the Map to list, select JSON.
- In the Map to key field, enter or select the .SamplePage page that you created as part of Task 4, step 5.
- In the Mapping method list, select Use fast processing.
- In the upper-right corner, click Save.
6 Mark properties relevant for decisioning
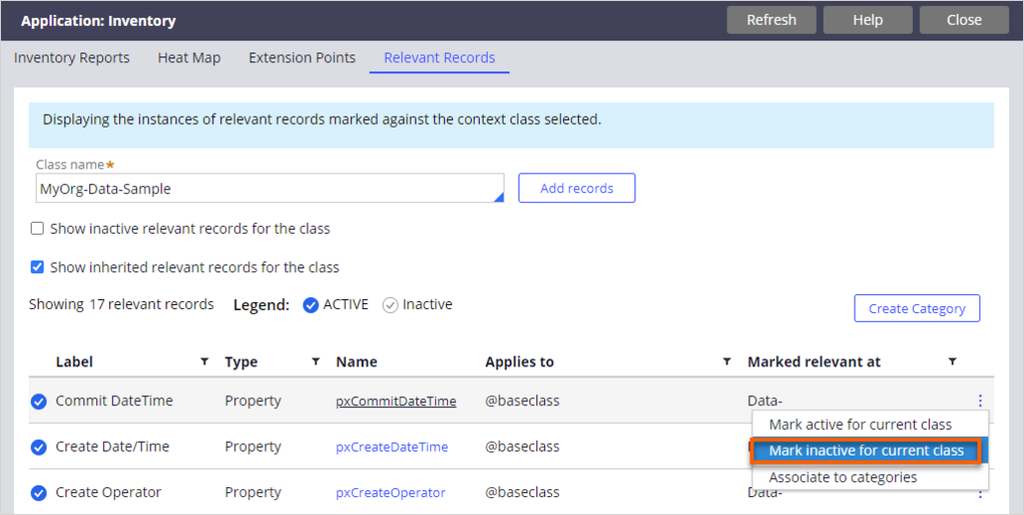
- In the header of Dev Studio, click Configure > Application > Inventory > Relevant Records to mark your properties as relevant for decisioning.
- On the Application: Inventory landing page, in the Class name field, enter the MyOrg-Data-Sample data class that you created in Task 3, step 2.
- Select the Show inherited relevant records for the class checkbox.
- For all properties or When rules that are listed that have a different Applies to class than the data class created in Task 3, step 2, click the More icon at the end of the row, and then select Mark inactive for the current class.
Tip: Click Add records to add new relevant records for properties that are not marked as relevant.
To add a new relevant record:
1. In the Type field, select Property,
2. In the Record name field, enter the properties in your data class.
3. In the Associate categories field, enter Eligibility, then enter Applicability.
4. Click Submit. - For all properties defined in the Data class, click the More icon at the end of their rows, select Associate to categories, and then select Eligibility and Applicability.
- Click OK.
Caution: Review all the relevant records and ensure that you include all the required properties and do not have any properties or when rules that should not be marked relevant. If there are any, mark them as inactive.
- In the upper-right corner, click Close.
7 Test the service
Before packaging the created artifacts and making the package available to others, you must unit test the configuration.
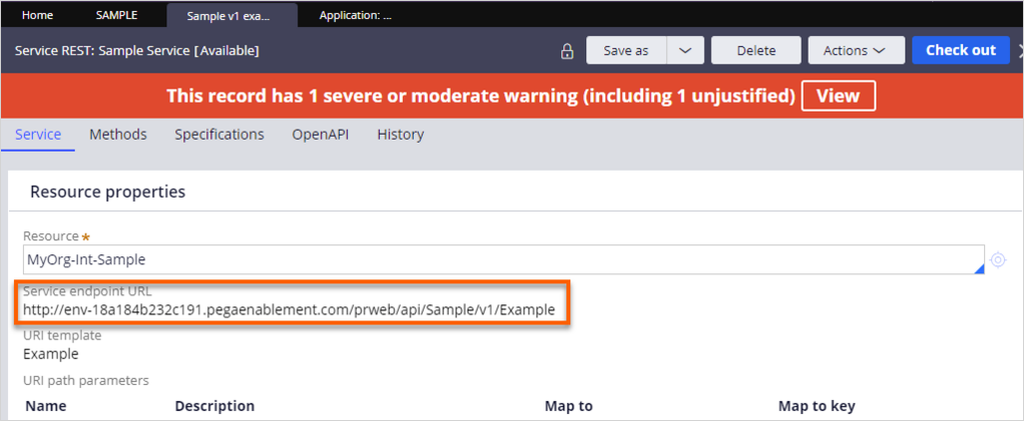
- Open the Service REST rule that you created in Task 5, step 5, to display the Service endpoint URL.
Caution: In the Service endpoint URL, update http to https when making the REST call.
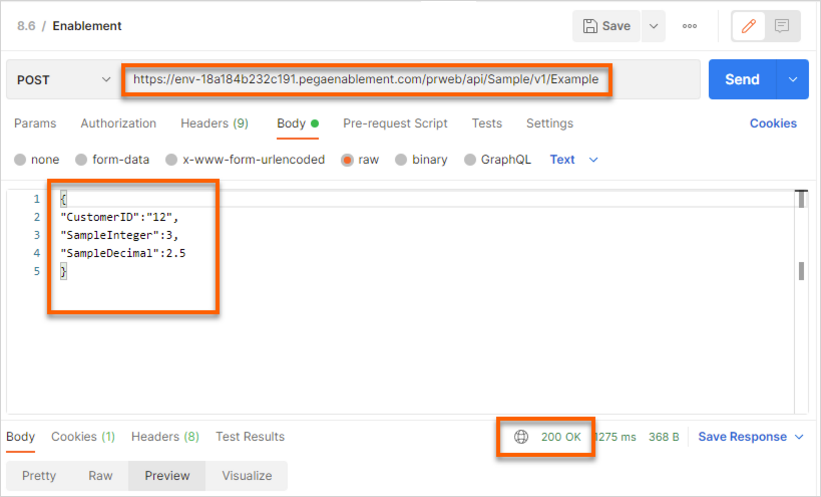
- Use an API testing tool, such as Postman, to invoke the service with a JSON request.
- Choose the POST method.
- Enter the Service URL: https://env.XXXXXX.pegaenablement.com/prweb/api/Sample/v1/Example.
- Enter the JSON payload:
{
"CustomerID":"12",
"SampleInteger":3,
"SampleDecimal":2.5
} - Send the request.
- Confirm that you receive a valid response. For example, 200 OK.
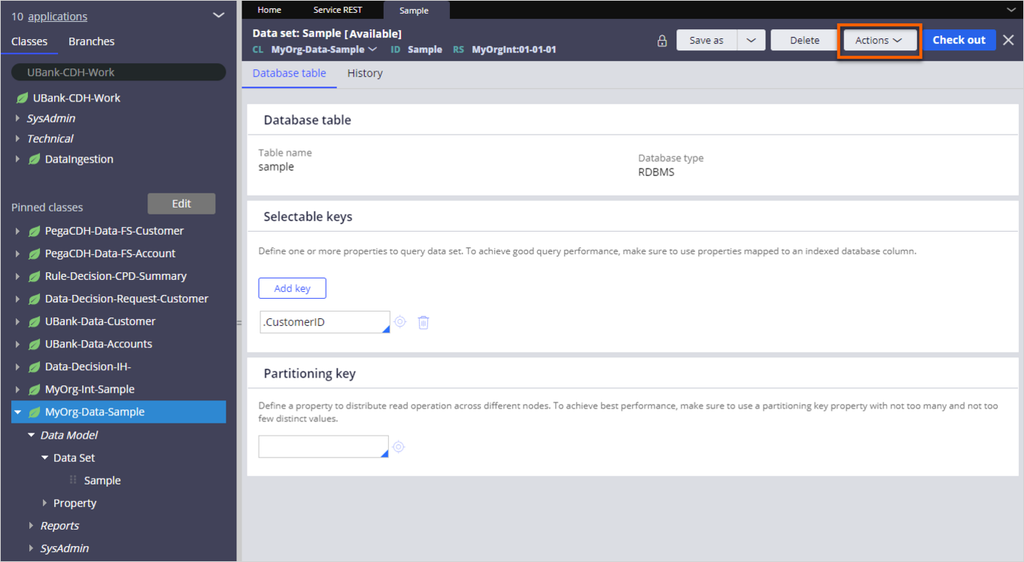
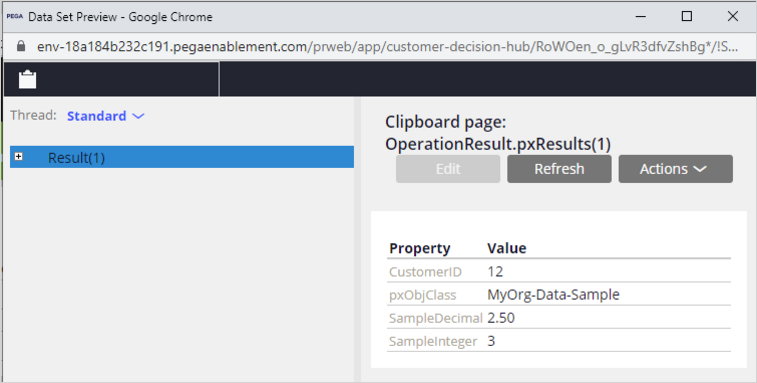
- Open the Data set rule that you created in Task 3, step 7, to confirm that the record sent via the service call is stored in the database table.
- Click Action > Run to browse the data set.
- In the Run Data Set window, in the Operation list, select Browse and then click Run.
- Confirm that the record is retrieved from the database table.
- Optional: You can also directly query the database table from CloudBeaver.
- Click Action > Run to browse the data set.
8 Package the artifacts
- In the header of Dev Studio, click Configure > Application > Components to create a new component.
- In the upper-right corner, click New component.
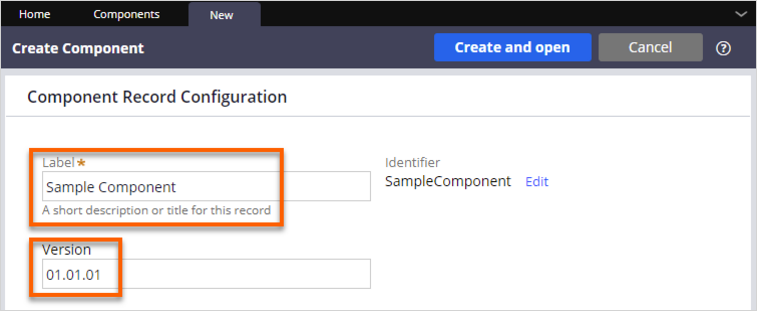
- On the Create Component rule form, configure the following settings:
- In the Label field, enter Sample Component as the name for your component ruleset.
- In the Version field, enter 01.01.01 to distinguish this version of the component from previous versions.
- Click Create and open.
- On the Edit Application: Component: rule form, configure the following settings:
- In the Short description field, enter Sample Component as a description for the component.
- In the Publisher field, enter MyOrg as the organization name.
- In the header of the rule form, click [Edit] to update the Associated RuleSet to the MyOrgInt rule set that you created in Task 1, step 6, and then click OK.
- In the Component rulesets section, configure the following settings:
- Remove the default ruleset: SampleComponent_20220624T125609882:01-01-01
- Click + Add ruleset.
- Add the MyOrgInt:01-01-01 ruleset that you created in Task 1, step 6 to the component.
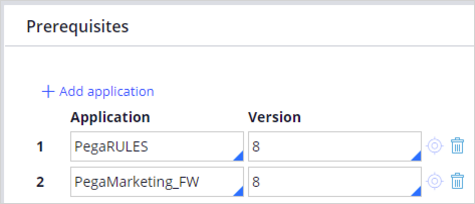
- In the Prerequisites section, click + Add application to add a prerequisite.
- In the Application field, enter or select PegaMarketing_FW.
- In the Version field, enter or select 8.
Note: If necessary, you can now add any other required prerequisites for the component.
- In the upper-right corner, click Save.
Caution: Components can only package versioned rules. This means that non versioned data instances such as relevant records, categories and service packages are not packaged. These rules are included through a product rule after packaging the component.
- On the Definition tab, select the Locked checkbox.
- Enter and confirm the password.
Caution: You will need this password to unlock the component.
- Click Submit.
- In the Package section, click Package Component.
The system creates a zip file. - Click Download to download the zip file and check that the component has been correctly packaged.
- Enter and confirm the password.
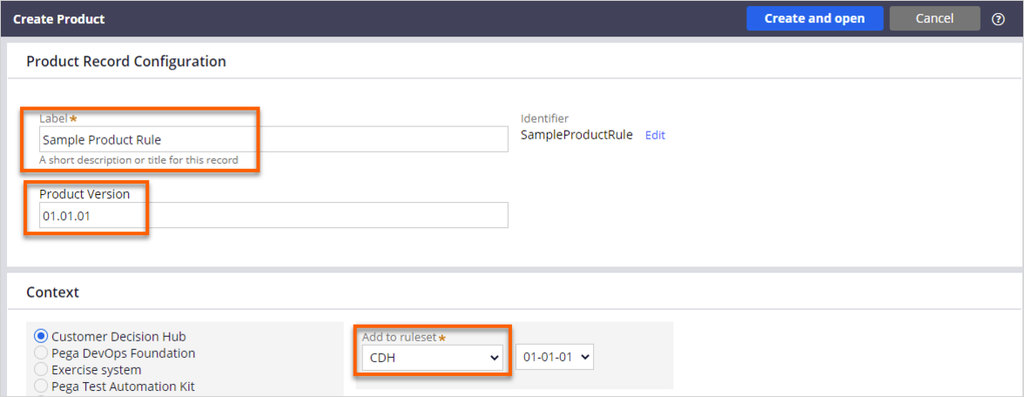
- In the header of Dev Studio, click Create > SysAdmin > Product to create a new product rule.
- In the Label field, enter Sample Product Rule as a short description.
- In the Product Version field, enter 01.01.01 as the version.
- In the Add to ruleset list, select CDH.
Caution: Save this product rule into any ruleset that has visibility of the ruleset that you created in Task 1, but not in that specific ruleset itself.
- On the Edit Product rule form, configure the following settings:
- In the Applications and Components to include section, in the Name field, add the SampleComponent_XXXXXX component that you created in Task 8, step 3.
- In the Version field, enter 01.01.01.
- In the Class instances to include section, include the relevant records instances:
- In the Name column, enter or select Data-Tag-RelevantRecord.
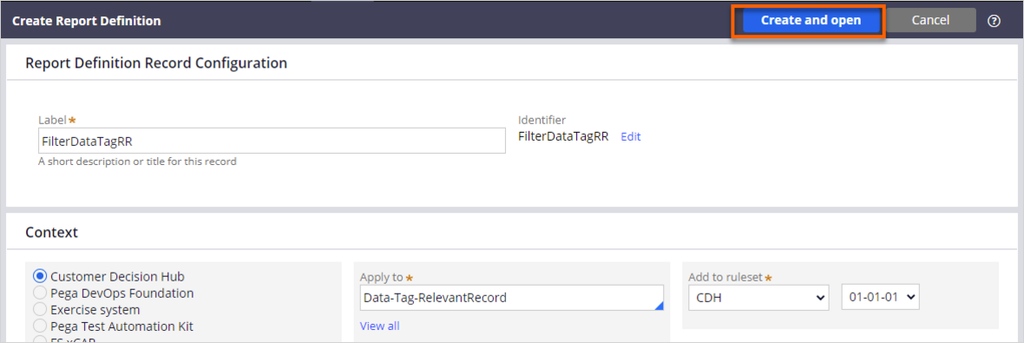
- In the Report Definition Filter column, enter FilterDataTagRR and then click the target icon.
- On the Create Report Definition tab, in the upper-right corner, click Create and open.
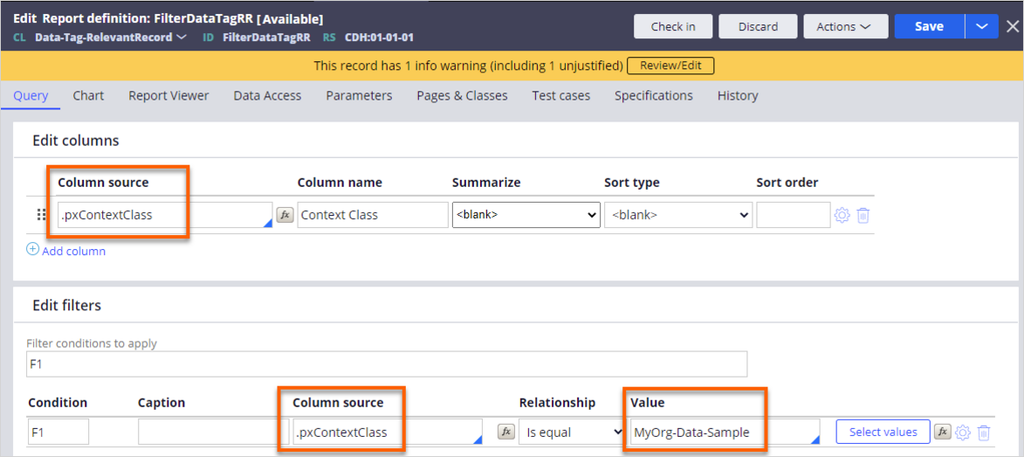
- In the Edit columns section, in the Column source column, enter or select .pxContextClass.
- In the Edit filters section, in the Column source column, enter or select .pxContextClass.
- In the Edit filters section, in the Value column, enter or select the MyOrg-Data-Sample data class that you created in Task 3, step 2.
- In the upper-right corner, click Save and then click the Close icon to return to the Product rule configuration form.
- In the Class instances to include section, include the linked association instances:
- Click the + icon to add a new row.
- In the Name column, enter or select Link-Association-RRCategories.
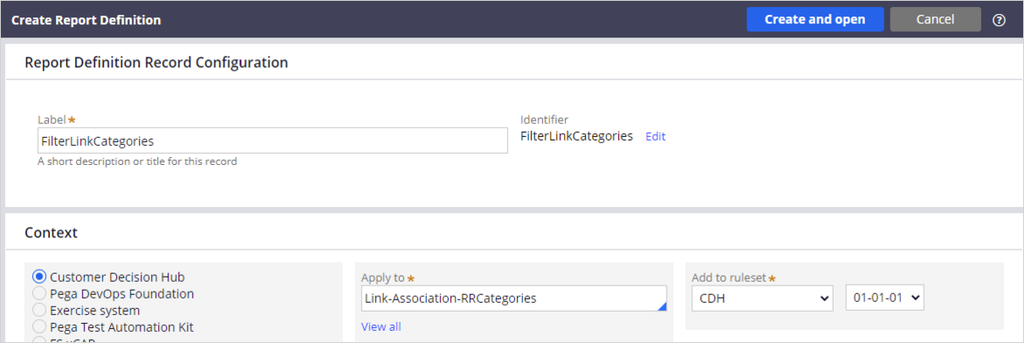
- In the Report Definition Filter column, enter FilterLinkCategories and then click the target icon.
- On the Create Report Definition tab, in the upper-right corner, click Create and open.
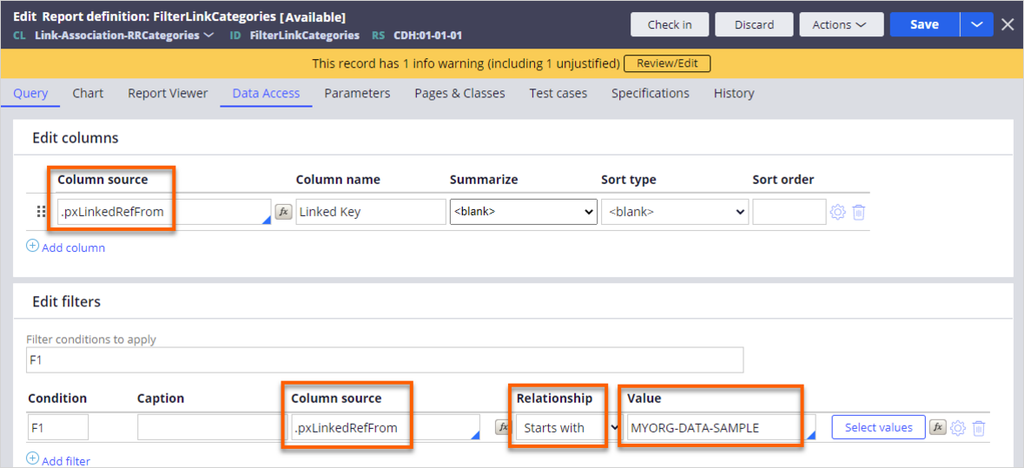
- In the Edit columns section, in the Column source column, enter or select .pxLinkedRefFrom.
- In the Edit filters section, in the Column source column, enter or select .pxLinkedRefFrom.
- In the Edit filters section, in the Relationship list, select Starts with.
- In the Edit filters section, in the Value column, using capital letters enter or select the MYORG-DATA-SAMPLE data class that you created in Task 3, step 2.
- In the upper-right corner, click Save and then click the Close icon to return to the Product rule configuration form.
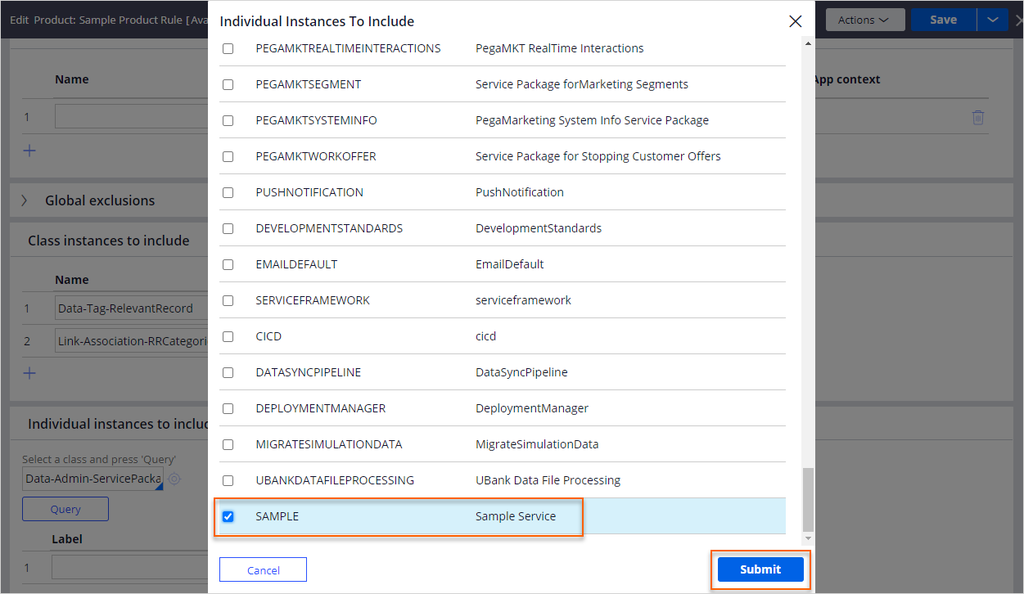
- In the Individual instances to include section, add the service package that you created in Task 5, step 1.
- In the Select a class and press 'Query' field, enter or select Data-Admin-ServicePackage and then click Query.
- In the Individual Instances To Include window, select Sample as the service package and then click Submit.
- In the Select a class and press 'Query' field, enter or select Data-Admin-ServicePackage and then click Query.
- In the Individual instances to include section, add the database admin table that you created in Task 2, step 6.
- In the Select a class and press 'Query' field, enter or select Data-Admin-DB-Table and then click Query.
- In the Individual Instances To Include window, select MYORG-DATA-SAMPLE as the database table record, and then click Submit.
Tip: To add individual instances, you can also manually provide the pzInsKey of the rules in the Key column and a label in the Label column. To find the pzInsKey:
1.Open the rules that you want to add to the product rule.
2. Click Actions > View XML on the rule form.
3. Locate the pzInskey value inside the XML.
- In the File details section, enter a Short description for the product rule, in this case SampleProduct.
- In the upper-right corner, click Save.
- In the File details section, click Create product file.
- In the Create Product File window, enter SampleProduct as the name for the file, and then click OK.
- In the pop-up window, click the link to download the file locally.
If you are having problems with your training, please review the Pega Academy Support FAQs.
Want to help us improve this content?

