Designing a mobile app experience
Archived
5 Tareas
15 minutos
Escenario
GoGoRoad wants to allow customers to create an assistance request case from their mobile device. Customize the User mobile app channel to design a mobile app experience that lets customers:
- Create an assistance request case
- Check any notifications sent to the customer
- Update details on an assistance request case
- Update the location for an assistance request case
- Log off
In addition, customize the app branding, including the launch screen and app icon, and configure the app to lock after three minutes of inactivity.
The following table provides the credentials you need to complete the challenge.
| Role | User name | Password |
|---|---|---|
| Application Developer | author@gogoroad | pega123! |
Nota: Your practice environment may support the completion of multiple challenges. As a result, the configuration shown in the challenge walkthrough may not match your environment exactly.
Recorrido del Reto
Tareas detalladas
1 Configure navigation for the app menu
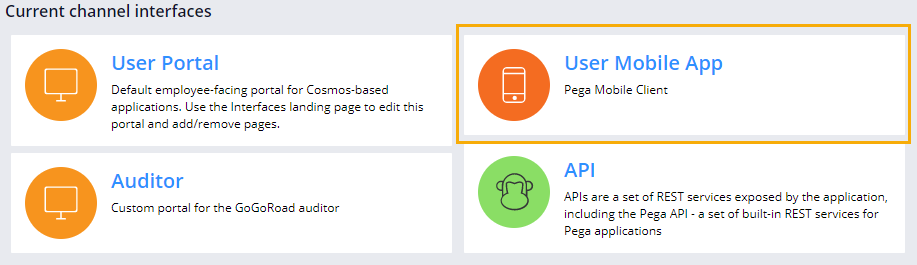
- In the navigation pane of App Studio, click Channels to access the multi-channel configuration.
- In the Current channel interfaces section, click User Mobile App to begin working on the mobile application.
- In the Navigation section, to the right of Create, click the Gear icon to configure the settings for navigation icon.
- In the Name field, enter Create case.
- Confirm the Assistance Request check box is selected and click Submit to close the dialog box.

- In the Navigation section, click Add items > Mobile list pages to display a list of menu options.
- In the options under the Mobile list pages category, click Assistance Request list to add it to the interface.
- In the Navigation section, drag the handle icons to reflect the following order: Assistance Request list, Create Case, Notifications, Log off.
- In the Navigation section, click the Delete icon in the remaining item rows so that the Navigation section resembles the following image.
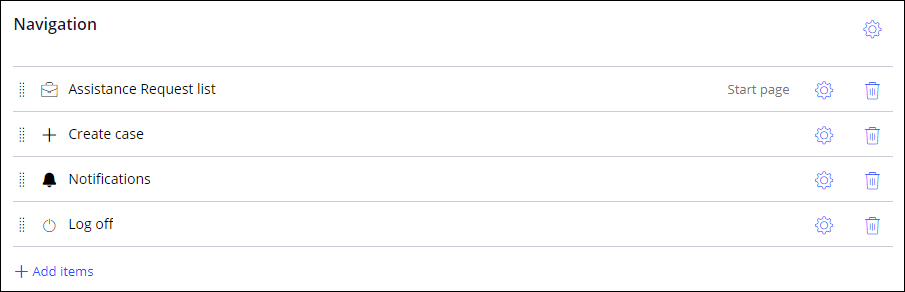
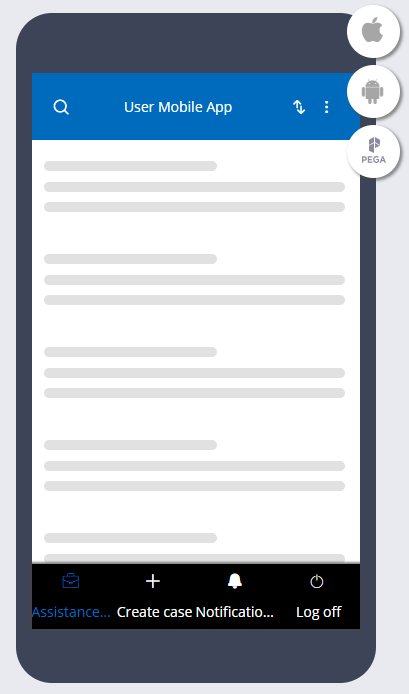
- In the mobile app preview, confirm that the bottom navigation has only four options.
2 Add actions for the Assistance Request cases
- On the Content tab, click Mobile list pages, and then Assistance request list to access the Assistance Request list page settings.
- In the Swipe actions area, in the Left side actions section, to the right of Follow, click the Delete icon to remove the swipe action.
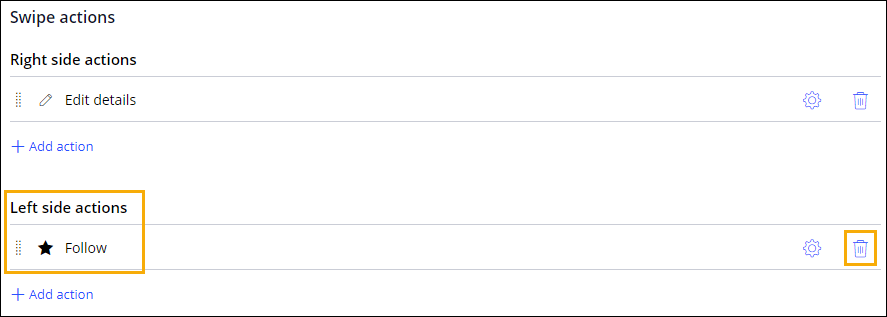
- In the Left side actions section, click Add action, and then Identify location to add the swipe action.
- To the right of Identify location, click the Gear icon to open the Edit settings dialog box.
- In the Edit settings dialog box, click Change to access the Icon class picker window.
- In the Icon class picker window, in the Search field, enter pi-location.
- In the Icon class picker window, select the pi-location icon, and then click Submit to close the Edit settings dialog box.
3 Configure app name, description, and security
- On the mobile channel page, select the Configuration tab and click the General category.
- In the Mobile app name field, enter Roadside Assist to rename your mobile app.
- In the Description field, enter Help is never far away with Roadside Assist!.
- In the Select role list, select User to grant access to the User role for this channel.
- In the left menu navigation, select the Security category.
- In the Authentication and Security settings section, enter 3 as the time-out value in the Lock app after x minutes of inactivity field.
4 Customize the app branding
- On the Layout tab, click the Branding category to configure branding options.
- Hover your pointer over the Launch screen area to display a Change box.
- Click Change to open the Launch screen window.

- In the Launch screen window, click the Icon tab to select a launch screen icon.
- In the Select icon area, click the gauge icon to select it as your launch screen icon.
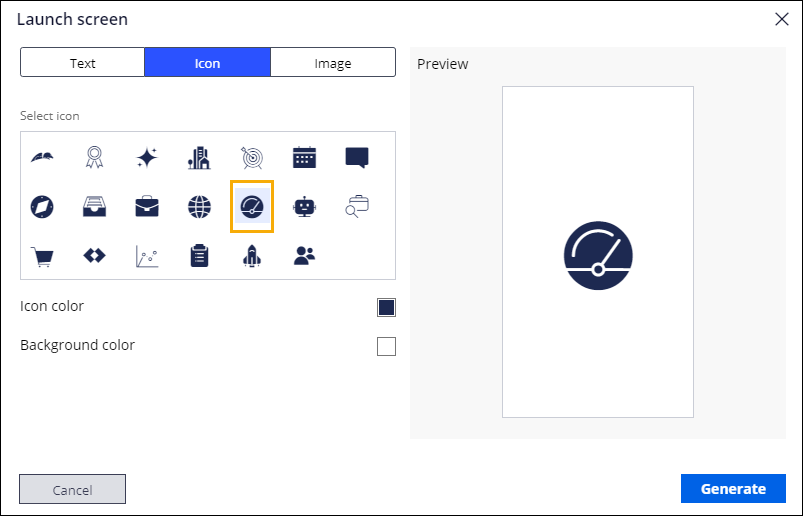
- Click Generate to add the icon to the Roadside assist app.
- Repeat steps 2-6 to change the App icon.
- Click the Theme category to configure your mobile app's theme.
- In the Mobile specific colors section, click the swatch to the right of Mobile bottom navigation.
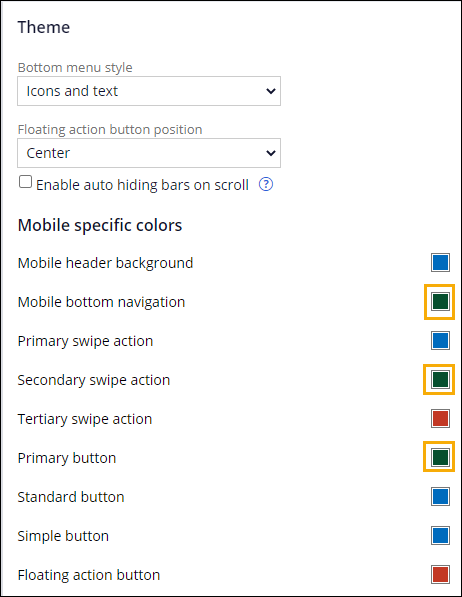
- In the color swatch window, select dark green, or enter the Hex value #064F2E.
- Click Save to make your selection and dismiss the color swatch window.
- Repeat steps 9-11 to change the color for Secondary swipe action and Primary button to dark green.
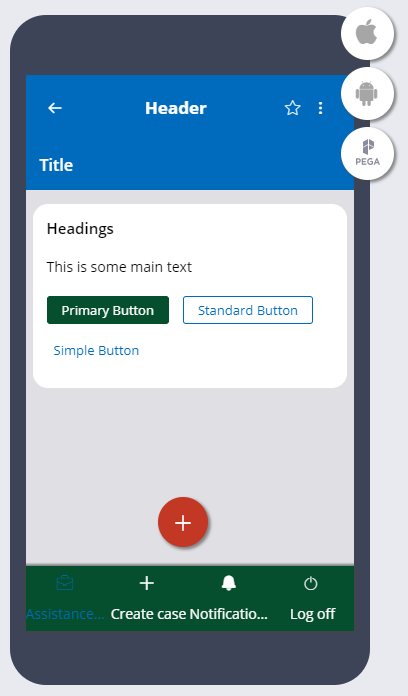
- In the mobile app preview, confirm your color changes.
- In the main App Studio window, click Save to save your changes.
5 Confirm your work (section not graded)
- Install Pega Mobile Preview from your device-specific app store (App Store for iOS or Google Play for Android).
- In your web browser, in the upper right, click the Pega icon to generate your QR code.

- Open Pega Mobile Preview and scan the QR code to preview your app.
Nota: You can further check your work by opening the app and confirming that the preview on the device matches the preview in the channel.