Challenging a Predictive Model
3 Tasks
10 mins
Scenario
U+ Bank uses Pega Customer Decision Hub™ to personalize the credit card offers that a customer receives on the U+ Bank website. The bank makes a proactive retention offer instead of a credit card offer for customers who are likely to leave the bank soon. Customer Decision Hub uses a churn Prediction to calculate each customer's propensity to churn. The Predictive Model that drives the Prediction requires regular updates, as customer behavior changes over time.
Learn how to challenge the currently active model with a model you created externally by using the latest Data Set.
Use the following credentials to log in to the exercise system:
| Role | User name | Password |
|---|---|---|
| Data Scientist | DataScientist | rules |
Your assignment consists of the following tasks:
Task 1: Create a validation Data Set
Use the ValidationData.csv file to create a Data Set for model validation.
Task 2: Challenge the active model
Configure the ChurnH20 candidate model to challenge the currently active champignon model in the Predict churn propensity Prediction.
Note: The recommended approach is to introduce a new model in shadow mode. For brevity, you skip that step in this challenge.
Task 3: Promote the challenger model
Promote the challenger model to replace the champignon model.
Challenge Walkthrough
Detailed Tasks
1 Create a validation Data Set
- On the exercise system landing page, click Pega Infinity™ to log in to Customer Decision Hub.
- Log in as a Data Scientist:
- In the User name field, enter DataScientist
- In the Password field, enter rules.
- In the navigation pane of Customer Decision Hub, click Intelligence > Prediction Studio.
- In Prediction Studio, in the navigation pane on the left, click Data > Data sets to view the list of Data Sets.
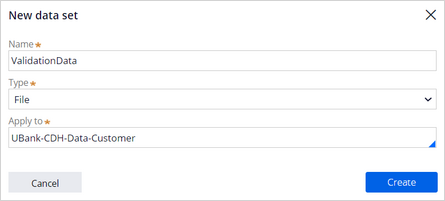
- On the Data sets page, in the upper-right corner, click New to add a new Data Set.
- Configure the new Data Set with the following information:
- In the Name field, enter ValidationData.
- In the Type list, select File.
- In the Apply to field, enter or select UBank-CDH-Data-Customer.
- Click Create to build the Data Set.
- On the File tab of the Data Set, in the File location section, select Embedded file.
- Download the ValidationData Data Set to your local machine, and then extract the CSV file.
- In the File Management section, click Upload file.
- In the Upload file dialog box, click Choose File.
- Select the ValidationData.csv file, and then click Upload.
- In the upper-right corner, click Save.
2 Challenge the active model
- Download the ChurnH2O.zip file to your local machine.
- In the navigation pane of Prediction Studio, click Predictions to open the Predictions work area.
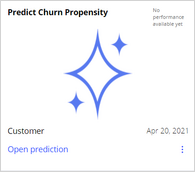
- Click the Predict Churn Propensity tile to open the Prediction.
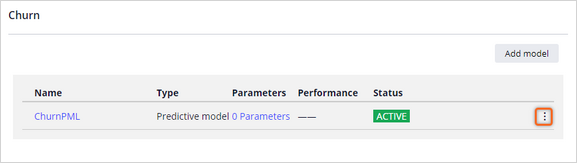
- On the Models tab, in the ChurnPML row, click the More icon, and then select Introduce challenger model:
- In the Introduce challenger model dialog box, ensure that Upload model file is the active selection, and then click Choose file.
- Select the ChurnH2O.zip file, and then click Next.
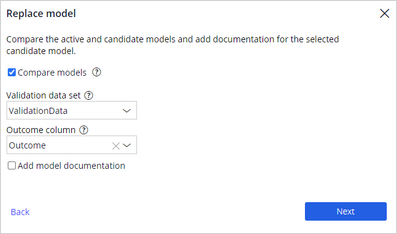
- Select the Compare the models checkbox to run a validation test of the active model against the candidate model.
- In the Dataset list, enter or select ValidationData.
- In the Outcome column list, enter or select Outcome, and then click Next.
- In the Candidate model name field, enter ChurnH20.
- Click Add challenger model.
- In the Churn section, when the status of the ChurnH20 model changes to CHALLENGER (PENDING REVIEW), in the ChurnH20 row, click the More icon.
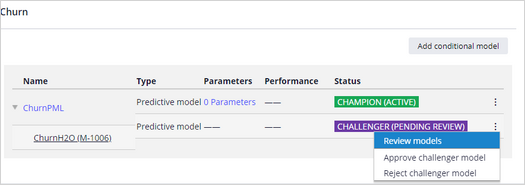
- Select Review models to inspect the model comparison, and then click Approve.
- In the Evaluate ChurnH20 dialog box, select Approve and start champion/challenging.
Note: The recommended approach is to introduce a new model in shadow mode. For brevity, you skip that step in this challenge.
- In the Comment field, enter The ChurnH2O model in challenger mode, and then click Approve.
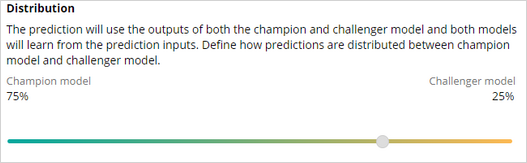
- In the Distribution section, set the slider to 25% Challenger model, and then click Approve.
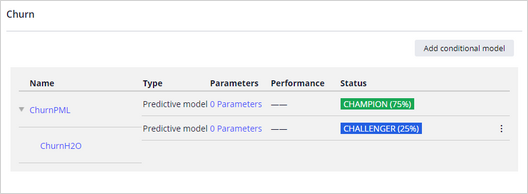
- Confirm that the ChurnH2O model is challenging the ChurnPML model.
3 Promote the challenger model
- When the challenger model proves to outperform the champion model, click the More icon in the ChurnH2O row, and then select Promote challenger model:
- In the Promote challenges model dialog box, click Promote.
- In the upper-right corner, click Submit for deployment.
- In the Submit Prediction for deployment dialog box, enter appropriate comments, and then click Submit to save your changes in a change request.
Note: The Revision manager deploys the change request with the next revision and your changes become active.
This Challenge is to practice what you learned in the following Module:
- MLOps v5
Available in the following mission:
If you are having problems with your training, please review the Pega Academy Support FAQs.
Want to help us improve this content?