Converting the class of incoming data
4 Tasks
25 mins
Beginner
English
Scenario
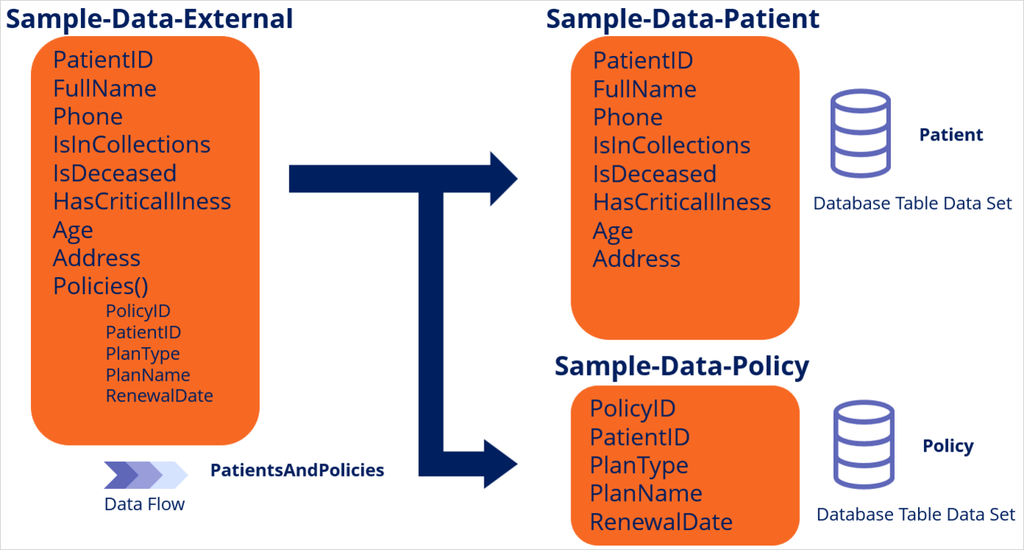
In the Sample application, two entities exist for storing patient data and their corresponding health policy data, where one patient may have multiple health policies.
- Sample-Data-Patients has the following Data Model. To access the data, the Patient database table Data Set is avaliable for you.
Field Type Description PatientID
Identifier
Patient identifier
FullName
Text
Full name of the patient
Phone
Text
The phone number of the patient
IsInCollections
TrueFalse
Is the patient in collections?
IsDeceased
TrueFalse
Is the patient deceased?
HasCriticalIllness
TrueFalse
Does the patient have a critical illness?
Age
Integer
Age of the patient
Address
Text
Address of the patient
Policies
PageList
Page-list property of type Sample-Data-Patient
Note: The Policies field is not part of the database table. The field is a Page-list property that points to the Sample-Data-Policy class.
- Sample-Data-Policy has the following Data Model. To access the data, the Policy database table Data Set is available for you.
Field Type Description PolicyID
Identifier
Policy identifier
PatientID
Text
Patient identifier
PlanType
Text
Healthcare plan type
PlanName
Text
Healthcare plan name
RenewalDate
DateTime
Renewal date of the policy
The Patient and Policy tables currently have no data in them, and you are tasked with loading sample data into both tables.
For your convenience, the System Architect created a Data Flow in the Sample-Data-External class called PatientsAndPolicies that uses a Monte Carlo Data Set to populate sample data. The Sample-Data-External class is where System Architects typically generate, load, and manipulate external data.
Create a new Data Flow that uses the PatientsAndPolicies Data Flow to load sample data in the Patient and Policy database tables.
Use the following credentials to log in to the exercise system:
| Role | User name | Password |
|---|---|---|
| System architect | SystemArchitect | rules |
Your assignment consists of the following tasks:
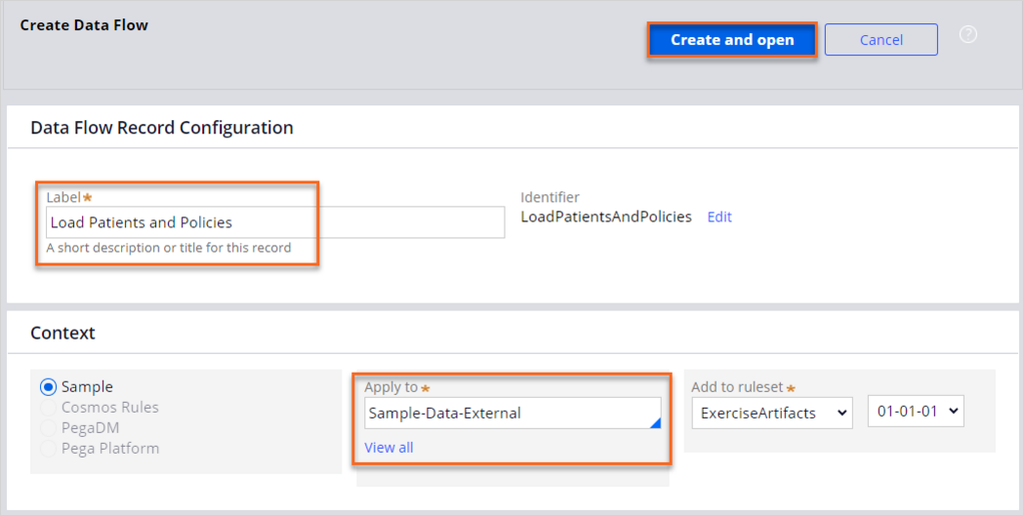
Task 1: Create the Load Patients and Policies Data Flow
Create a new Data Flow named Load Patients and Policies in the Sample-Data-External class.
Note: For the purposes of the exercise, the PatientsAndPolicies Data Flow is available for you to generate sample data that uses a Monte Carlo Data Set.
Use the PatientsAndPolicies Data Flow as the source of the Load Patients and Policies Data Flow, and then preview the data.
Task 2: Configure the Load Patients and Policies Data Flow
The Patient Data Set resides in the Sample-Data-Patients class, and the Policy Data Set resides in the Sample-Data-Policy class.
- Use the Convert shape to change the class of the sample data from Sample-Data-External to Sample-Data-Patients. Use the Patients database table Data Set to save the values.
- Add another branch to the Data Flow and save the Policies embedded page. Use the Policy database table Data Set to save the values.
Task 3: Preview the Records in the Data Flow
Preview the records in both convert shapes to verify that the properties have the correct mappings, and that each preview has the right records.
Task 4: Run the Load Patients and Policies Data Flow
Run the Load Patients and Policies Data Flow with the default settings and validate the final records in the Patients database table Data Set and Policy database table Data Set.
Challenge Walkthrough
Detailed Tasks
1 Create the Load Patients and Policies Data Flow
- Log in as the System Architect:
- In the User name field, enter SystemArchitect.
- In the Password field, enter rules.
- In the navigation pane of Dev Studio, click App to open the Application Explorer.
- In the Application Explorer, search for the Sample-Data-External class.
- In the Application Explorer, right-click on the Sample-Data-External class, then select Create > Data Model > Data Flow.
- On the Create Data Flow tab, create a new Data Flow:
- In the Label field, enter Load Patients and Policies.
- In the upper-right corner, click Create and open.
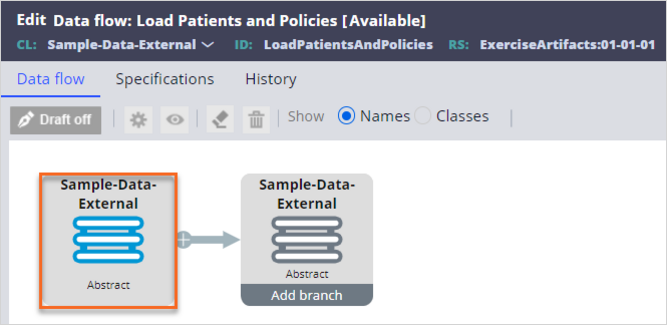
- On the Edit Data flow: Load Patients and Policies rule form, complete the following settings:
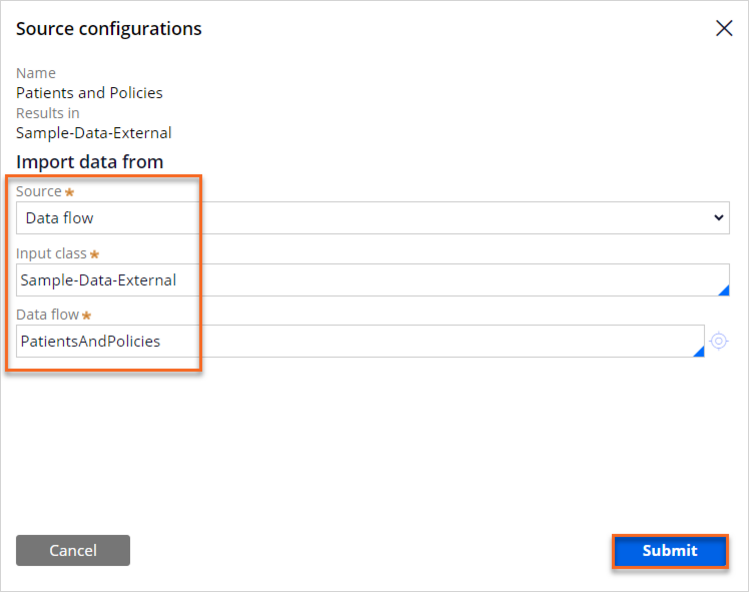
- On the canvas, double-click on the first shape to set up the source configurations.
- In the Source list, select Data flow.
- In the Input class field, enter or select Sample-Data-External.
- In the Data flow field, enter or select PatientsAndPolicies.
- Click Submit.
- In the upper-right corner, click Save.
- On the canvas, double-click on the first shape to set up the source configurations.
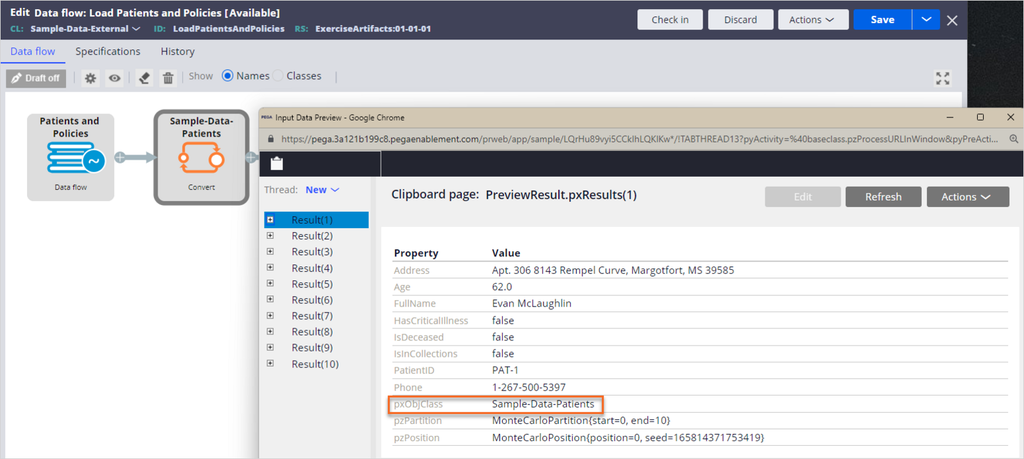
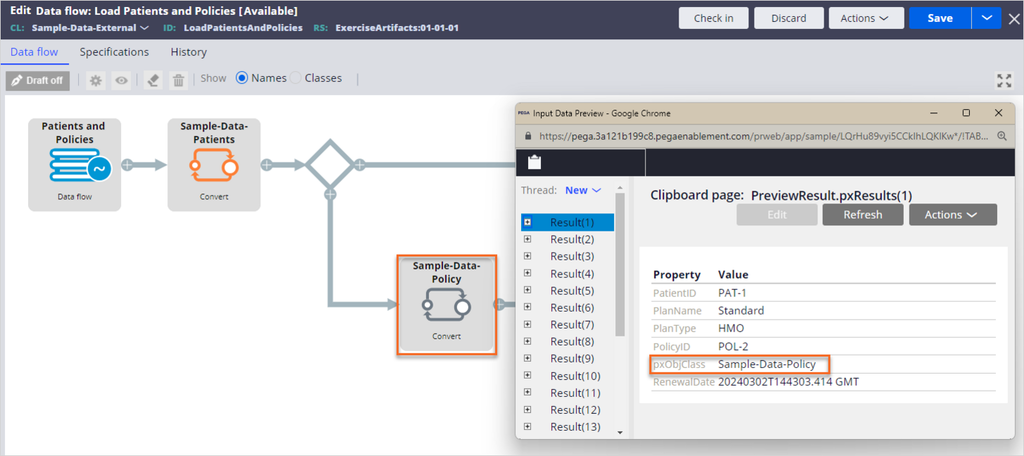
- On the canvas, right-click the Patients and Policies Data Flow, and then select Preview to browse the results:
- In the Clipboard page: PreviewResult.pxResults(1) section, review the values for each property.
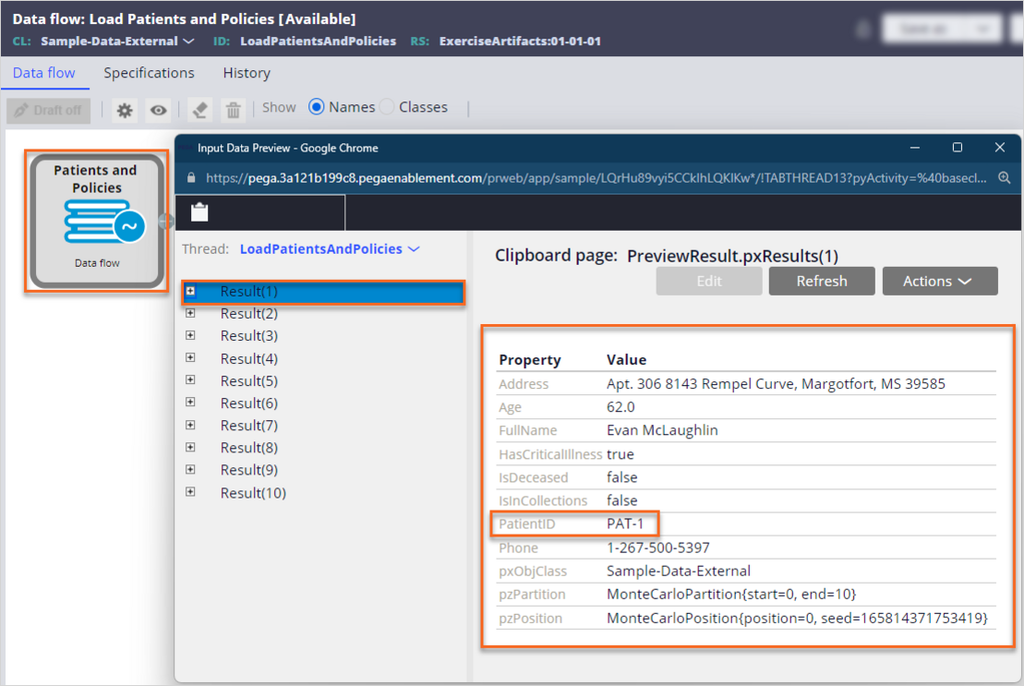
- Click the + icon to expand the Results(1) page.
- Click the + icon to expand the Policies page.
- Click the + icon to expand the Policies(1) page.
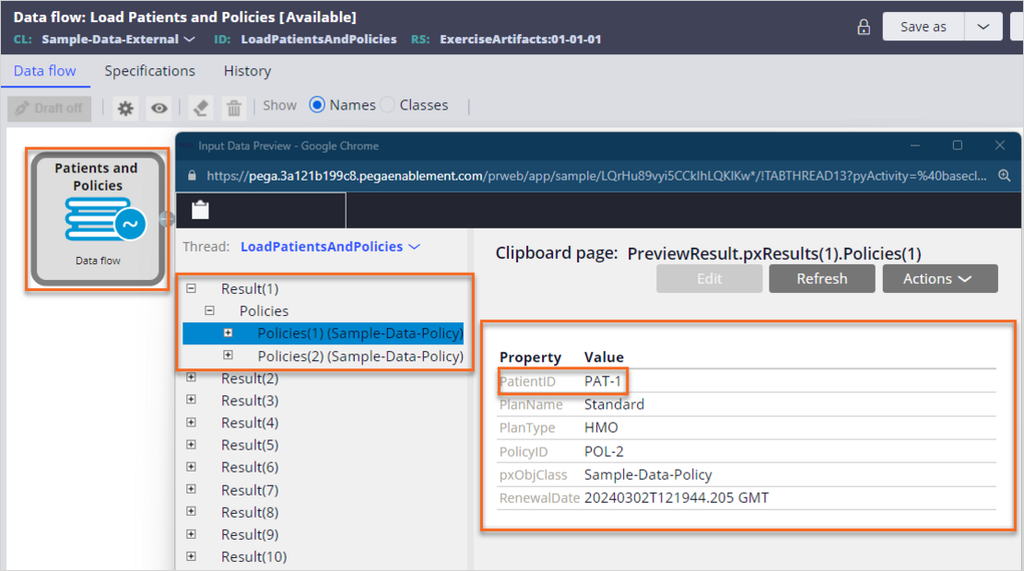
- Browse through other Results.
Note that each patient page contains one or more policies associated with it.
- In the Clipboard page: PreviewResult.pxResults(1) section, review the values for each property.
2 Configure the Load Patients and Policies Data Flow
- On the Data flow: Load Patients and Policies Rule form, in the upper-right corner, click Check out.
- On the canvas, on the first shape, click Add > Convert to add a new convert component:
- On the canvas, double-click the empty Convert component to set up the convert configurations.

- On the canvas, double-click the empty Convert component to set up the convert configurations.
- In the Convert configurations dialog box, complete the following settings:
- In the Convert page on Sample-Data-External field, ensure that Top-level is the default value.
- In the Into page(s) of class, enter or select Sample-Data-Patients.
- In the Field mapping section, select the Auto-copy properties with identical names checkbox.
Tip: If the field names differ between two data sources, you can manually add a field mapping to copy the value.
- Click Submit.
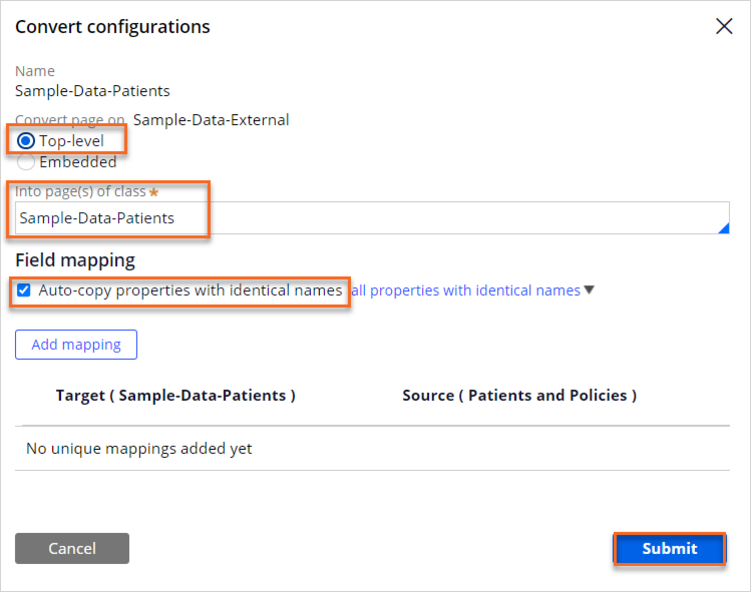 Note: The Sample-Data-External class converts to Sample-Data-Patients, and the system copies all properties automatically. When you use a Convert shape, it is possible to do additional mappings.
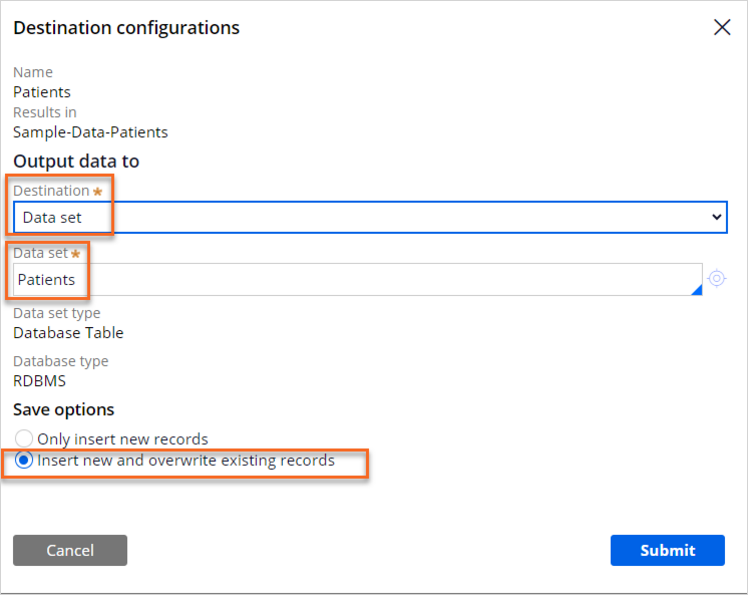
- On the canvas, double-click the last component to set up the destination configurations.
- In the Destination configurations dialog box, complete the following settings:
- In the Destination list, select Data set.
- In the Data set field, enter or select Patients.
- In the Save options section, select Insert new and overwrite existing records.
- Click Submit.
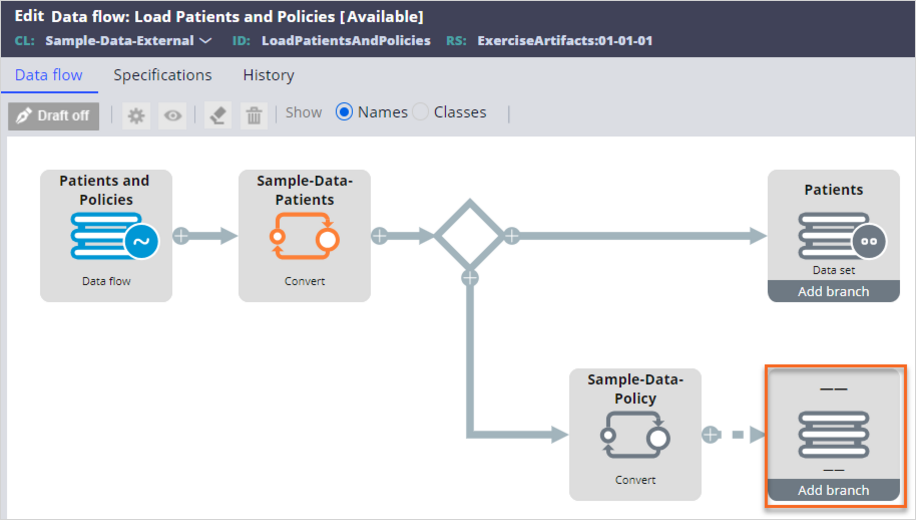
- On the canvas, click Add branch on the last component to add a secondary destination.
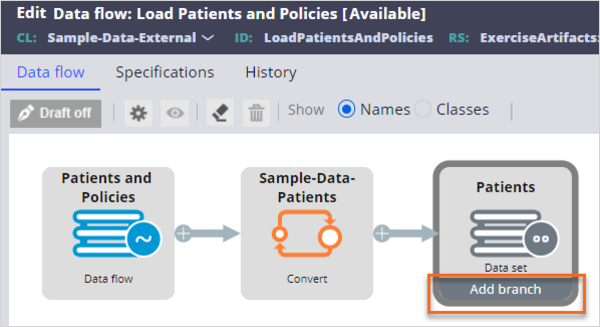 Note: The system copies embedded Policies Page-list in Sample-Data-External to the Page-list in the Sample-Data-Patients class. You extract the data from this embedded page, convert it into the Sample-Data-Policies, and then insert it into the Policy data set.
- On the canvas, click the dotted line, and then select Convert to add another convert component.
- On the canvas, double-click the [Convert] component.

- In the Convert configurations dialog box, complete the following settings:
- In the Convert page on Sample-Data-Patients section, select Embedded.
Tip: This option enables you to select a Page or Page-list property defined on the primary page.
- In the Select page(list) field, enter or select .Policies.
- Click Submit.
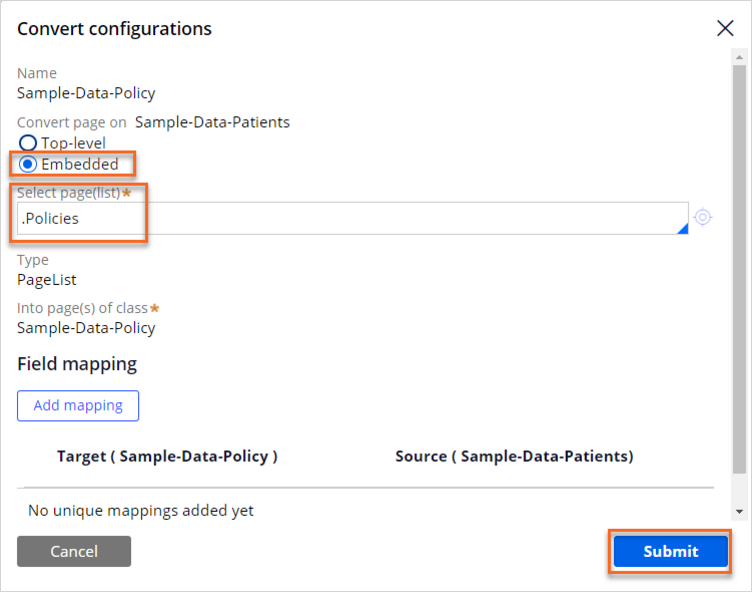
- In the Convert page on Sample-Data-Patients section, select Embedded.
- On the canvas, double-click the empty (- -) component to set up the destination configurations.
- In the Destination configurations dialog box, complete the following settings:
- In the Destination list, select Data set.
- In the Data set field. Enter or select Policy.
- In the Save options section, select Insert new and overwrite existing records.
- Click Submit.

- In the upper-right corner, click Save.
3 Preview the records in the Data Flow
- On the Edit Data flow: Load Patients and Policies Rule form, right-click the Sample-Data-Patients convert shape, and then select Preview to view the results:
- Browse the Results to confirm that the class successfully converted and that the properties have values.
- Close the Input Data Preview window.
Note: The class Sample-Data-External is converted to Sample-Data-Patients and all properties are automatically copied. When using a Convert shape, it is possible to do additional mappings.
- Browse the Results to confirm that the class successfully converted and that the properties have values.
- On the Edit Data flow: Load Patients and Policies Rule form, right-click the Sample-Data-Policy convert shape, then select Preview to review the results:
- Browse the Results to confirm that the class successfully converted and that the properties have values.
- Close the Input Data Preview window.
- Browse the Results to confirm that the class successfully converted and that the properties have values.
- In the upper-right corner, click Check in.
- In the Check-in comments field, enter any comment, and then click Check in.
4 Run the Load Patients and Policies Data Flow
- On the Data flow: Load Patients and Policies Rule form, in the upper-right corner, click Actions > Run.
- On the New: Data Flow Work Item page, review the settings, and then, in the upper-right corner, click Submit.
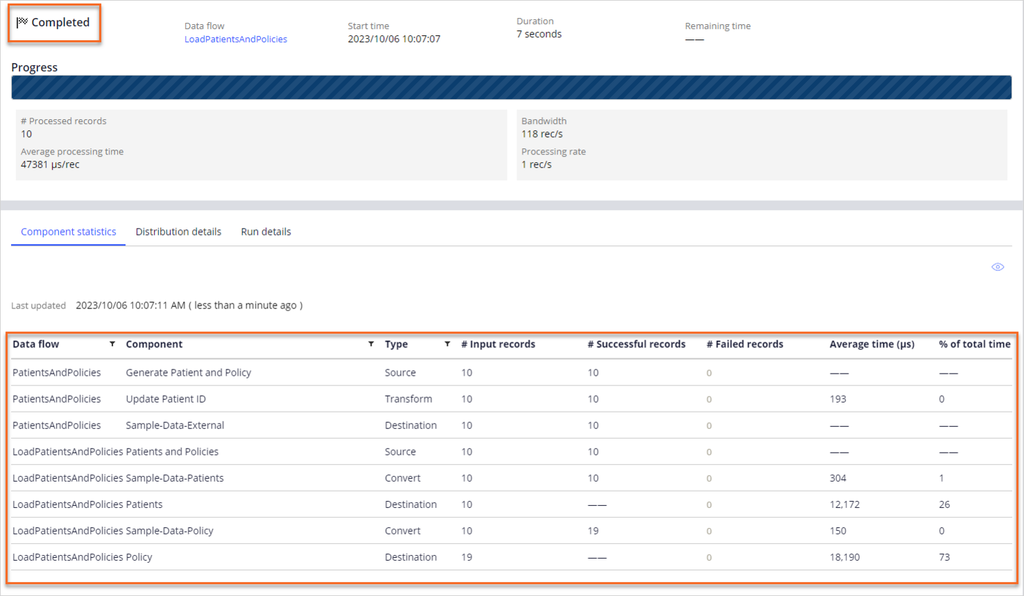
- On the Data Flow Run page, in the upper-right corner, click Start.
- Confirm that the Data Flow run completed successfully, and then in the progress bar, click LoadPatientsandPolicies.
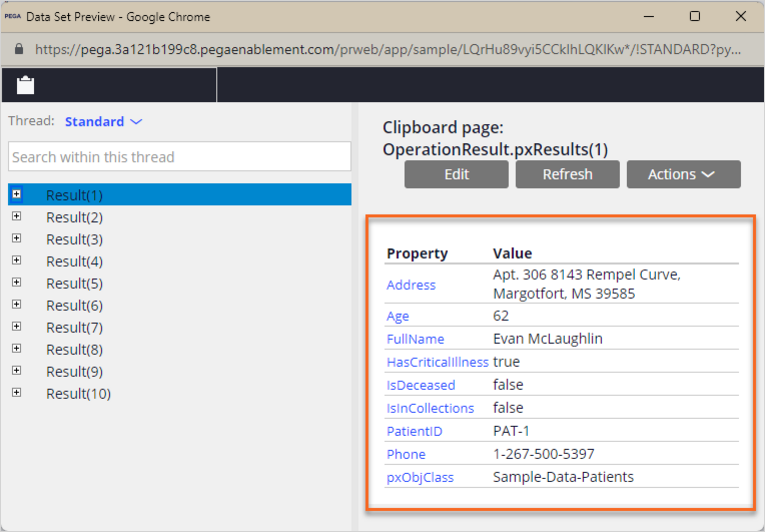
- On the Data flow: Load Patients and Policies Rule form, right-click the Patients Data Set, and then select Open data set.
- On the Data set: Patients Rule form, in the upper-right corner, click Actions > Run to open the Run Data Set: Patients window, and then run the data set:
- In the run context, in the Operation list, select Browse.
- In the upper-right corner of the run context, click Run.
- Browse the results to confirm that the data updated successfully.
- Close the Data Set Preview window.
- Close the Run Data Set: Patients window.
- Close the Data set: Patients Rule form.
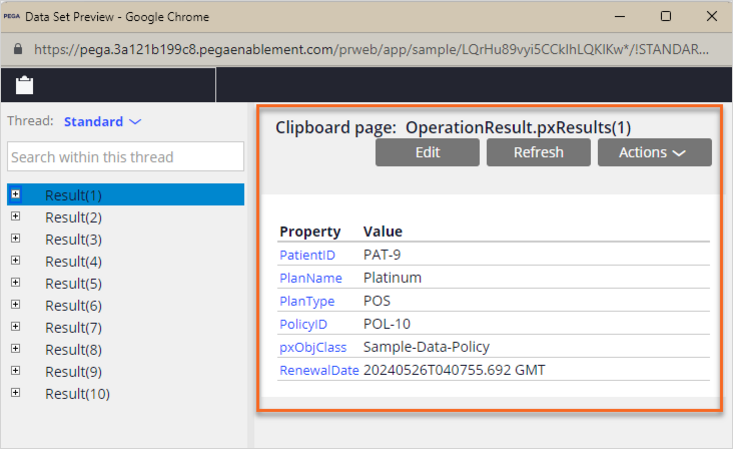
- On the Data flow: Load Patients and Policies Rule form, right-click the Policy Data Set, and then select Open data set.
- On the Data set: Policy tab, in the upper-right corner, click Actions > Run to open the Run Data Set: Policy window, and then run the Data Set:
- In the run context, in the Operation list, select Browse.
- In the upper-right corner of the run context, click Run.
- Browse the results to confirm that the data updated successfully.
This Challenge is to practice what you learned in the following Module:
Available in the following mission:
If you are having problems with your training, please review the Pega Academy Support FAQs.
Want to help us improve this content?