Creating a case from an email
4 Tasks
20 mins
Intermediate
Email
English
Scenario
Your customer, U+ Bank, wants to speed up email interactions for address changes by pre-populating cases with the correct values. For address change emails, the bank wants the email channel to start the Address Change Request case and populate the case with relevant data from the email.
To support this scenario, you need to update the MySupport email channel.
Use the following credentials to log in to the exercise system:
| Role | User name | Password |
|---|---|---|
| Email client user | Customer1 | password |
| Customer service representative | CSCSR | password123! |
| Customer Service Application Administrator | CSAppAdmin | password123! |
Your assignment consists of the following tasks:
Task 1: Map email content
In App Studio, configure the My Support channel to map email content to case properties.
Task 2: Configure a routing rule
In App Studio, in the My Support channel, configure a routing rule to create a case when an address change request is detected.
Task 3: Run a test in the console
In App Studio, use the test console in the My Support channel to send an email requesting an address change.
Task 4: Run a test using the email client
In the email client, send an email requesting an address change. In the Interaction Portal, check that case properties are populated from the email content.
Use the following email content to send the test emails.
From (email): [email protected]
To (email): [email protected]
From (name): Sara Connor
Subject: Moving to a new house
Message: enter the following email content:
Hello,
I would like to inform you that I have a new address:
222 West Las Colinas Blvd, Irving, TX 75039, USA.
Regards, Sara
Challenge Walkthrough
Detailed Tasks
1 Map email content
- Log in to App Studio as the Customer Service Application Administrator with user name CSAppAdmin using password password123!.
- In the navigation pane of App Studio, click Channels.
- On the Channels landing page, click the My Support channel.
- In the My Support channel, click the Behavior tab.
- In the Suggested cases section, to the right of the Address change case, click the Gear icon to open the Address change dialog box.
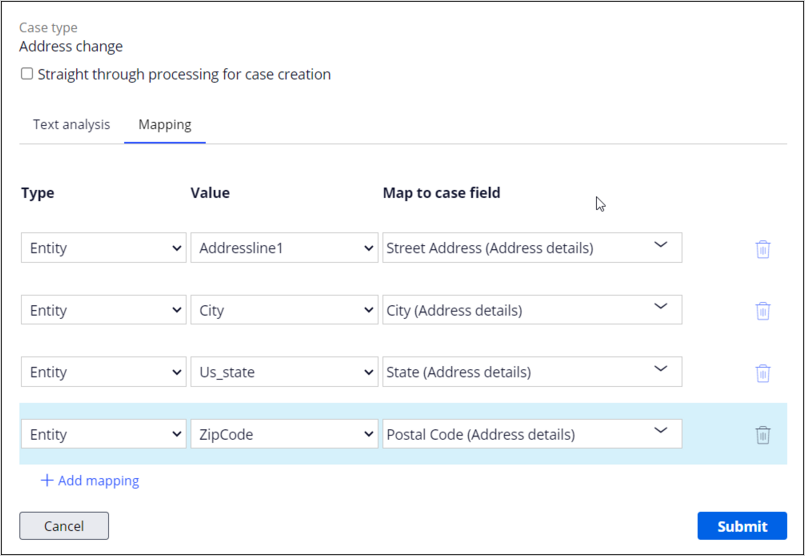
- In the Account address change dialog box, click the Mapping tab.
This tab shows the mapping of entities (from email content) to case properties. - Click Add mapping to configure the following mappings:
- Click Submit.
- Click Save.
2 Configure a routing rule
- In the My Support channel, go to the Intelligent routing section.
- If there is an existing rule for Account Address Change, click the trash icon to remove it, then click Save.

- To add the new rule, click Add condition.
- In the Action list, select Create case.
- In the Value list, select Address Change.
Tip: In a value field like Action or Value, you can also place the cursor in the field and press the Down arrow key to select a valid value from the list.
- Set the When condition to NLP >Topic is equal to Address Change.

- Click Save.
3 Run a test in the console
- In the upper-right corner, click Test to test the new email channel configuration.
- Enter the email content:
From (email): [email protected]
To (email): [email protected]
From (name): Sara Connor
Subject: Moving to a new house
Message: enter the following email content:
Hello,
My customer number is: 12457890.
I would like to inform you that I have a new address:
222 West Las Colinas Blvd, Irving, TX 75039, USA.
Regards, Sara - Click Test. The test email evaluation is displayed.
- Observe that the email creates an Address Change case and that the results show the entities that can be used to populate case properties.
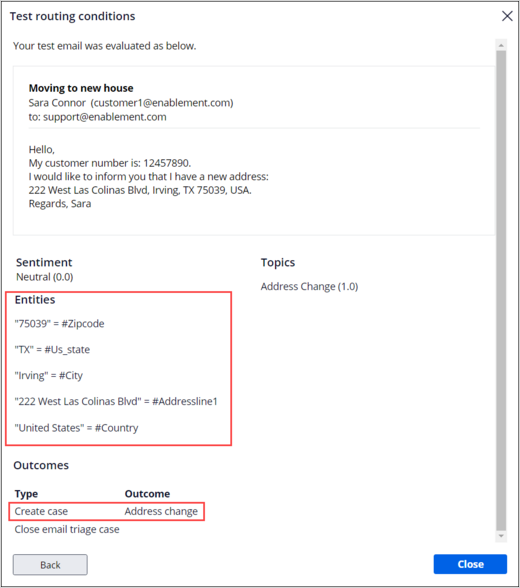
- Click Close to dismiss the test email evaluation.
4 Run a test using the email client
- Send a test email that requests an address change. Use the email content in the Scenario section to create a test email.
- Open the exercise system landing page, and then click Email.
- Log in as the Email client user with user name Customer1 and password password.
- In the left pane, click Mail to access the Inbox.
- In the header, click Write mail to compose a new email.
- Enter the email content from the previous task.
- Click Send message.
- As a Customer Service Representative, open the test email.
- Log in to Pega Customer Service as a Customer Service Representative with user name cscsr and password password123!.
- In the left navigation, click My open emails
- Click Get Next Email. The Interaction Portal opens the case and displays the request from Sara Connor
Note: It can take up to two minutes for the case to get created after you send the email.
The email received from Sara Connor is displayed in the right pane. The email shows the color-coded entities that the Email Bot has identified.
The Address Change case is displayed in the left pane. The entities identified in the email content are used to fill the associated properties in the Address Change case.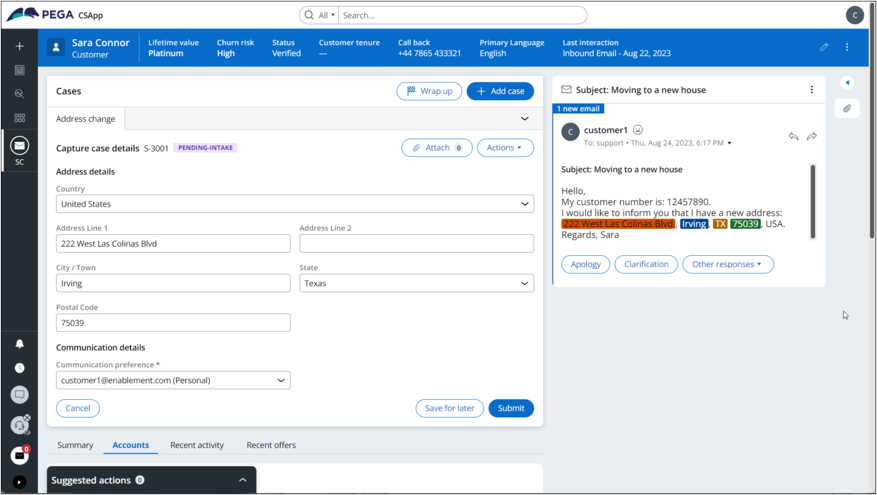
- In the Email pane, click the Expand icon to view the text analysis and the entities extracted by the email bot. Review the mappings.
 Note: If an email has attached documents, the Email Bot can scan those documents (using Optical Character Recognition (OCR)) to identify other entities that map to case properties.
 - Complete the Address Change case.
The street address, city, state and postal code are identified correctly and added to the case properties. Optional: If any other address items are incorrect, you can highlight the text and select the appropriate property.
- Click Submit. The Address Change case is created and assigned a case number.
- Click Done. The case is submitted successfully.
- Click Wrap-up, and then click Submit to complete the case.
Available in the following mission:
If you are having problems with your training, please review the Pega Academy Support FAQs.
Want to help us improve this content?