Creating an entry criteria strategy for customer journeys
6 Tasks
1 hr
Intermediate
English
Scenario
U+ Bank wants to create more sophisticated entry criteria for the Discover and Apply for a Mortgage customer journey. One of the business requirements states that customers must engage with at least one offer from one stage to advance to the next one. Customer engagement is measured based on the click-on actions on the U+ Bank website.
You are tasked with creating such entry criteria for the customer journey. Create a strategy that tracks the interactions with the offers and reports the system the current stage of the journey. Create an interaction history summary to track how many times each customer clicks the actions in the journey. After setting up the interaction history summary, assemble the strategy and directly use that strategy as the entry criteria for all the stages in the Discover and Apply for a Mortgage customer journey.
Use the following credentials to log in to the exercise system:
| Role | User name | Password |
|---|---|---|
| Decisioning architect | DecisioningArchitect | Rules |
| System architect | SystemArchitect | Rules |
Your assignment consists of the following tasks:
Task 1: Prepare an interaction history summary
Create an interaction history summary that groups its entries by outcomes and counts how many times the system registers each outcome. Use Outcome, Journey, and Stage as group by fields.
Task 2: Materialize the IH_Journeys data source
As a system architect, materialize the created interaction history summary to make it available for the system to use.
Task 3: Create the strategy and assemble the strategy components
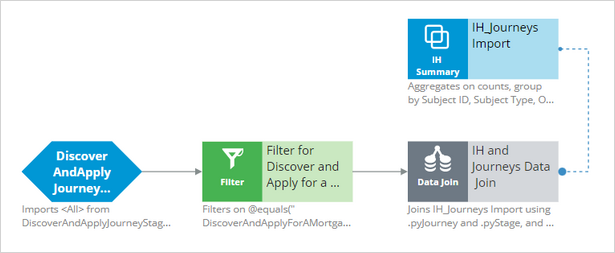
Create the Entry Criteria Discover and Apply for a Mortgage strategy in the Grow issue and Mortgages group that applies to UBank-CDH-Data-Customer, and then assemble the decision strategy:
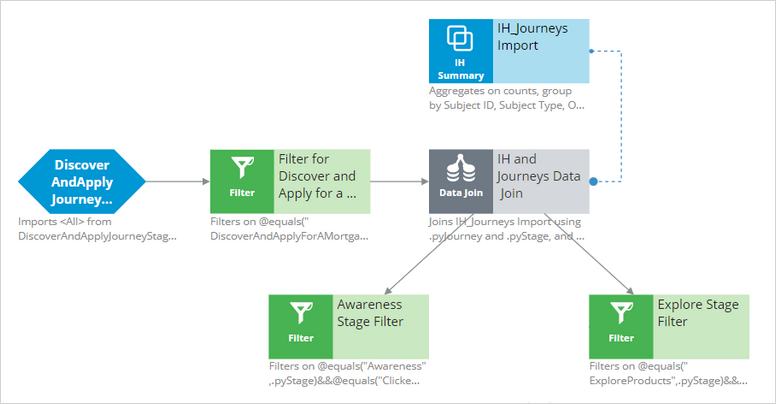
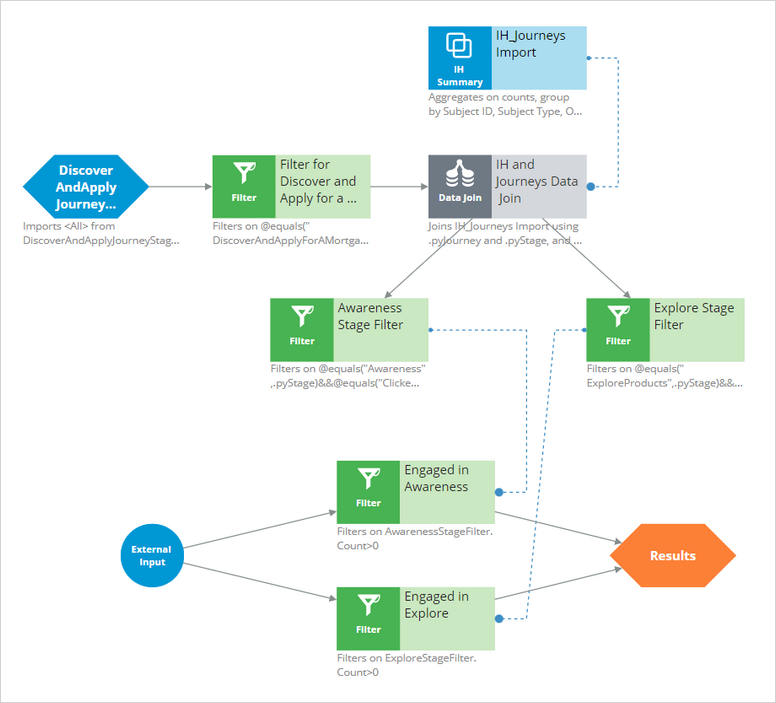
- Import all the active journeys with all their stages, and then filter for the Discover and Apply for a Mortgage customer journey.
- Join the interaction history summary with the imported journey stages to assign each stage a corresponding Clicked outcome and the count of that outcome.
- Filter for each stage and Clicked outcome.
- Enable external input that represents the active stages from all the journeys. Connect two filter components to the external input to determine if the customer is engaged in the Awareness, or the Explore products stage. Each component filters the results to count the Clicked outcome, which it references from the previous filter components.
- Connect the Engaged in filters to the Results component to use as conditions in the entry criteria.
Task 4: Set the entry criteria
Use the results of the Entry Criteria Discover and Apply for a Mortgage strategy as entry criteria with the following conditions:
|
Stage |
Entry Criteria Discover and Apply for a Mortgage |
Result |
|
Explore product |
has results for |
Engaged in Awareness |
|
Talk to advisor |
has results for |
Engaged in Explore |
Task 5: Test the decision strategy
Test the strategy on the data for Barbara and Joanna.
Task 6: Test the customer journey
Test the strategy for Joanna. Go through the customer journey by using the Customer Profile Viewer, and then confirm that she progresses through the journey after each click. Additionally, check that the impressions of an action do not count towards journey progress.
Challenge Walkthrough
Detailed Tasks
1 Prepare an interaction history summary
- On the exercise system landing page, click Launch Pega Infinity™ to log in to Pega Customer Decision Hub™.
- Log in as a decisioning architect:
- In the User name field, enter DecisioningArchitect.
- In the Password field, enter rules.
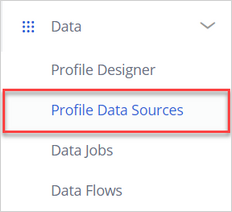
- In the navigation pane of Customer Decision Hub, click Data > Profile Data Sources to open the Profile Data Sources window.
- In the Profile Data Sources window, click the Summaries tab to view existing summaries.
- In the upper-right corner of the Summaries tab, click Add > Summary, and then create a new summary record:
- In the Create summary dialog box, in the Name field, enter IH_Journeys.
- In the table with data sources, in the Name column, select Interaction History.
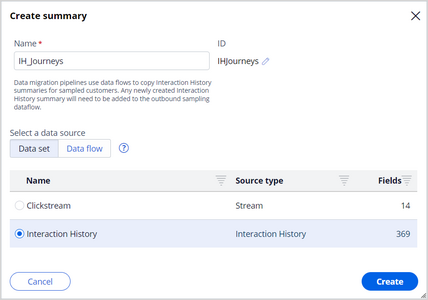
- Click Create to create the summary record.
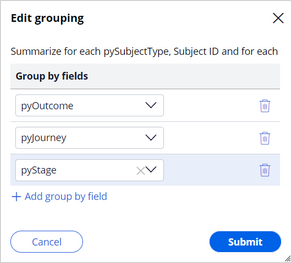
- In the Summary: IH_Journeys window, in the Fields tab, click Edit grouping.
- In the Edit grouping dialog box, click Add group by field.
- In the Group by fields field, enter or select pyOutcome.
- Click Add group by field.
- In the new field, enter or select pyJourney.
- Click Add group by field.
- In the new field, enter or select pyStage.
- Click Submit to finish the grouping setup.
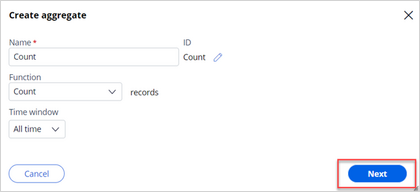
- Click Create aggregate.
- In the Create aggregate dialog box, in the Name field, enter Count.
- In the Time window field, select All time.
- Click Next.
- Click Next to proceed with the setup.
- Click Submit to finish create aggregate setup.
- Click Save to save the summary configuration.
 Note: When you summarize the entities for Outcome, the system aggregates data in a way that groups the results by the outcome of each interaction. In this exercise, the system groups the results by Outcome, Journey, and Stage for each customer.
- In the upper-right corner of the Customer Decision Hub, click Decisioning Architect > Log off.
2 Materialize the IH_Journeys data source
- On the exercise system landing page, click Pega Infinity to log in to Dev Studio.
- Log in as a system architect:
- In the User name field, enter SystemArchitect.
- In the Password field, enter rules.
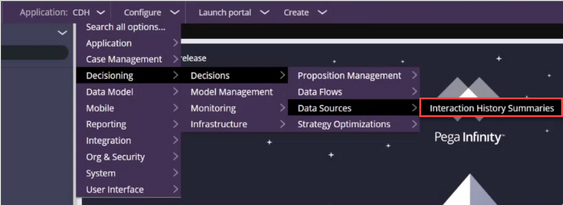
- In the Dev Studio, click Configure > Decisioning > Decisions > Data Sources > Interaction History Summaries.
- In the IH_Journeys field, click Manage > Materialized.

- In the bottom-left corner of the Dev Studio, click SA > Log off.
3 Create the strategy and assemble the strategy components
- On the exercise system landing page, click Pega Infinity to log in to Pega Customer Decision Hub™.
- Log in as a decisioning architect:
- In the User name field, enter DecisioningArchitect.
- In the Password field, enter rules.
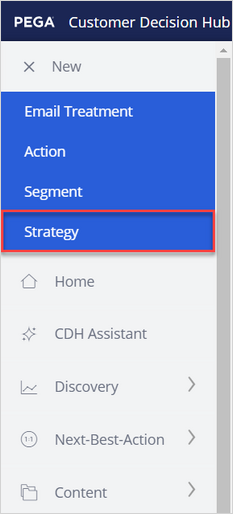
- In the upper-left corner of Customer Decision Hub, click New > Strategy to configure a strategy.
- In the Strategy Record Configuration section, in the Description field, enter Entry Criteria Discover and Apply for a Mortgage.
- In the Business issue list, select Grow.
- In the Group list, select Mortgages.
- In the Context section, in the Apply to field, enter or select UBank-CDH-Data-Customer.
- Click Create and open to create a strategy.
- Right-click the canvas, and then click Sub strategy > External to add the Sub Strategy component to the canvas.
- Right-click the Sub strategy component, click Properties, and then configure an external strategy:
- In the External strategy field, enter DiscoverAndApplyJourneyStages to specify the strategy from which you want to import the data.
- To the right of the External strategy field, click the Open icon to create the external strategy.
- In the Create strategy window, in the Context section, in the Add to ruleset field, select CDH-Rules.
- In the upper-right corner of the Customer Decision Hub, click Create and open to open the strategy canvas.
- Right-click the canvas, and then click Sub strategy > External to add the Sub Strategy component to the canvas.
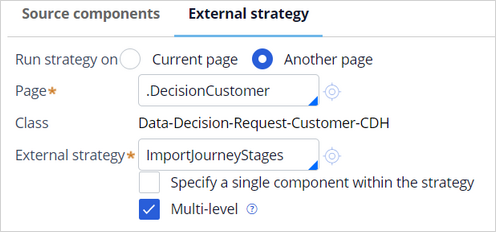
- Right-click the External strategy component, click Properties, and then configure the external strategy:
- In the Run strategy on field, select Another page.
- In the Page field, enter or select .DecisionCustomer.
- In the External strategy field, enter ImportJourneyStages to specify the strategy from which you want to import the data.
- To the right of the External strategy field, click the Open icon to create the strategy.
- In the upper-right corner of the strategy configuration window, click Create and open to open the strategy canvas.
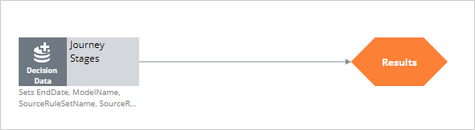
- Right-click the canvas, and then click Enrichment > Decision data to add the component to the canvas.
- Right-click the Decision data component, click Properties, and then configure the decision data:
- In the Import section, in the Decision Data field, enter or select JourneyStages.
- Click Submit to close the Decision data properties dialog box.
- On the canvas, hover over the Decision data component, and then click and drag the gray arrow to the Results component as shown in the following figure:
- Save and close the strategy.
- Click Submit to close the External strategy properties dialog box.
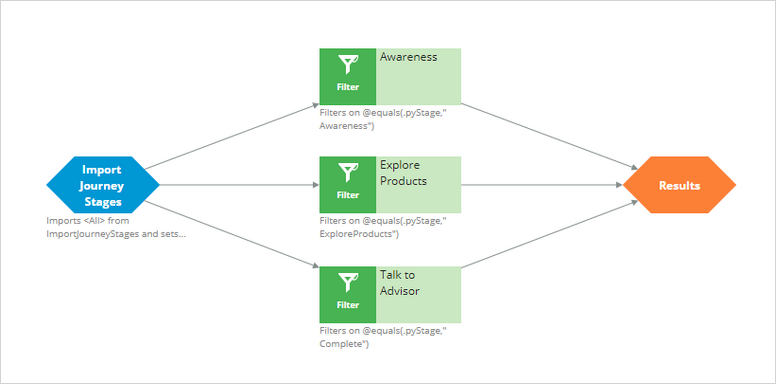
- Right-click the canvas, and then click Arbitration > Filter to add a filter component to the canvas.
- Right-click the Filter component, click Properties, and then configure the filter:
- In the Filter properties window, in the Name field, enter Awareness.
- In the Filter condition field, enter @equals(.pyStage,"Awareness").
- Click Submit to finish the component setup.
- Right-click the canvas, and then click Arbitration > Filter to add the second filter component to the canvas.
- Right-click the Filter component, click Properties, and then configure the filter:
- In the Filter properties window, in the Name field, enter Explore Products.
- In the Filter condition field, enter @equals(.pyStage,"ExploreProducts").
- Click Submit to finish the component setup.
- Right-click the canvas, and then click Arbitration > Filter to add the third filter component to the canvas.
- Right-click the Filter component, click Properties, and then configure the filter:
- In the Filter properties window, in the Name field, enter Talk to Advisor.
- In the Filter condition field, enter @equals(.pyStage,"Complete").
- Click Submit to finish the component setup.
- On the canvas, hover over the Import Journey Stages component, and then click and drag the gray arrow to each new filter component.
- On the canvas, for each new filter component, hover over the component and then click and drag the gray arrow to the Results component as shown in the following figure:
- Save and close the strategy.
- Click Submit to close the External strategy properties dialog box.
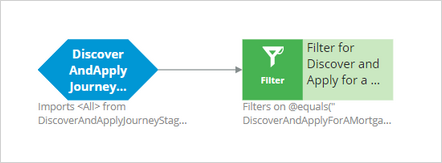
- Right-click the canvas, and then click Arbitration > Filter to add a new filter component to the canvas.
- Right-click the Filter component, click Properties, and then configure the filter:
- In the Filter properties window, in the Name field, enter Filter for Discover and Apply for a Mortgage.
- In the Filter condition field, enter or select @equals("DiscoverAndApplyForAMortgage",.pyJourney).
Note: For this strategy, you filter out any other journeys to use only the Discover and Apply for a Mortgage customer journey.
- Click Submit to finish the component setup.
- On the canvas, hover over the External strategy, and then click and drag the gray arrow to the Filter component as shown in the following figure.
- Right-click the canvas, and then click Import > Interaction history summary to add the interaction history summary component to the canvas.
- Right-click the IH Summary component, click Properties, and then configure an interaction history summary:
- In the Interaction history summary properties window, in the Name field, enter IH_Journeys Import.
- In the Summary data set section, in the empty field, press the down arrow and select IHJourneys.
- Click Submit to finish the IH Summary component setup.
Note: This configuration of the Interaction history summary component references the interaction history summary that you created in the first task.
- Right-click the canvas, and then click Enrichment > Data Join to add the data join component to the canvas.
- Right-click the Data Join component, click Properties, and then configure the data join:
- In the Data Import properties window, in the Name field, enter IH and Journeys Data Join.
- In the Join source components with section, in the Name list, select IH_Journeys Import.
- In the Join when all conditions below are met section, click Add item.
- In the IH and Journeys Data Join column, enter or select .pyJourney.
- In the IH_Journeys Import column, enter or select .pyJourney.
- Click Add item.
- In the IH and Journeys Data Join column, enter or select .pyStage.
- In the IH_Journeys Import column, enter or select .pyStage.
The following figure shows the current stage of the Data Join component configuration: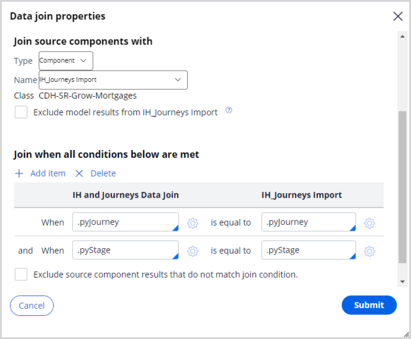
- Click the Properties mapping tab.
- In the Define mapping section, click Add item.
- In the Target column, enter or select .Count.
- In the Source column, enter or select .Count.
- Click Add item.
- In the Target column, enter or select .pyOutcome.
- In the Source column, enter or select .pyOutcome. The following figure shows the Properties mapping tab configuration:
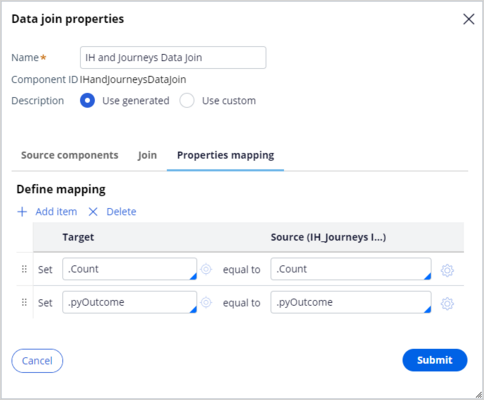
- Click Submit to finish the component setup.
Note: In step 30, the journey stages that you imported are joined with matching interaction histories, which is why we group by journey name and stage in the Data join component.
- On the canvas, hover over the Filter for Discover and Apply for a Mortgage component, and then click and drag the gray arrow to the Data Join component.
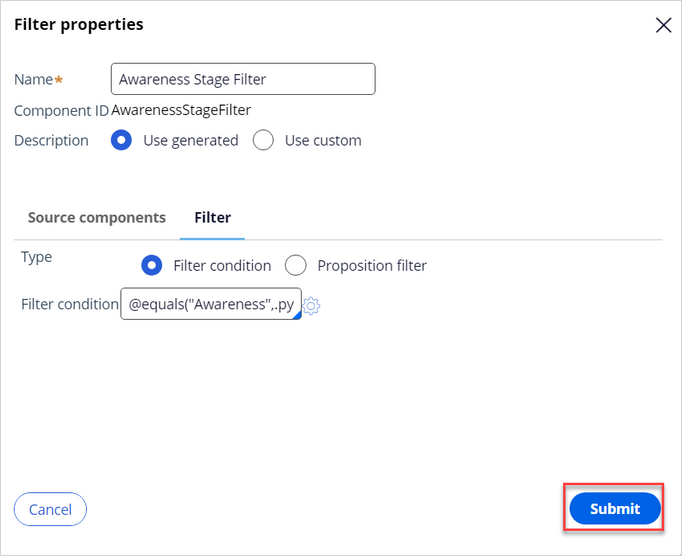
- Right-click the canvas, and then click Arbitration > Filter to add the filter component to the canvas.
- Right-click the Filter component, click Properties, and then configure the filter:
- In the Filter properties window, in the Name field, enter Awareness Stage Filter.
- In the Filter condition field, enter @equals("Awareness",.pyStage) && @equals("Clicked",.pyOutcome).
- Click Submit to finish the component setup.
- On the canvas, hover over the Data Join component, and then click and drag the grey arrow to the Awareness Stage Filter component.
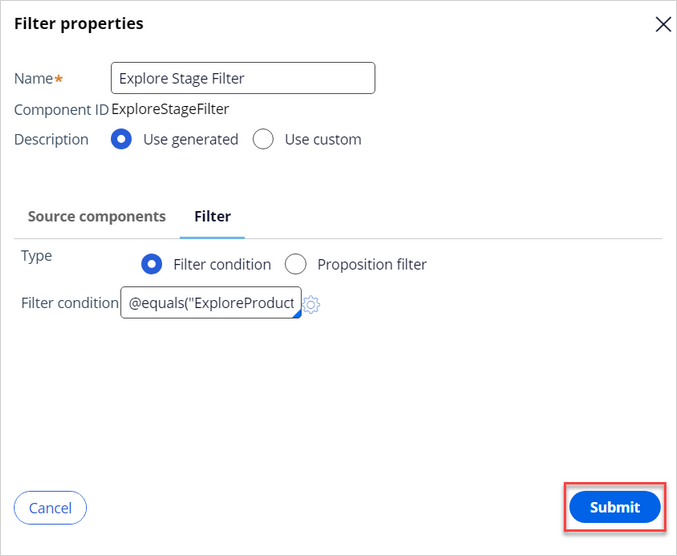
- Right-click the canvas, and then click Arbitration > Filter to add the filter component to the canvas.
- Right-click the Filter component, click Properties, and then configure the filter.
- In the Filter properties window, in the Name field, enter Explore Stage Filter.
- In the Filter condition field, enter: @equals("ExploreProducts",.pyStage) && @equals("Clicked",.pyOutcome).
- Click Submit to finish the component setup.
- On the canvas, hover over the Data Join component, and then click and drag the gray arrow to the Explore Stage Filter component.
 Note: In these two filter components, you filter for only clicked outcomes and stages as those items are the only information that is relevant to this strategy.
- Right-click the canvas, and then click Arbitration > Filter.
- Right-click the Filter component, click Properties, and then configure the component:
- In the Filter properties window, in the Name field, enter Engaged in Awareness.
- In the Filter condition field, enter AwarenessStageFilter.Count>0.
- Click Submit to finish the component setup.
- Right-click the canvas, and then click Arbitration > Filter to add the component to the canvas.
- Right-click the Filter component, click Properties, and then configure the filter:
- In the Filter properties window, in the Name field, enter Engaged in Explore.
- In the Filter condition field, enter ExploreStageFilter.Count>0.
- Click Submit to finish the component setup.
- Right-click the canvas, and then click Enable external input to add the component to the canvas.
- On the canvas, hover over the External Input component, and then click and drag the gray arrow to the Engaged in Awareness and Engaged in Explore components.
- On the canvas, hover over the Engaged in Awareness component, and then click and drag the gray arrow to the Results component. Repeat for the Engaged in Explore component.
- Click Save to finish the strategy setup.
- Click Actions > Mark as relevant record to mark this strategy for later use.
Note: You need to log off and log in as the decisioning architect for this strategy to become a relevant record.
- In the upper-right corner of the Customer Decision Hub, click Decisioning Architect > Log off.
- Log in as a decisioning architect:
- In the User name field, enter DecisioningArchitect.
- In the Password field, enter rules.
4 Set the entry criteria
- In the navigation pane of Customer Decision Hub, click Next-Best-Action > Designer.
- On the Next-Best-Action Designer landing page, click Engagement policy.
- In the Business structure pane, in the Grow issue, click Mortgages > Discover and Apply for a Mortgage to view the journey.
- In the header of the Discover and Apply for a Mortgage journey, click Edit.
- In the Awareness stage, click More > Edit stage entry criteria, and then remove the current criteria:
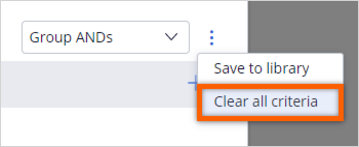
- In the Edit entry criteria: Awareness window, click More > Clear all criteria.
- Click Submit to finish editing the entry criteria.
- In the Edit entry criteria: Awareness window, click More > Clear all criteria.
- In the Explore products stage, click More > Edit stage entry criteria, and then remove the current criteria:
- In the Edit entry criteria: Explore products window, click More > Clear all criteria, and then click Add criteria.
- In the Customer is in this stage when section, in the second list, select Strategy > Entry Criteria Discover and Apply for a Mortgage.
- In the last list, select Engaged in Awareness.

- Click Submit to finish editing the entry criteria.
- In the Talk to advisor stage, click More > Edit stage entry criteria, and then remove the current criteria:
- In the Edit entry criteria: Talk to Advisor window, click More > Clear all criteria, and then click Add criteria.
- In the Customer is in this stage when section, in the second list, select Strategy > Entry Criteria Discover and Apply for a Mortgage.
- In the last list, select Engaged in Explore.

- Click Submit to finish editing the entry criteria.
- Click Save.
Note: With these criteria, you look for results in the final filter component. If a customer clicks one of the awareness offers, the last filter component contains the results for Engaged in Awareness outcome.
5 Test the decision strategy
Note: For strategy testing purposes, you need a customer that has already progressed through the Discover and Apply for a Mortgage customer journey. Use the following steps to progress Barbara through the customer journey.
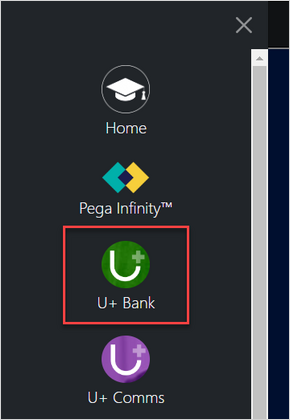
- On the exercise system landing page, in the upper left corner, select the Application Switcher and click U+ Bank icon to open the website.
- In the upper right corner of the home page, click Log in to log in as a customer.
- In the Username field, select Barbara, and then click Sign in to log in.
- In the web tile, click Learn more to record a positive interaction with the treatment that is displayed on the page.
- In the upper-right corner of the page, click the user icon, and then click Log out.
- Repeat step 1 until you reach Talk to advisor web tile. Click Learn more to record a positive interaction with the treatment.
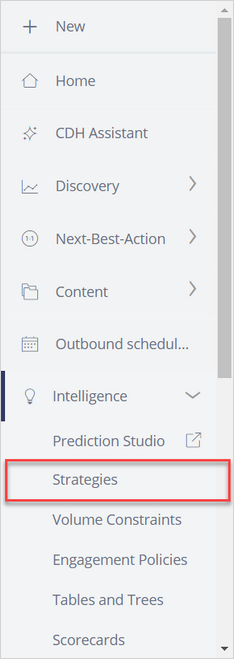
- In the upper-left corner of the Customer Decision Hub, click Intelligence > Strategies to open the strategies list.
- Double click EntryCriteriaDiscoverAndApplyForAMortgage to open the newly created strategy.
- On the right side of the canvas, expand the test pane.
- In the Test run pane, on the Single case tab, expand the Settings section.
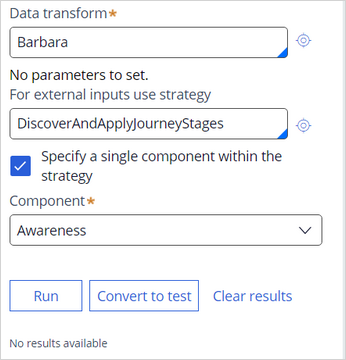
- Select the Data transform option.
- In the Data transform field, enter or select Barbara.
- In the For external inputs use strategy field, enter DiscoverAndApplyJourneyStages.
- In the Test run pane, select the Specify a single component within the strategy checkbox.
- In the Component list, select Awareness. The following figure shows the current stage of the Test Run pane configuration:
- In the Test run pane, click Run.
- Repeat steps 11 through 12 for other components in the strategy to notice how the results change.
- In the Settings section, in the Data transform field, enter or select Joanna.
- On the Test run pane, click Run.
Note: Joanna has not engaged in this customer journey, so the strategy does not produce any results for her.
6 Test the customer journey
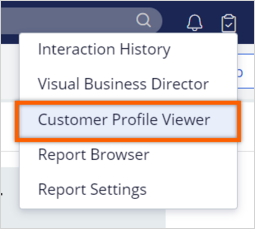
- In the upper-right corner of Customer Decision Hub, click Reports > Customer Profile Viewer.
- In the Type field, select Customer name.
- In the Customer name field, enter or select Joanna Williams.
- Click View to view the customer profile for Joanna.
- Go to the Next best actions tab.
- In the Channel context field, select Web Inbound.
- Select Show only decision results that will be delivered.
- Click Make decision.
Note: Only the first stage action is listed and it has a PASSED flag because Joanna is eligible only for the first stage of the customer journey.
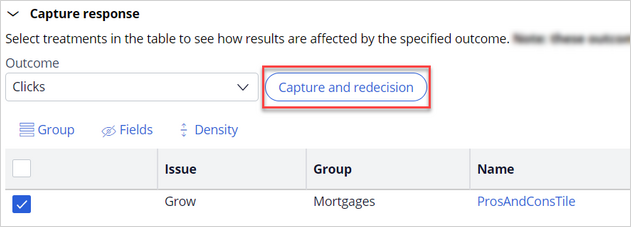
- Select the ProsAndCons row.
- Expand the Capture response section.
- In the Outcome field, select Clicks, and then click Capture and redecision.
 Note: Joanna has moved to the Explore products stage, and that all available actions for that stage have the PASSED flag.
- Repeat steps 11 to 13 for one of the Explore products actions, and then analyze the results.
- Go to the Overview tab.
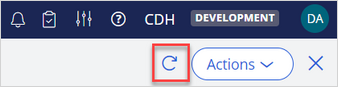
- In the upper-right corner of the Customer Profile Viewer, click Refresh.
 Note: Joanna progressed through the customer journey.
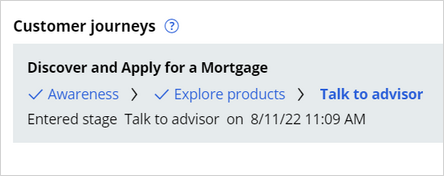
This Challenge is to practice what you learned in the following Module:
Available in the following mission:
If you are having problems with your training, please review the Pega Academy Support FAQs.
Want to help us improve this content?