
Creating a robotic test solution for Citrix
6 Tasks
30 mins
Pega Robotic Automation 19.1
Intermediate
Robotic Process Automation
English
Scenario
The client company ABC Enterprises needs a Citrix Robotic solution that allows users to manage their legacy applications. Create a test solution to verify you can connect to Citrix with your current architecture. Then, create a local Windows Form as well as a Windows Form within your new Citrix context. Develop an automation to test the communication between the two forms and test this solution on your local machine. Update the runtime configuration files to make sure deserialization errors do not occur. Finally, test the solution locally to ensure it works as expected.
Note: Because of the technical limitations in providing a real training environment, these challenges guide you to think through testing the Citrix configuration before actual robotic solution development. The values and configuration settings provided in the steps do not connect to servers and act only as examples in the challenges.
Challenge Walkthrough
Detailed Tasks
1 Configure the Runtime configuration file
- On the Windows Taskbar of the development machine, left-click the Start button, and then select File Explorer. The File Explorer window is displayed.
- At the top of the folder, click the file path to highlight the path, and then navigate to the installation directory to locate the Runtime configuration file within the installation folder. For this example, navigate to the following folder:
Program Files (x86) > Pegasystems > Pega Robot Studio Plug-In
- Right-click to open the object menu and select the RuntimeConfig.xml file.
- In the object menu, click Edit with Notepad++ to open the configuration file.
- Within the file, locate the IgnoreRuntimeDeserializationErrors section within the file, and then update the value to True.
- In the upper left of the Notepad++ toolbar, click the Save icon.
- Close the RuntimeConfig.xml file.
- In File Explorer, copy and paste %appdata%/Pegasystems into the file path to open the AppData/Roaming/Pegasystems directory.
- If the Runtime configuration file is present, repeat steps 3-5 to update the file.
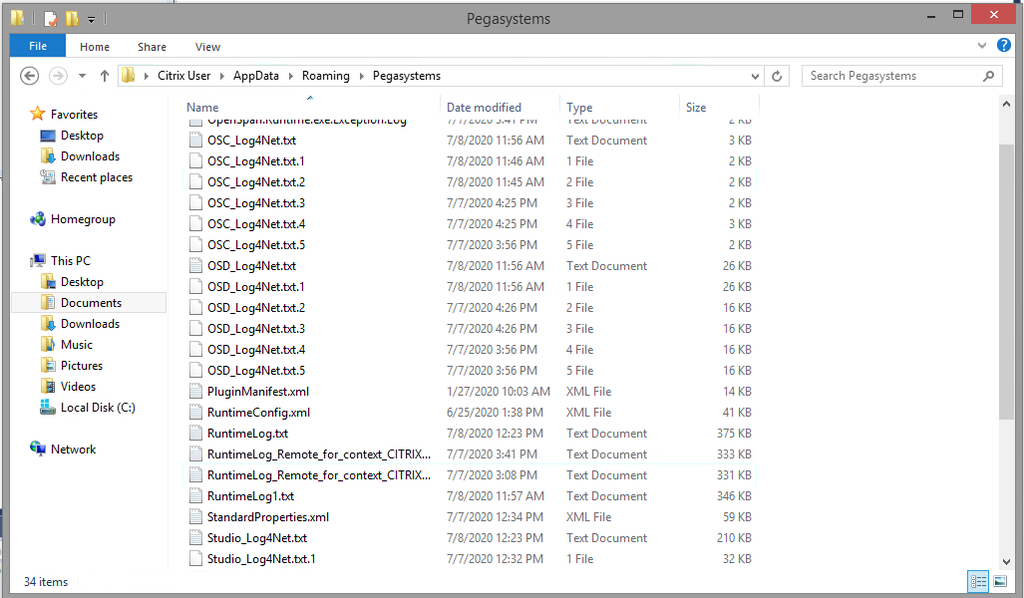
Note: You do not have to continue if the Runtime configuration file is not present in this directory because Robot Studio copies the most recent version once the solution has been run.
2 Create your Project solution and local Windows Form
- On the Windows Taskbar on your client machine, click the Start icon, and then select the Pega Robot Studio or Visual Studio icon to launch your development environment.
- In the upper-left corner, click File > New > Project to create an empty Pega Robotic Automation project.
- In the Name field, enter CitrixCommunicationTest for the name, and then click OK to create the new solution.
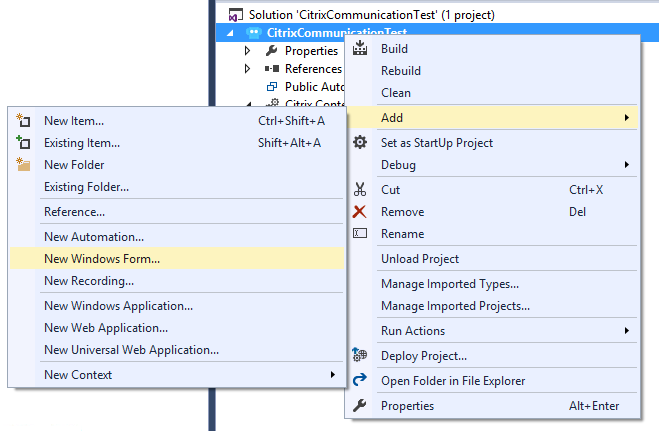
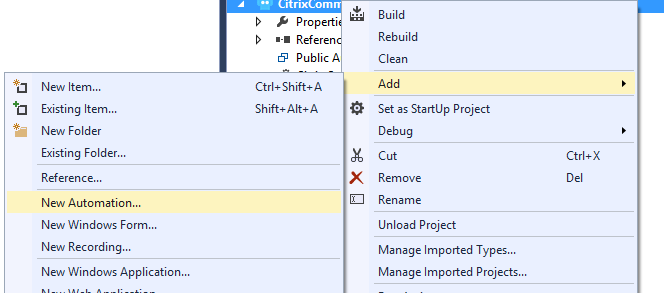
- In the Solution Explorer, right-click the CitrixCommunicationTest project, and then selectAdd > New Windows Form
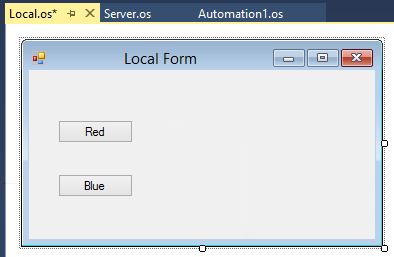
- In the Name field, enter Local.os and click Add to add the form to the project.
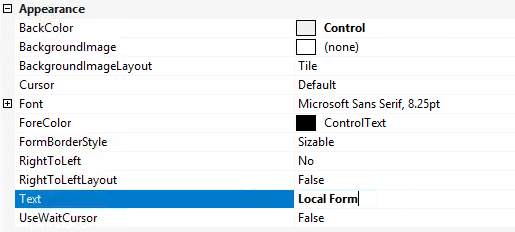
- In the Object Explorer, click the Local.os form to select the local form.
- Below the Object Explorer, click the Properties tab to configure the local form.
- In the Text field, enter Local Form.
- On the left side of Robot Studio, click the Toolbox tab.
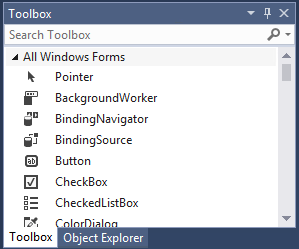
- In the list of All Windows Forms controls, click and drag Button to the local Windows Form.
- On the form, click the button object to select it and open the Properties form.
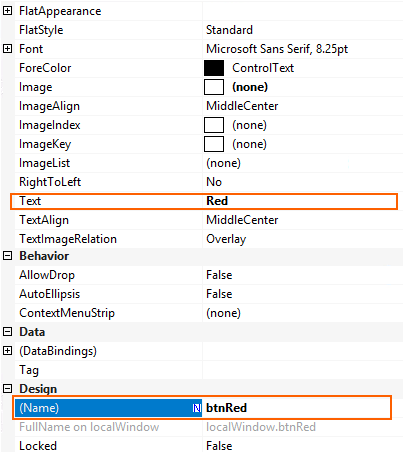
- In the Properties form, enter the following values to configure the local form:
- In the Text field, enter Red.
- In the Name field, enter btnRed.
-
- Repeat steps 7-12 to create an additional button with the following values:
- In the Name field, enter btnBlue.
- In the Text field, enter Blue.
- In the upper-left corner of Robot Studio, click File > Save All to save your changes.
3 Create and configure Citrix context for testing locally
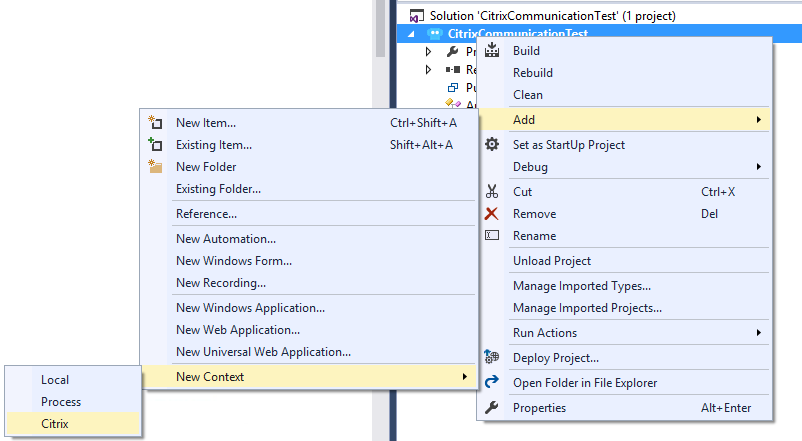
- In the Solution Explorer, right-click the CitrixCommunicationTest, and then select Add > New Context > Citrix to add a new Citrix context to the solution.
- In the Object Explorer, select the CitrixContext1 file.
- Click the Properties tab to configure the context.
- In the Debug section, to the right of Run Local, select True to ensure that the project is prepared for local deployment.

4 Add a Windows Form to Citrix context
- In the Solution Explorer, right-click the Citrix context, and then select Add > Windows Form.

- In the Name field, enter Server.os.
- Click to add the form the project.
- Select the Windows Form, and then navigate to the Toolbox tab on the left side of Robot Studio.
- In the list of All Windows Forms controls, click and drag Label to the server Windows Form.

- Select the label object.
- Click the Properties tab.
- In the Properties form, enter the following values to configure the server form:
- In the Text field, enter Test Label.
- In the Name field, enter testLbl.
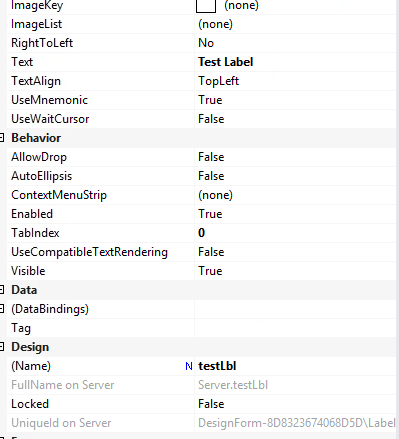
- In the list to the right of the AutoSizefield, select False to allow the ability to resize the label.

- In the Design Form of the Server.os, click and drag the corners of the label to increase the size to fill the server Windows Form.

- In the upper-left corner of Robot Studio, click File > Save All to save your changes.
5 Create a test automation
- In the Solution Explorer, right-click the CitrixCommunicationTest project, and then select Add > New Automation to add a new automation context to the local context of the solution.
Note: In this example, you are creating an automation that can use the buttons established in the local Windows Form, therefore you must design the automation in the local context.
- In the Name field, enter TestAutomation.os.
- Click to add the new automation to the project.
- In the Object Explorer section on the right, click the Local.os object.
- Right-click the Local.os object, and then select Expand All to display the buttons.
- Repeat steps 4-5 to expand the Server.os form and display the label object.
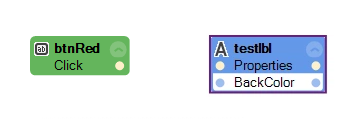
- Under the Local.os object, click btnRed to select the Red button.

- In the Object Inspector of the btnRed section under the Object Explorer, click the lightning bolt icon to display events for that object.
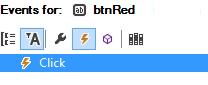
- Select the click event, and then drag it to the automation surface.
- In the Object Inspector of the testLbl section under the Object Explorer, click the wrench icon to display the properties for that object.
- Click and drag the BackColor property to the automation next to the btnRed form click event to add it to the automation.
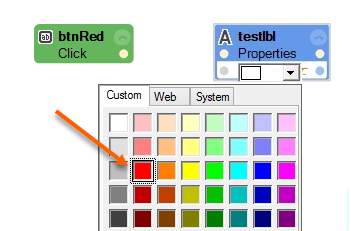
- In the testLbl Properties box located next to the btnRed button, click the down arrow to display a color swatch.
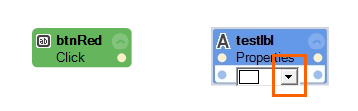
- From the color swatch, select a Red box to set the property.
- Click the connector point on the btnRed click event and draw a line to the label next to it to connect the two.
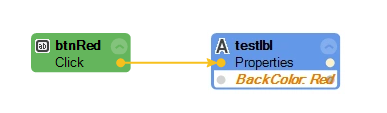
- Repeat steps 5-14 to create another automation that connects the btnBlue click event to a blue label. Your automation must resemble the following image:

- In the upper-left corner of Robot Studio, click File > Save All to save your changes.
6 Verify solution on local machine
- In the toolbar of Robot Studio, click to begin the debugging process.

- Click to acknowledge that you are running the solution locally.

- Move the Local Form dialog box to the side of the Server Form.
- In the Local Form dialog box, click and verify that the background color displayed in the Design Form dialog box is red.
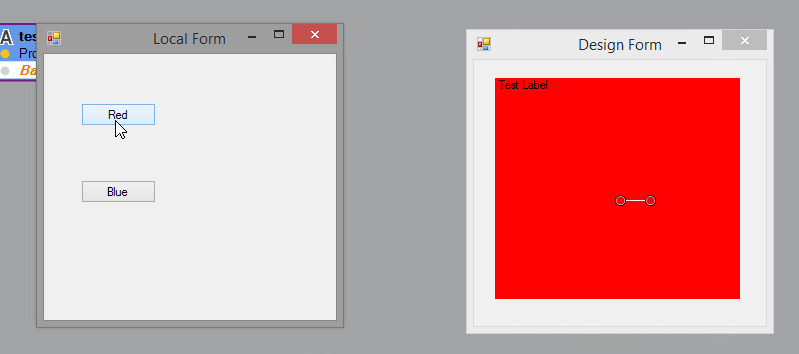
- Repeat step 3 to verify that the background color changes to blue when you click .

Available in the following mission:
If you are having problems with your training, please review the Pega Academy Support FAQs.
Want to help us improve this content?