Creating Windows form and procedure automations
Archived
9 Tasks
45 mins
Beginner
Robotic Process Automation
English
Scenario
The solution design requires a button click on a user interface to perform a search in the ACME Search System and return the nearest store address based on the customer ZIP code. The automation should return the user to the Home page after successfully locating the nearest store. The solution does not yet have the user interface. An interim solution is to develop a testing Windows form that allows the developer to complete and test the automations in the ACMESearch project.
After testing the automations, investigate the source code on the sign-in page to modify the ACME_P_SignIn automation.
The expected result of the business case is to locate the nearest store from the ZIP code of the customer. With the home navigation and sign-in automations completed, you need the remaining automations to locate the nearest store in the ACME Search System. A temporary automation that handles the button click from the Windows test form is necessary to debug the solution.
In this part of the solution, complete the following tasks:
- Create a Windows form containing a label, a text box, and a button.
- Update the ACME_P_SignIn automation to test the login process on the btnTest.
- Create the ACME_P_SearchByZip automation to search for the nearest store by transferring in a ZIP code from the user interface and return the store address in the automation. Consider using the Object Explorer to extract a proxy for the input parameter. After locating the nearest store, return the user to the Home page of the ACME Search System.
- Create the ACME_P_GetNearestStore automation by passing in the string parameter for the ZIP code and by calling the ACME_P_NavToHome and the ACME_P_SearchByZip automations. Consider using Object Explorer to extract a proxy for the input parameter.
- Create the ACME_E_btnTestClicked automation that calls the ACME_P_GetNearestStore automation and returns the store address or a failed message to a MessageDialog.
Detailed Tasks
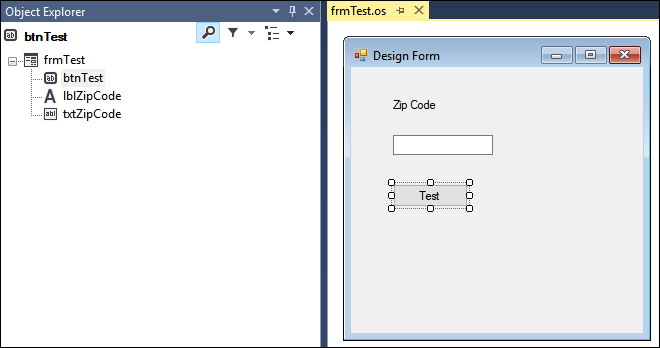
1 Create a Windows form for testing
- On the Solution Explorer, right-click ACMESearchPrj, and then select Add > New Windows Form to display the Add New Item window.
- In the Add New Item window, in the Name field, enter frmTest.
- In the Add New Item window, click Add to display the frmTest.os window in the design area.
- In the Object Explorer, click frmTest to highlight the object and display the full list of available properties in the Properties window.
- In the Properties window, set the TopMost property to True.
- From the menu bar, select File > Save All to save the edits.
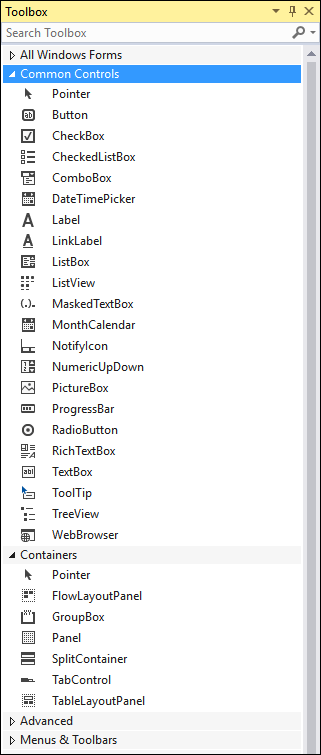
- In the Common Controls section of the Toolbox, drag the following controls to the frmTest window:
- Label
- TextBox
- Button
- In the Object Hierarchy, click the controls (Label, TextBox, and Button) to highlight the selections.
- In the Properties window, update each property of the controls and Design (Name) property with the information in the following table.
Object Name
Properties to update
Property Value
label1
Design (Name)
Text
lblZipCode
Zip Code
textbox1
Design (Name)
txtZipCode
button1
Design (Name)
Text
btnTest
Test
- From the menu bar, select File > Save All to save the Windows form.
2 Update automation for testing
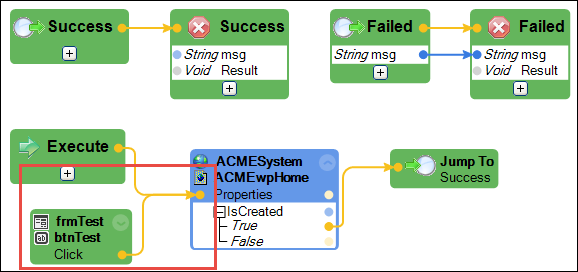
- In the Solution Explorer, right-click ACME_P_NavToHome.os and select Open to display the automation in the design area.
- In the automation, add the following design block.
Source project Items Property, Event, Method Description frmTest btnTest.Click event - In the automation, connect the automation links as shown in the following image.
3 Test the procedure automations
- In the Solution Explorer, right-click ACMESearchPrj and select Set as Startup Project.
- From the menu bar, select Debug > Start Debugging to debug the two procedure automations.
- On the test Windows form, click Test. Notice the process works up until the Sign In page, where the Sign In button is not enabled.
- From the menu bar, select Debug > Stop Debugging to close the debugger and return to development mode.
4 Add a RaiseEvent method
- In the Solution Explorer, double-click ACMESystem.os to open it in the design area.
- On the ACMESearch.os tab, click Start Interrogation to launch the web application.
- In the Object Hierarchy, right-click ACMEwpSignIn and select View Source to display the Source Code window.
- In the Source Code window, search for
<small>checkLengthP()</small>(roughly around line 32).Note: The code calls a function to check the length of the password entry before enabling the Sign In button.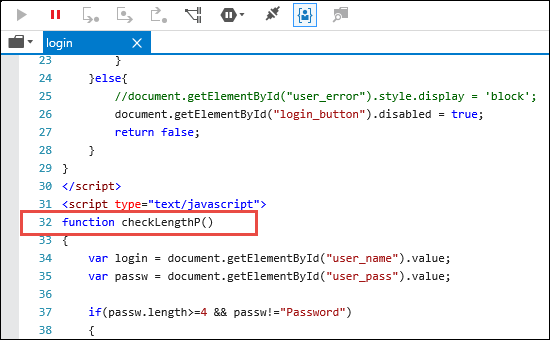
- In the Source Code window, search for
checkLengthP()(roughly around line 292).Note: A method,onkeyup, calls thechecklengthP()function.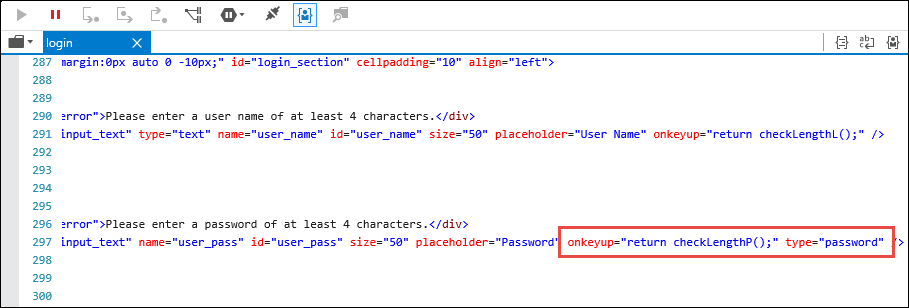
- In the Source Code window, click the Close icon to close the window.
- On the ACMESystem.os tab, click Stop Interrogation to close the web application and stop the interrogation.
- In the design area, click ACME_P_SignIn.os tab to activate the automation.
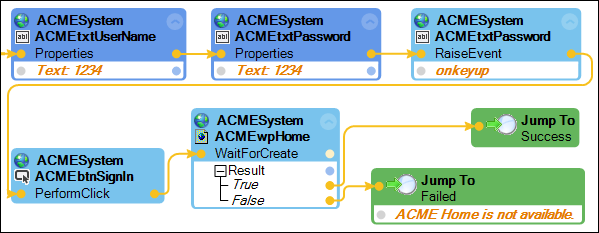
- In the automation, delete the automation link between the ACMEtxtPassword.Text and ACMEbtnSignin.PerformClick design blocks.
- In the Object Hierarchy, select ACMEtxtPassword to highlight the control
- In the Object Inspector, click Show Methods Only to filter the window.
- In the Object Inspector, click and drag the RaiseEvent method to the automation.
Note: Use Configure Type to search for the method.
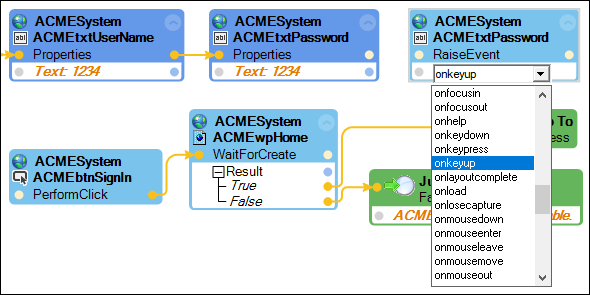
- On the RaiseEvent design block, click evt and select onkeyup to set the event for the method to perform.
- In the automation, connect the components as shown in the following image.
- From the menu bar, select File > Save All to save your edits.
5 Test the procedure automations
- From the menu bar, select Debug > Start Debugging to debug the two procedure automations.
- On the test Windows form, click Test. The Sign In button turns on to click and navigates to the Home page.
- From the menu bar, select Debug > Stop Debugging to close the debugger and return to development mode.
6 Create the ACME_P_SearchByZip automation
- In the ACME_P_NavToHome automation, delete the frmTest.btnTest.Click design block.
- In the Solution Explorer, in the ACMESearchPrj, right-click Procedures and select Add > New Automation to display the Add New Item window.
- In the Add New Item window, in the Name field, enter ACME_P_SearchByZip.
- In the Add New Item window, click Add to close the Add New Item window and open the automation in a new designer tab.
- In the automation, add the following design blocks to the automation.
Note: Use the Configure Type icon in the Object Inspector to locate properties, events, and methods.
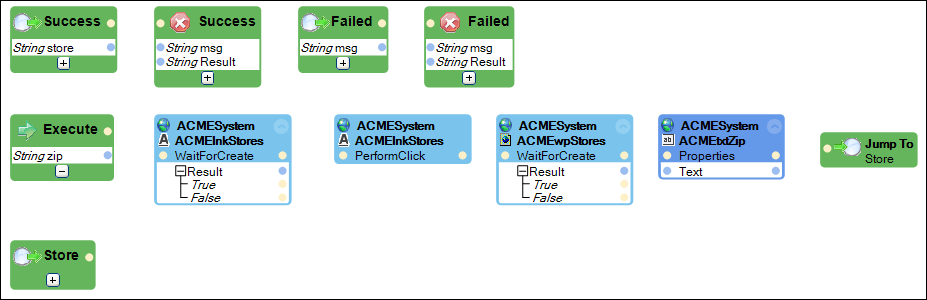
Source project Items Design Name Description Right-click in the automation Select Add Entry Point - Click the Add icon to add a parameter
- Rename the param1 as zip.
ACMESystem ACMElnkStores.WaitForCreate method - Expand the result.
Right-click in the automation Add two labels - Rename one label as Success and the other as Failed.
- On the Success label, click the Add icon to add one parameter.
- Rename the param1 as store.
- On the Failed label, click the Add icon to add one parameter.
- Rename param1 as msg.
Right-click in the automation Add two exit points - Rename one as Success and the other as Failed.
- On Success Exit point, Change Void parameter to String data type.
- On Failed Exit point, click the Add icon to add one parameter. The parameter is displayed on all exit points.
- Change param1 data type to String and rename as msg.
ACMESystem ACMElnkStores.PerformClick method ACMESystem ACMEwpStores.WaitForCreate method ACMESystem ACMEtxtZip.Text property Right-click in automation Select Add Label Rename Label1 as Store. Right-click in the automation Select Jump To > Store
- In Object Hierarchy, expand the ACME_P_SearchByZip automation and the Execute node to display the Zip input parameter.
- In the Object Hierarchy, select the zip parameter to highlight the parameter.
- In the Object Inspector, click Configure Type to display the Configuration window.
- In the Results frame of the Configuration window, click the Plus icon in front of Properties to expand the options.
- In the Results frame, select the This property and click OK to add the property to the Object Inspector and close the window.
- In the Object Inspector, click Show Properties Only to filter the results.
-
In the Object Inspector, drag the This property to the automation.
Note: The design block is a proxy of the input parameter. - In the automation, connect the design blocks as shown in the following image.
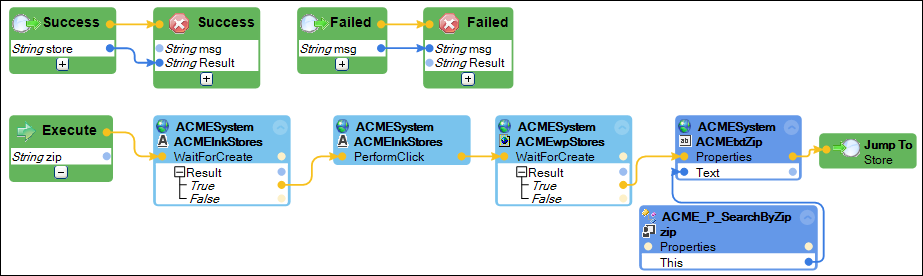
- From the Object Explorer, add the following design blocks to the automation.
Note: Use the Configure Type icon in the Object Inspector to locate properties, events, and methods.
Source project Items Design Name Description ACMESystem ACMEbtnFindStore.PerformClick method ACMESystem ACMElnkHome.PerformClick method ACMESystem ACMEtblNearestStore.WaitForCreate method - Wait for the Results page to load before storing the store address.
- Expand the Results parameter.
ACMESystem ACMEtblNearestStore.Text property - This property contains the store address.
Right-click in the automation Select Jump To > Success Right-click in the automation Select Jump To > Failed three times - Enter one message into each Failed design block:
- ACME Store is not created.
- ACME Stores Page is not available.
- ACME Stores result is not available.
- In the automation, connect the components as shown in the following image.

- From the menu bar, select File > Save All to save your edits.
7 Create the ACME_P_GetNearestStore automation
- In the Solution Explorer, in the ACMESearchPrj, right-click Procedures, and then select Add > New Automation to display the Add New Item window.
- In the Add New Item window, in the Name field, enter ACME_P_GetNearestStore.
- In the Add New Item window, click Add to close the Add New Item window and open the automation in a new designer tab.
- In the ACME_P_GetNearestStore automation, add the following design blocks to the automation.
Note: Use the Configure Type icon in the Object Inspector to locate properties, events, and methods.
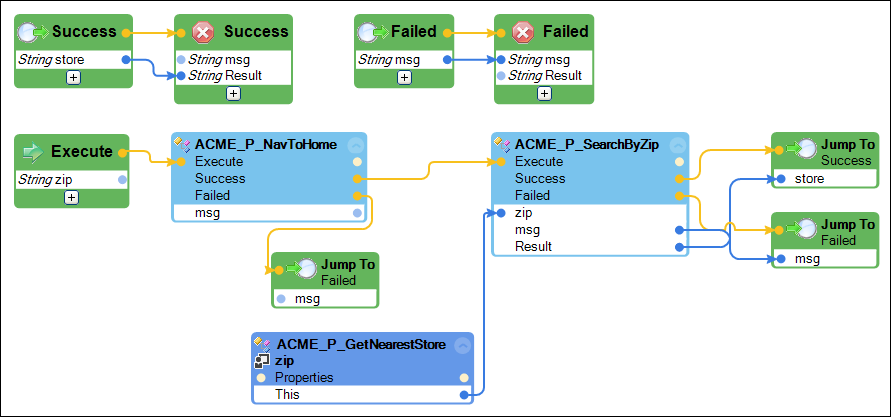
Source project Items Design Name Description Right-click in the automation Select Add Entry Point - Click the Plus icon to add a parameter.
- Rename the param1 as zip.
ACME_P_NavToHome automation Execute method - Call the automation to confirm the adapter and sign in to the web application.
Right-click in the automation Add two labels - Rename one label Success and one Failed.
- On the Success label, click the Plus icon to add one parameter.
- Rename the param1 as store.
- On the Failed label, click the Plus icon to add one parameter.
- Rename param1 as msg.
Right-click in the automation Add two exit points - Rename one label as Success and the other as Failed.
- On the Failed Exit point, click the Plus icon to add one parameter.
- Rename param1 as msg.
- On the Success Exit point, change Void parameter to String data type.
ACME_P_SearchByZip automation Execute method Call the automation to perform the search on a ZIP code. ACME_P_GetNearestStore zip.This property Create a proxy for the zip input parameter using the This property. Right-click in automation Select Jump To > Success Right-click in the automation Select Jump To > Failed
Create two Jump To design blocks. - In the automation, connect the automation links as shown in the following image.
- From the menu bar, select File > Save All to save your edits.
8 Create the ACME_E_btnTestClicked automation
- In the Solution Explorer, right-click ACMESearchPrj, and then select Add > New Folder to create a new folder in the project.
- In the Name field of the folder, enter Events.
- In the Solution Explorer, in the ACMESearchPrj, right-click the Events folder and select Add > New Automation to display the Add New Item window.
- In the Add New Item window, in the Name field, enter ACME_E_btnTestClicked.
- On the Add New Item window, click Add to close the Add New Item window and open the automation in a new designer tab.
- In the ACME_E_bntTestClicked automation, add the following design blocks to the automation.
Note: Use the Configure Type icon in the Object Inspector to locate properties, events, and methods.
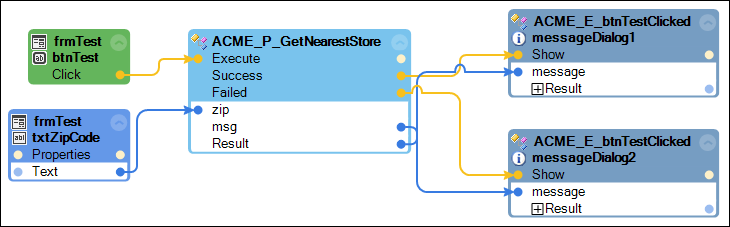
Source project Items Design Name Description frmTest btnTest.Click event Perform this automation when the user clicks the button. ACME_P_GetNearestStore automation Execute method Call the automation to confirm the adapter, sign in to the web application, search for the store address, and return the address. frmTest txtZipCode.Text property Use to pass in the ZIP code from the frmTest text field. Toolbox Add two MessageDialog In the Choose Method Overflow window, select the second radio button to display a message. - In the ACME_E_btnTestClicked automation, connect the automation links as shown in the following image.
- From the menu, select File > Save All to save your edits.
9 Confirm your work
- From the menu bar, click Debug > Start Debugging to debug the automations and display the test window.
- In the test window in the Zip Code field, enter a five-digit ZIP code.
- In the test window, click Test to start the web adapter, sign in to the applications, and perform the search on the ZIP code. A message box containing the store address is displayed.
- Optionally, you can test the error messages within the automations.
- On the menu bar, select Debug > Stop Debugging to close the debugger and return to development mode.