
Dismissing a Citrix logon window
4 Tasks
20 mins
Pega Robotic Automation 19.1
Intermediate
Robotic Process Automation
English
Scenario
As a developer, you are tasked with creating a Citrix robotic solution for your company to allow users to manage a legacy application in a mixed mode environment. You already created a Citrix robotic solution to test connectivity between your development machine and the Citrix server. Now that you are satisfied that the solution is working across the Citrix channel properly, you want to identify and automatically dismiss any logon windows that appear so that the end-user does not have to manually dismiss these windows.
Your Citrix environment is set up in the following way:
| Citrix Storefront URL | https://yourCitrixServer.com/Citrix/YourStoreWeb |
|---|---|
| Citrix domain | citrixdom |
| Citrix username | citrixuser |
| Citrix password | P4ssW0rd! |
Note: Because of the technical limitations in providing a real training environment, these challenges guide you to think through testing the Citrix configuration before actual robotic solution development. The values and configuration settings provided in the steps do not connect to servers and act only as examples in the challenges.
Challenge Walkthrough
Detailed Tasks
1 Identifying the window to be dismissed
- Launch Pega Robot Studio and open the
CitrixCommunicationTestproject. - In Solution Explorer, right-click the
CitrixCommunicationTestproject and choose to temporarily add a Windows adapter to your project. This adapter will be deleted after it has been used to gather the requisite information.
- On the Add New Item window, enter
TestCitrixfor the application name. Click . The Windows adapter is added to your project. - Click on CitrixTest in the Object Explorer
- In the Path property on the Properties window, click the ellipses button to open the Windows Open dialog.
- In the Open File window, navigate to C:\Program Files (x86)\Citrix\ICA Client and select
wfica32.exe. Click . - In the properties window, set the ResolvePath property to
false. - In the StartMethod property, select
MonitorAll.
- From the Studio menu, select to save the project.
- In the CitrixTest adapter tab, click . The Interrogation Form appears.

- In your browser, navigate to https://yourCitrixServer.com/Citrix/YourStoreWeb.
- On the Citrix Storefront page, click . The log on page is displayed.
- On the log on page, enter
citrixdom\citrixuserin the User name field. In the Password field, enterP4ssW0rd!.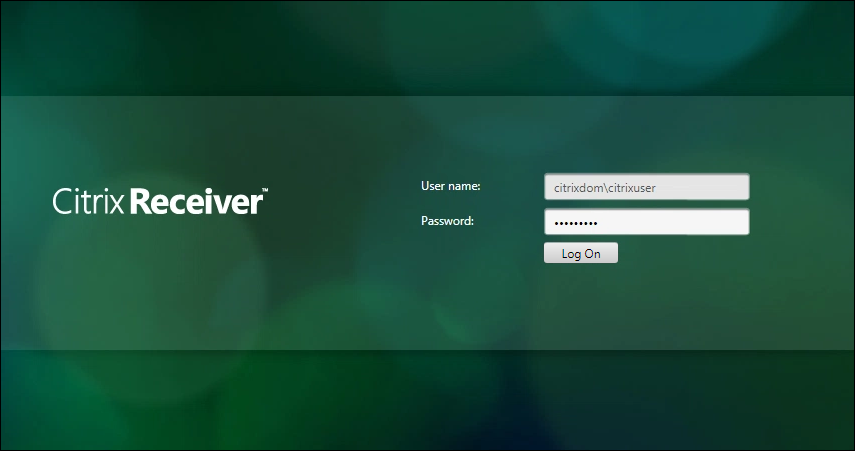
- Click . Your published applications are displayed.

- Click on the icon to launch the published application. A Windows logon form appears.
Note: If the ICA file does not launch automatically, click the downloaded file to launch the published application.
- From the Interrogation Form window, click and drag the over the logon window. Robot Studio will interrogate the Windows form.

- In Robot Studio, click Window Text Match Rule in the match rules frame of the adapter design window.
- Copy the value
Windows sign-in - \\Remotefrom the Text field and save it in Notepad. - In the match rules frame, click Window Class Name Match Rule in the match rules frame.
- Copy the value
Transparent Windows Clientfrom the ClassName field and save it in the same file as step 18.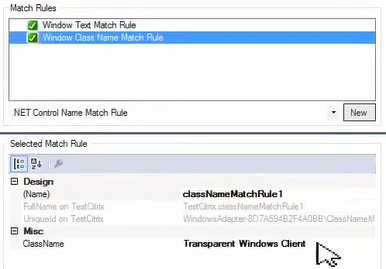
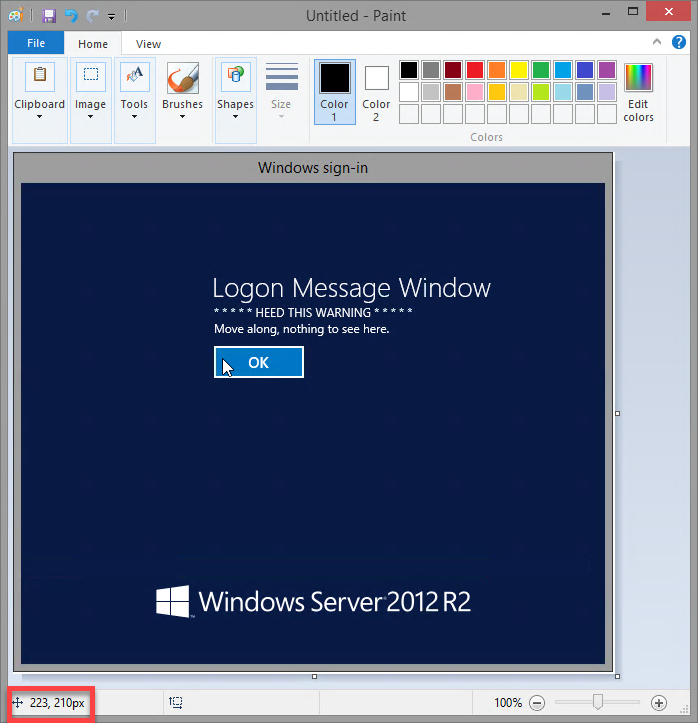
- Select the Windows Logon window and click to take a screenshot of the window.
- Open Paint, click to paste the screenshot into Paint.
- Hover your cursor over the button. Note the (x,y) coordinates in the same place you saved the window title and window class name.
- In Robot Studio, stop the interrogation by clicking the again.
- In Solution Explorer, right click on the CitrixTest adapter. Select . This adapter is no longer needed for your project.
- Click to confirm the deletion.
- Click File > Save All to save the project.
2 Configuring the Dialog Dismissal List property
- In Solution Explorer, click the Citrix Context project item.
- In the Properties window, in the Misc section, click the Dialog Dismissal List property. Click the ellipsis.

- On the DismissalSpecificationListEditorForm window, click .
- Enter the information that you previously gathered:
- Class Name –
Transparent Windows Client - Window Title –
Windows sign-in - \\Remote - Click X Position –
223 - Click Y Position –
210

- Class Name –
- Click .
- Click .
- In the Properties toolbar, in the Misc section, set the value of the Dismiss Dialog property to
true. - Select to save the solution.
3 Deploy solution
- From the Solution Explorer tab on the right side, right-click the solution name
CitrixCommunicationTestand select Build Solution. - Right-click the project name again and select Deploy Project to begin deployment.
- Click to deploy the solution.
- Click to dismiss the Deployment Status window.
- On the Windows Taskbar of the Client Machine, left-click the or icon and select . The File Explorer window is displayed.
- Navigate to Documents > Robot Studio > Projects > CitrixCommunicationTest > CitrixCommunicationTest > bin > debug to locate the project file.
- Select both the
.openspanand.manifestfiles. Right-click to copy them. - Navigate to the network folder for the Citrix server > Citrix solutions. Right-click within the folder and paste the files.
- Click to replace any previous deployment files.
- Close the folder on the client machine to go back to Robot Studio.
4 Test solution
- To test the functionality, click the in the Standard toolbar to run the solution. The solution will run and the Windows Logon form will be automatically dismissed.
Available in the following mission:
If you are having problems with your training, please review the Pega Academy Support FAQs.
Want to help us improve this content?