Implementing a fast-release change request
6 Tasks
20 mins
Beginner
English
Scenario
U+ Bank is cross-selling on the web by showing various credit cards to its customers.
The bank introduced a new offer that promises 0 percent APR and no annual fees to customers opting for the standard card. However, the team identifies a typo in the description of the action. Because the action is active in the production environment, the team needs to implement the revision, and then deploy the change by creating a fast-track change request in the 1:1 Operations Manager of Pega Customer Decision Hub™
The following table provides the credentials you need to complete the challenge:
| Role | User name | Password |
|---|---|---|
| Business User | BusinessUser | rules |
| Team Lead | TeamLead | rules |
| NBA Specialist | NBASpecialist | rules |
| Revision Manager | RevisionManager | rules |
Your assignment consists of the following tasks:
Task 1: Create a change request to update existing actions
As a Business User, submit a fast-track change request to update the existing action to change the description of the offer from 0% ARP and No Annual Fee to 0% APR and No Annual Fee.
Task 2: Prioritize the change request created
As a Team Lead, assign a rank of 1 to the change request that the Business User submits.
Task 3: Complete action build tasks for the Rewards Plus card
As an NBA Specialist, complete the build tasks to update the Standard card action that the Business User defined in the change request:
- Define action details
Task 4: Review and validate the change request
Review and validate the change request as an NBA Specialist.
Task 5: Promote the changes to production
As a Team Lead, promote the change request to the revision manager, who deploys the business changes to the production environment.
Task 6: Deploy changes to production
As a Revision Manager, deploy the promoted changes to the production environment.
Task 7: Confirm your work
Log in to the U+ Bank website as Gill and then verify that the description of the Standard card offer is displayed.
Challenge Walkthrough
Detailed Tasks
1 Create a change request to update existing actions
- Log in to 1:1 Operations Manager as a Business User:
- In the User name field, enter BusinessUser.
- In the Password field, enter rules.
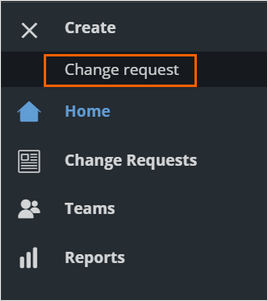
- In the navigation pane of 1:1 Operations Manager, click Create > Change Request to create a change request for updating an existing offer.
- In the New operations change request dialog box, configure the details:
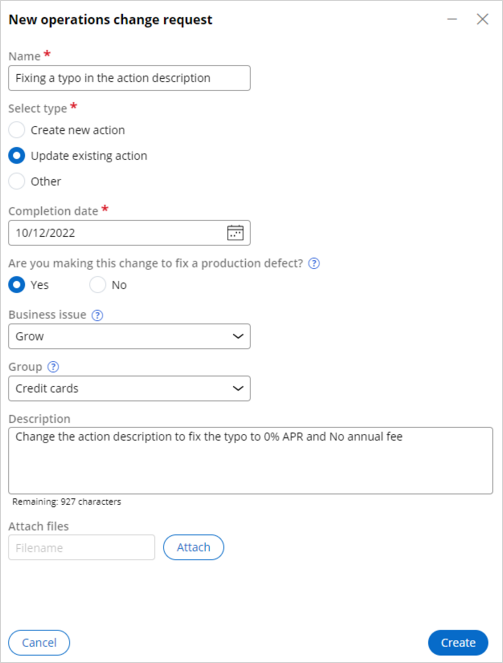
- In the Name field, enter Fixing a typo in the action description to represent the change request name instead of the action name.
- In the Select type section, select Update existing action.
- In the Completion date field, click the Calendar icon and then select a date that is in the future.
- In the Are you making this change to fix a production defect? section, select Yes.
Note: Selecting Yes in this section adds the change request to the Fast track release.
-
- In the Business issue list, select Grow.
- In the Group list, select Credit cards.
-
- In the Description field, enter Change the action description to fix the typo to 0% APR and No annual fee.
- Click Create to submit the change request.
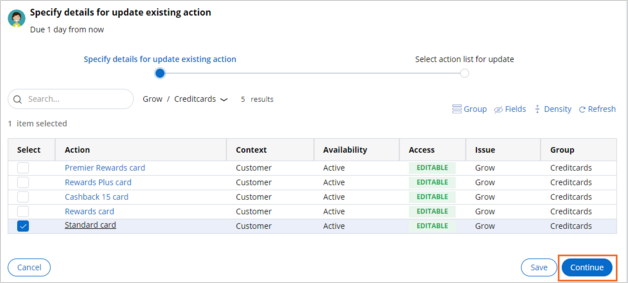
- In the To do list, in the Specify details for update existing action task, click Go to open the task.
- In the Specify details for update existing action section, select the Standard card checkbox to select the action that requires the change.
- Click Continue to select the tasks for the action.
- In the Select action list for update section, select the Edit action details task for the action, and then click Continue to edit the attributes of the actions
- In the Edit availability & attributes section, provide the following information:
- In the Short description field, in the 0% APR and No annual fee text, replace ARP with APR.
- In the Benefits field, in the 0% intro APR for 15 billing cycles. $0 intro balance transfer fee. No annual fee text, replace ARP with APR.
- Click Finish to complete the task.
- In the lower-left corner, click the user profile image, and then select Log off to sign out as the Business User.
2 Prioritize the created change request
- Log in to 1:1 Operations Manager as a Team Lead:
- In the User name field, enter TeamLead.
- In the Password field, enter rules.
- In the navigation pane of 1:1 Operations Manager, click Change Requests to view the list of change requests.
- In the list of change requests, click the Fixing a typo in the action description change request.
 Note: You can see the Release type of the change request is CDH fast release.
- In the To do list, in the Rank change request task, click Go to open the task.

- In the Rank change request section, in the Rank field, enter 1.
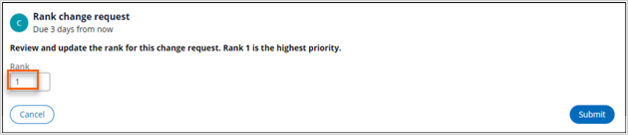
- Click Submit to submit the rank.
- In the lower-left corner, click the user profile image, and then select Log off to sign out as the Team Lead.
3 Complete action build tasks
- Log in to 1:1 Operations Manager as an NBA Specialist:
- In the User name field, enter NBASpecialist.
- In the Password field, enter rules.
- In the navigation pane of 1:1 Operations Manager, click Change Requests to view the list of change requests.
- In the list of change requests, click Fixing a typo in the action description change request.
- In the To do list, in the Define action details task, click the More icon, and then select Assign to myself.
- In the Define action details task, click Go.
- In the Define action details section, confirm that the action details reflect the changes requested.
Note: The Build stage reflects the action details that the Business User defines while creating the change request. However, as an NBA specialist, you can change the action details in the Build stage.
- Click Submit to complete the task.
4 Review and validate the change request
- In the Review all completed tasks in build stage task, click the More icon, and then select Assign to myself.
- In the Review all completed tasks in build stage task, click Go.
- Review all completed tasks in the build stage, and then click Submit to update the status of the task.
- In the navigation pane of 1:1 Operations Manager, click Change Requests to view the list of change requests.
- In the list of change requests, click the Fixing a typo in the action description change request.
- In the To do list, in the Validate artifacts task, click the More icon, and then select Assign to myself.
- In the Validate artifacts task, click Go.
- In the Validate artifacts section, review the artifact that the change request generated.
- Click Submit.
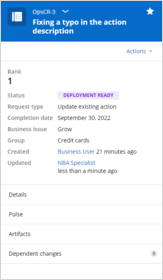
- Confirm that the action status is DEPLOYMENT READY, as shown in the following figure:
- In the lower-left corner, click the user profile image, and then select Log off to sign out as the NBA Specialist.
5 Promote changes to production
- Log in to 1:1 Operations Manager as a Team Lead:
- In the User name field, enter TeamLead.
- In the Password field, enter rules.
- In the navigation pane of 1:1 Operations Manager, click Change Requests to view the list of change requests.
- In the list of change requests, click the Fixing a typo in the action description change request.
- In the To do list, in the Complete this change request task, click the More icon, and then select Assign to myself.
- In the Complete this change request task, click Go.
- In the Artifacts table, click Standard card to review the action attributes in the utility pane.
- Close the utility pane.
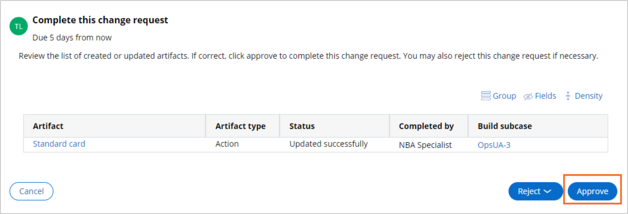
- In the Complete this change request section, click Approve, as shown in the following figure:
- Confirm that the action status is RESOLVED-COMPLETED.
- In the lower-left corner, click the user profile image, and then select Log off to sign out as the Team Lead.
6 Deploy changes to production
- Log in to 1:1 Operations Manager as a Revision Manager:
- In the User name field, enter RevisionManager.
- In the Password field, enter rules.
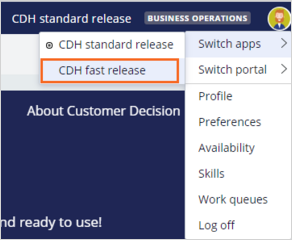
- In the upper-right corner of Customer Decision Hub, click the user icon, and then select Switch apps > CDH fast release.
Note: By default, the Revision Manager logs in to CDH standard release app in the Customer Decision Hub.
- In the navigation pane of Customer Decision Hub, click Revision Management to see the current revisions.
- In the Welcome back, Revision Manager section, click Update business rules.
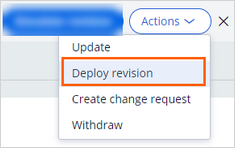
- In the upper-right corner, click Actions > Deploy revision.
- Enter a comment, and then click Deploy to view the merge status message and wait for deployment.
Note: Notice that the business pipeline has Fast Release pipeline as the default selection.
- Confirm that the screen refreshes by itself to indicate that the deployment is successful and is ready for testing, and then click Test or activate this revision to select the test users.

- In the Test or activate this revision window, select Activate for all operators.
- Click Submit to display the message that the deployment is successfully activated.
- Click Complete revision to finish the revision.
- In the lower-left corner, click the user profile image, and then select Log off to sign out as the Revision Manager.
If you are having problems with your training, please review the Pega Academy Support FAQs.
Want to help us improve this content?