Using online model scores as predictors
4 Tasks
15 mins
Pega Customer Decision Hub '23
Beginner
English
Scenario
U+ Bank is implementing cross-selling of its products on the web by using Pega Customer Decision Hub™. The U+ Bank data science team develops predictive models, including models that predict the likelihood of a customer discontinuing a service or even leaving the bank. To further enhance the predictive power of the adaptive models, you create a parameterized predictor that is the on-the-fly score of a predictive churn model that runs in Customer Decision Hub. The parameter references a newly created churn prediction.
Use the following credentials to log in to the exercise system:
| Role | User name | Password |
|---|---|---|
| Data Scientist | DataScientist | rules |
Your assignment consists of the following tasks:
Task 1: Create a property to store the parameter value
In Next-Best-Action Designer, create the ChurnRisk property to store a customer's propensity to churn.
Task 2: Create a churn prediction
Create a churn prediction and replace the placeholder scorecard with the ChurnH2O model. Map the output of the model to the ChurnRisk property.
Task 3: Add ChurnRisk as a parameterized predictor
Configure the Predict Web Propensity prediction to store the results in the CDH-SR class. Add the ChurnRisk field as a parameterized predictor to the adaptive model that drives the prediction.
Task 4: Configure the pre-processing extension strategy
In the NBAPreProcessExtension strategy, reference the churn prediction.
Challenge Walkthrough
Detailed Tasks
1 Create a property to store the parameter value
- On the exercise system landing page, click Launch Pega Infinity™ to log in to Customer Decision Hub.
- Log in as a Data Scientist:
- In the User name field, enter DataScientist.
- In the Password field, enter rules.
- In the navigation pane of Customer Decision Hub, click Next-Best-Action > Designer.
- In Next-Best-Action Designer, click the Taxonomy tab, and then click the Properties tab.
- Click Edit, and then click Add property to create the new property.
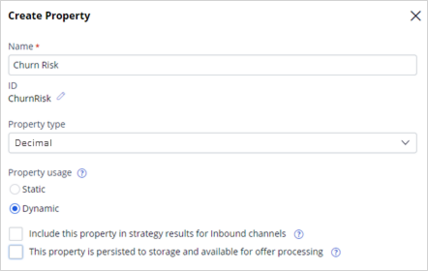
- In the Create property dialog box, configure the property:
- In the Name field, enter ChurnRisk.
- In the Property type field, select Decimal.
- In the Property usage section, select Dynamic.
- Clear the Include this property in strategy results for Inbound channels checkbox.
- Clear the This property is persisted to storage and available for offer processing checkbox.
- Click Submit to close the dialog box.
- Click Save to save the Taxonomy configuration.
Note: Saving the taxonomy might take some time as the system regenerates the entire Next-Best-Action framework.
2 Create a churn prediction
- In the navigation pane of Customer Decision Hub, click Intelligence > Prediction Studio.
- In the upper-right corner of Prediction Studio, click New to create a prediction.
- Ensure that Customer Decision Hub is the active selection, and then click Next to configure the prediction:
- In the Prediction name field, enter Predict Churn Propensity.
- In the Outcome field, select Churn.
- In the Subject field, select Customer.
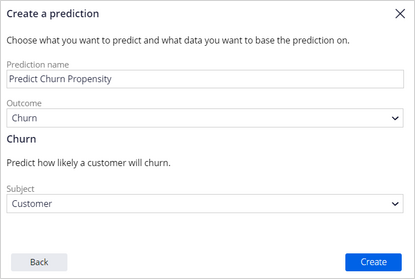
- Click Create.
- Download the ChurnH2O.zip file to your local machine.
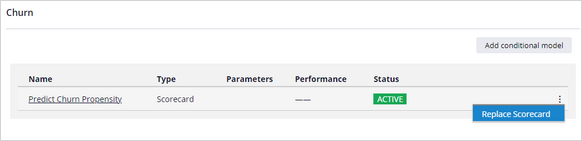
- Click the Models tab, and then in the Churn section, in the Predict Churn Propensity prediction row, click the More icon.
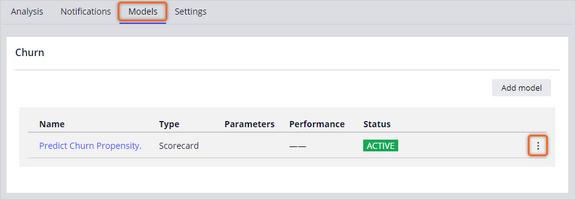
- Click Replace Scorecard, and then configure the churn model:
- In the Replace model dialog box, select Model, and then click Next.
- Click Choose File, select the ChurnH2O.zip file, and then click Next.
- Ensure that the Compare models checkbox is clear, and then click Next.
- In the Candidate model name field, enter ChurnH2O, and then click Add challenger model to add the ChurnH2O model to the prediction.
- When the status of the ChurnH2O model changes to Challenger (pending review), click the More icon in the ChurnH2O (M-1) row, and then select Approve challenger model.
- Enter appropriate comments, and then click Approve.
3 Configure the pre-processing extension strategy
- In the header of Customer Decision Hub, in the Search field, enter NBAPreProcessExtension, and then press the Enter key.
- In the search results, click NBAPreProcessExtension to open the strategy.
- In the upper-right corner, click Save as.
- In the Context section, in the Apply to field, enter or select Data-Decision-Request-Customer-CDH.
- In the Strategy Record Configuration section, define the strategy in the CDH-SR class.
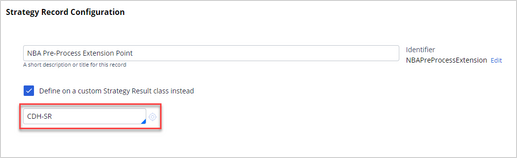
- In the upper-right corner, click Create and open to edit the strategy.
- On the canvas, right-click, and then select Prediction.
- Right-click the Prediction component, and then select Properties to configure the component:
- Select Run prediction on Another page.
- In the Page field, enter or select Primary, and then select Customer.
- Confirm that the UBank-CDH-Data-Customer class auto-populates.
- In the Prediction field, enter or select PredictChurnPropensity.
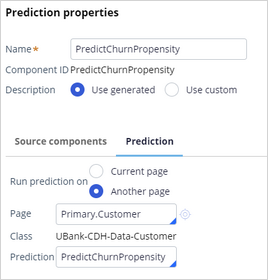
- Click Submit to close the dialog box.
- Right-click the canvas, and then select Enrichment > Set property.
- Right-click the Set Property component, and then click Properties to configure the component:
- In the Name field, enter Set Churn Risk.
- In the Define action, target, and source section, click Add item.
- In the Target field, enter or select .ChurnRisk.
- In the Source field, enter or select .pyPropensity.
- Click Submit to close the dialog box.
- Connect the strategy components, as shown in the following figure:

- In the upper-right corner, click Save.
4 Add ChurnRisk as a parameterized predictor
- In the navigation pane of Prediction Studio, click Predictions.
- On the Predict Web Propensity tile, click Open prediction to edit the prediction.
- Click the Settings tab, and then in the Prediction details section, click Configure.
- In the Save results to section, select CDH-SR.
- Click Submit to close the dialog box.
- In the Confirm dialog box, click Yes.
- In the upper-right corner, click Save.
- Click the Models tab, and then in the Web Click Through Rate Customer row, click 6 Parameters to edit the parameters.
- In the Edit Parameters dialog box, click Add parameterized predictor to configure the parameter:
- In the Name field of the new parameter, enter ChurnRisk.
- In the Data type list, select Decimal.
- In the upper-right corner of the dialog box, click the Next Page icon.
- Confirm that the Predictor type of the new parameter is numeric.
- In the Field field, select .ChurnRisk.
- Click Submit to close the dialog box.
- In the upper-right corner, click Submit for deployment.
- In the Submit prediction for deployment dialog box, enter appropriate comments, and then click Submit.
Note: A System Architect must merge the changes made to the prediction before they take effect.
- In the lower-left corner, click Back to Customer Decision Hub.
Available in the following missions:
If you are having problems with your training, please review the Pega Academy Support FAQs.
Want to help us improve this content?