
Importing predictive models
1 Aufgabe
10 Min.
Anfänger
Englisch
Szenario
U+ Bank implements Pega Decision Management but already uses predictive models that an external bureau created. You are asked to make an existing H2O model actionable in Pega Customer Decision Hub™. The model is based on historical customer interactions with the bank and predicts the likelihood that a customer might churn soon.
Use the following credentials to log in to the exercise system:
| Role | User name | Password |
|---|---|---|
| Data Scientist | DataScientist | rules |
Your assignment consists of the following tasks:
Task 1: Import an H2O model
In Prediction Studio, create a predictive model rule by using the ChurnH2O.zip model file.
Challenge-Schritte
Genaue Übungsschritte
1 Import an H2O model
- Download the ChurnH2O model file to your local machine.
- On the exercise system landing page, click Launch Pega Infinity™ to log in to Customer Decision Hub.
- Log in as a data scientist:
- In the User name field, enter DataScientist
- In the Password field, enter rules.
- In the Work from 1:1 Operations Manager section, click CR-1 to open the change request.
- In the Scope of changes section, click Create, and then select Decision > Predictive model.
- In the Predictive Model Record Configuration section, in the Label field, enter ChurnH2O.
- In the Context section, in the Apply to field, enter or select UBank-CDH-Data-Customer.
- In the upper-right corner, click Create and open to configure the new predictive model.
- Click Create new model to start the model configuration.
- In the Create Predictive Model dialog box, click the Import model tab.
- Click Choose File, and then, on your local machine, select the ChurnH2O.zip model file.
- Click Next to proceed to the Outcome definition section.
- In the Outcome definition section, ensure that Predict the probability to is set to Churn. Do not alter the advanced settings.
- In the Expected performance (AUC) field, enter 80.
- Click Import to import the model file.
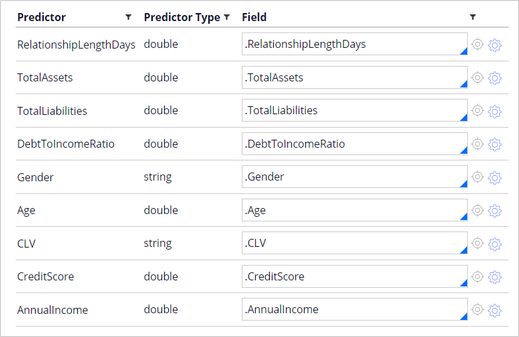
- On the Mapping tab, verify that all predictors of the model are correctly mapped to the fields of the data model.
- Click Save to save the model.
In der folgenden Mission verfügbar:
Wenn Probleme mit den Lerninhalten auftreten, lesen Sie bitte die Pega Academy Support FAQs.
Möchten Sie uns dabei helfen, diesen Inhalt zu verbessern?