Designing a Case Life Cycle
Note: Some interactive elements in this Mission may not work as expected in non‑English versions. These do not impact the learning objectives or Mission completion.
Pega Platform™ supports the Case Life Cycle design modeling technique. This model enables business users to see and interact with a Case the same way that they think about it. Each Case Life Cycle contains Stages, Processes, and Steps.
For example, the Case Life Cycle for an Onboarding Case Type allows the HR, Facilities, and IT teams to set up a new employee for their first day.
To accommodate the complexity and specific needs of your business, Pega Platform supports different types and Configurations for Stages, Processes, and Steps.
In the following image, click the + icons to learn more about the Onboarding Case Life Cycle:
The following table describes the various components of a Case Life Cycle:
| Component | Purpose |
|---|---|
| Create Stage |
The first Stage in the Case Life Cycle is the Create Stage, which is denoted by a green bar. The Create Stage should contain Processes and Steps for users to enter initial data upon Case creation. The Create Stage cannot be deleted or repositioned in the Case Life Cycle. The Create Stage can be renamed. Cases that include the Create Stage are assigned a Case ID upon Case creation. |
| Create Process |
By default, the Create Stage contains a Create Process, which you can modify to meet your business needs. Create Processes that are not Channel-specific can only include Collect information Steps. You can configure Create Processes to start conditionally. For example, you create a Digital Messenger Channel and configure a Channel-specific Create Process. You configure the Process to start only if the user is using the Digital Messenger app. |
| Primary Stages |
Primary Stages are Stages that lead to an expected outcome. To help identify the Primary Stages of a Case Type, consider whether:
The path that a Case takes through the Case Life Cycle without deviating from the Primary Stages is called the primary path. The Primary Stages in the Onboarding example are Verification, Pre-arrival Setup, Setup and Onboarding. |
| Collect information Step |
Collect information Steps are Steps that require user action or input. Collect information Steps have green icons in the Case Life Cycle. Collect information Steps are often referred to as Assignments or Tasks. |
| Parallel Process |
In a Stage with two or more Processes, the Processes will normally run in sequential order. If two or more Processes can be started and completed independently of each other, you can configure them as parallel Processes. During Case processing, the active Assignment in either Process can be performed. The Onboarding example contains a Create IT Setup Process to provide a configured laptop to the new employee, and a Create Facilities Setup Process to assign the new employee an office. These Processes can be run in any order and the Stage will progress when both are complete. Tip: You can also configure standard Processes as parallel Processes in the Create Stage. |
| Automation Step |
Automation Steps are steps performed by the system and have yellow icons in the Case Life Cycle. Automation Steps can send emails, create PDF files, wait a specified time, or change the Stage of a Case. The Onboarding example uses Automation Steps to return rejected IT setups to the primary path, send a welcome packet email to the new employee, and send various types of notifications to the employee's new supervisor and team. |
| Alternate Stage |
Alternate Stages are Stages that handle deviations from the primary path. Alternate Stages are optional and represent a negative Resolution Stage or are used for exception handling to allow the Case to reenter the primary path. Following the Onboarding example Case's primary path, if the IT setup selections are approved, the Case advances to the Verification Stage. If the IT setup selections are instead rejected, the Case advances to the Approval Rejection Alternate Stage, where the IT setup selections can be modified. |
| Resolution Stage |
The Resolution Stage, denoted by a red bar, defines Case behavior at the end of the Case Life Cycle. Resolution Stages indicate that the Case finishes its Life Cycle at the conclusion of the Stage. Every Case Type should have at least one Resolution Stage. A Case Type can have more than one Resolution Stage if you define an alternate path for your business process. In this example, the Onboarding Case Life Cycle has two Resolution Stages: the Verification Stage and Approval Rejection Stage. |
Stage transitions
When you design a Case Life Cycle, consider how the Case transitions from one Stage to another.
In the following image, click the + icons to learn more about the transition options that are available in the Stage contextual properties pane:
Note: You cannot configure Stage transitions on the Create Stage.
Stage transitions with Automations
Use Change Stage Automation Steps to transition the Case progression to a specific Stage automatically. This type of Configuration is most useful for automated transitions to and from Alternate Stages.
In the Onboarding Case Type, you add a Change Stage Automation to the Approval Rejection Alternate Stage. You configure the Change Stage Step to advance the Case to the Verification Stage once the IT setup selections are modified.
Step transitions
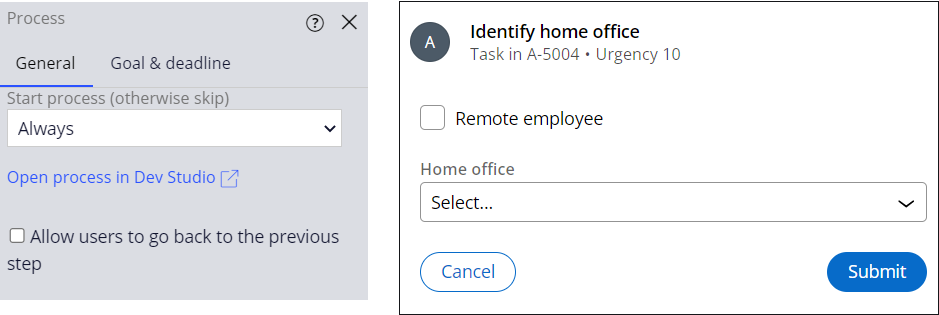
When you design a Case Life Cycle, consider how the Case transitions from one Step to another. By default at run time, you click Submit to advance the Case to the next Step. The following figure displays the Process settings in App Studio on the left and the Step at runtime on the right:
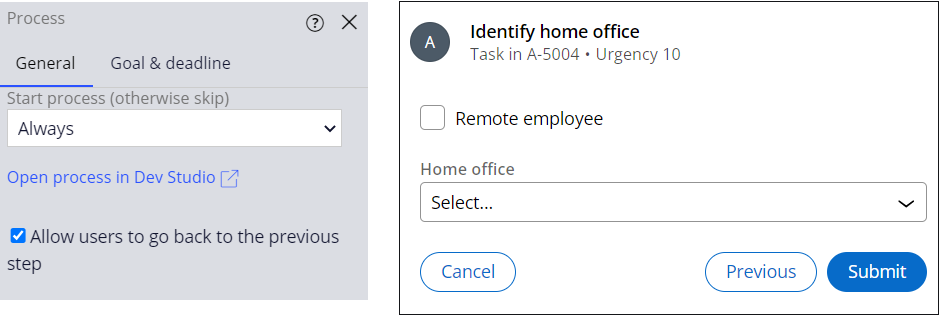
In a Process in App Studio, you can enable the Allow users to go back to the previous Step option to display the Previous button at run time. The following figure shows the Process settings in App Studio on the left and the Step at run time on the right:
Check your knowledge with the following interaction:
This Topic is available in the following Module:
If you are having problems with your training, please review the Pega Academy Support FAQs.
Want to help us improve this content?