Adding agreements and activity plans from the PGP landing page
3 Tasks
20 mins
Scenario
GrantsCo. want to get the consent of local residents, with their e-signatures, as part of their new public awareness program. GrantsCo. also needs to devise a plan for their public awareness program that includes goals and tasks for each step.
As a system administrator, add the Consent Agreement and Activity plan components, and then configure the Activity plan tab as part of the application workflow. Then, as a system manager, confirm and resolve tasks created as part of the Activity plan.
The following table provides the credentials that you need to complete the challenge:
| Role | User name | Password |
|---|---|---|
| Admin | pgpcosmossysadmin | rules |
| Manager | pgpcosmosmanager | rules |
Challenge Walkthrough
Detailed Tasks
1 Create the Consent agreement
- In the navigation pane of App studio, click Case types and then click the Grant case type.
- On the Workflow tab, in the Create stage, click + Step > More > Processes.
- In the Processes list, click Consent Agreement and then click Select.
- In the Step configuration pane, In the Source list, select By name.
- In the Consent agreement template list, select Federal Consent Agreement, and then select the Is e-signature required? checkbox.
- In the header of App Studio, click Save and run to run a new instance of the Grant case type.
- In the New Grant window, In the Person ID list, select PERSONS-6, and then click Submit.
- In the New Grant window, in the Passport row, click + Attach.
- In the Add document window, in the Name field, enter Passport.
- In the Content field enter Passport and then click Submit.
- In the New Grant window, in the License row, click + Attach.
- In the Add document window, in the Name field, enter License.
- In the Content field enter License doc and then click Submit.
- In the document intake pane, click Submit.
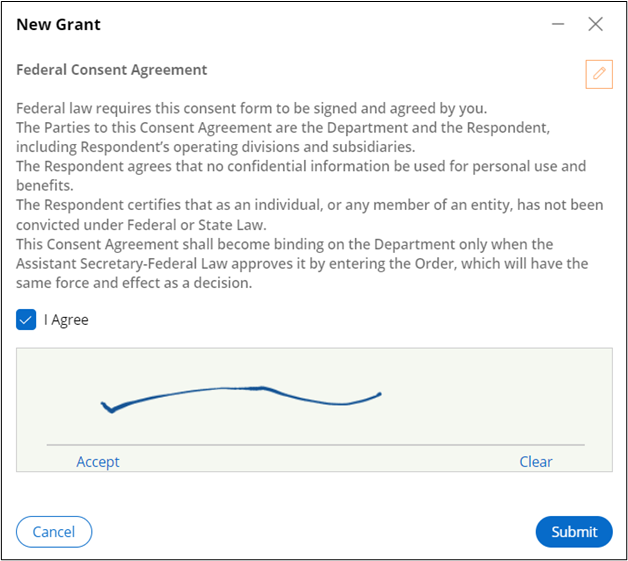
- In the New Grant window, in the Federal Consent Agreement section, use your mouse to enter a signature in the field below, and then select the I Agree check box.
- Click Accept below the signature field and then click Submit.
- In the Review checklist window, in the Checklist section, select the Identification document, Land registration document, and Finance document check boxes.
- Click Submit to submit the checklist.
- In the Evaluate section, in the Score column, use the sliders to increase the Score value for Financial Criteria to 91, and the Score value for Personal Criteria to 96.
- Wait for the circular Approve graph to finish filling, and then click Submit.
- In the Verify Document section, click Go.
- Select the Approve radio button and then click Submit to verify the documents.
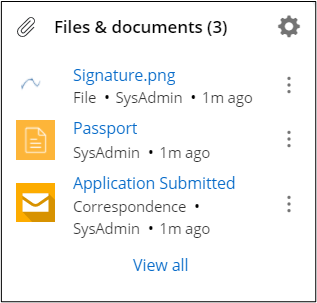
- Expand the Utility pane and check that the signature file and other documents are displayed in the File & documents section.
2 Create the Activity plan
- In the navigation pane of App studio, click Case types and then click the Grant case type.
- On the Workflow tab, in the upper-right corner, click Optional Actions.
- In the Review stage, click + ACTION, and then click Process.
- Rename the process to Activity Plan.
- Delete the Review (1) step.
- Click + Step > More > Processes > Add activity plan, and then click Select.
- Click Save.
- In the header of App Studio, click Preview.
- In the left pane, click Activity Plan.
- Click the TASKS tab, and then click Add task.
- In the New task dialog box, enter the following information:
Task Name
Due in
Unit
Description
Provide Clean water
10
Days
Providing clean water
- Click Submit.
- Click the GOALS tab, and then click Add goal.
- In the New goal dialog box, enter the following information:
-
Goal Name
Due in
Unit
Description
Clean water drive in the neighborhood
10
Days
Clean water drive in the neighborhood
- Click + Add task.
- Select the Select existing task radio button and then, in the Task list, select the Provide Clean Water task.
- Click Submit.
- Click the ACTIVITY PLANS tab, and then click Add activity plan.
- In the New plan template dialog box, enter the following information:
Activity Plan Name
Due in
Unit
Description
Grant activity plan
15
Days
This activity plan drives clean water
- Click Submit.
- In the New plan template window, click + Add task.
- In the New task dialog box, select the Create custom task radio button, and then enter the following information:
Task Name
Due in
Unit
Description
Sanitation Drive
10
Days
Sanitization drive in the community
- Click Submit.
- In the New plan template window, click Submit.
- In the header of App Studio, click Exit Preview.
- In the upper-right corner, click Save and run.
3 Create the Activity plan view
- Click Save and run to run a new instance of the Grant case type.
- Run through the case to the Review Checklist window, and in the View pane, in the upper-right corner, click Configure this view.
- In the Case information pane on the right, expand the Case information list and then select Case Main Inner.
- In the Main content (Grouped - Default) section, click the + icon to view a list of available tabs.
- In the Add... pane, in the Activity plan tab row, click the + icon.
- Click Close to return to the Case main innerpane.
- In the Activity plan tab row, click the Edit icon.
- In the Activity plan tab pane, in the upper-right corner, click Settings.
- In the Section pane, in the Container settings section, select the Include Icon or value check box.
- Click the Icon or value type list and select Property value.
- In the Property value field, enter or select .Plancount.
- Click Apply.
- Click the Close button to return to the tab.
- Click Actions > Refresh.
- In the left pane, click Activity plan, and then click Add activity plan.
- In the window, select the Select existing activity plan template radio button.
- In the Activity plan list, select Grant activity plan, and then click Submit.
- Expand the Assigned to list and select PGP Cosmos Manager.
- Click Submit.
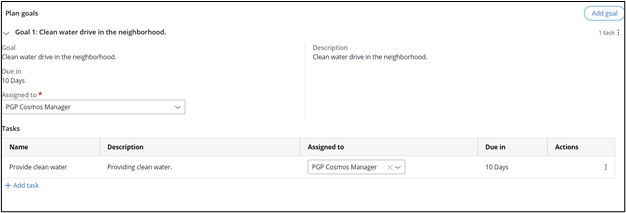
- In the window, in the section, click Grant activity plan and then, in the Activity plan: Grant activity plan section, click Add goals and tasks.
- In the window, in the section, in the Assigned to field, select PGP Cosmos Manager.
- Click Submit.
- In the window, select the Select existing goal radio button.
- In the Goal field, select Clean water drive in the neighborhood.
- Click Submit.
- In the window, in the section, in the Assigned to list, select PGP Cosmos Manager.
- In the section, in the Assigned to list, select PGP Cosmos Manager.
- Click Submit.
- Expand the Grant activity plan list and select the Grant case type.
- In the lower-left corner of App Studio, click the user icon, and then click Log off.
Confirm your work
- Log in to the Grants Management Application as a Manager:
- In the User name field, enter pgpcosmosmanager.
- In the Password field, enter rules.
- In the My worklist section, in the Perform task row for Sanitization Drive, click Go.
- In the Completion notes field, enter Completed and then click Submit.
- Ensure that the task has the Resolved-Completed status.
- In the TASK details pane on the left, click Grant activity plan.
- On the Create goals and tasks tab, in the upper-right corner, click Go.
- In the Completion notes field, enter Completed and then click Submit.
- In the TASK details pane on the left, expand the TASK number and then click Grant in the menu.
- In the Grant window, in the details pane on the left, click Activity plan.
- Check that the task details are correct.
- Expand the Grant activity plan row and check that the task details are correct.
Available in the following mission:
If you are having problems with your training, please review the Pega Academy Support FAQs.
Want to help us improve this content?


