Adding framework components to a solution
Archived
8 Tasks
45 mins
Beginner
Robotic Process Automation
English
Scenario
The first two application projects are complete. After reviewing the solution's documentation, you need a user interface project, named MainPrj, which contains a Windows form to display the customer information and display the nearest store address based on the customer's ZIP code. Because many cases may be open at one time, use a combo box to collect the account numbers so that the agent can switch customers when selecting a different account number in the combo box.
From the solution documentation, you want to display the customer account information from the CRM application in the Customer Information window. To communicate and pass data efficiently from one project to another, use the Interaction Framework for the solution and update the framework XML file to account for the customer information and store information.
The solution documentation states that the final solution must act and be deployed as one solution. The MainPrj contains the user interface that is the primary conduit to the other applications. The MainPrj project references the other projects to meet the business need and must be set as the start-up project for the solution as well.
When reviewing a case, the account numbers should display in the combo box on the Customer Information window to allow users to select and move between opened accounts with ease. One existing automation logs in to the CRM application and presses the User 1 button to access the first customer. Based on the case, when a customer account opens, the solution updates all necessary information and starts the Interaction Framework to begin storing and sharing data. The business case states that the interaction key for the framework must be the CRM account number.
Your assignment
In this part of the solution, complete the following tasks:
|
Object Name |
Properties to update |
Property Value |
|---|---|---|
|
Customer Information |
Text TopMost |
Customer Information True |
|
label1 |
Design (Name) Text Font > Bold Font > ForeColor - |
MainlblCurrentAcct Current Account True Highlight |
|
label2 |
Design (Name) Text Text Font > Bold Font > ForeColor |
MainlblGetAcct Get Account True Highlight |
|
label3 |
Design (Name) Text Text Font > Bold Font > ForeColor |
MainlblName Customer Name (True) Highlight |
|
label4 |
Design (Name) Text Text Font > Bold |
MainlblAddress Address True |
|
label5 |
Design (Name) Text Text Font > Bold |
MainlblCity City True |
|
label6 |
Design (Name) Text Text Font > Bold |
MainlblState State True |
|
label7 |
Design (Name) Text Text Font > Bold |
MainlblZip ZIP Code True |
|
combobox1 |
Design (Name) MaxDropDownItems Sorted |
MaincmbGetAcct 100 True |
|
textbox1 |
Design (Name) Text |
MaintxtCurrentAcct -------- (eight dashes) |
|
textbox2 |
Design (Name) |
MaintxtName |
|
textbox3 |
Design (Name) |
MaintxtAddress |
|
textbox4 |
Design (Name) |
MaintxtCity |
|
textbox5 |
Design (Name) |
MaintxtState |
|
textbox6 |
Design (Name) |
MaintxtZip |
|
Groupbox1 |
Design (Name) Text |
MaingboxNearestStore ACME Nearest Store |
|
Button1 |
Design (Name) Text |
MainbtnNearestStor Find Store |
| Label 8 |
Design (Name) Text |
MainlblNearestStore ----- (five dashes) |
- Add a project, named MainPrj and set it as the startup project.
- Add a Windows form to the MainPrj named CustomerInformation.
- Add the following .Net controls from the Toolbox and update the properties based on the following table:
- Add a global container to the CRMPrj and MainPrj projects and name them _GC_CRM and _GC_Main, respectively.
- Add the interaction-call.xml to the MainPrj folder in the TrainingCertificationSln directory
- Add and configure the Interaction Manager component to the global containers in the CRMPrj, ACMESearchPrj, and MainPrj projects. Rename each Interaction Manager component to IntMgr and associate the components to the interaction-call.xml.
- Add the seven account information items, their data types, and default values to the interaction-call.xml document.
Context Item Data Type Default Value AcctNum String 10000 Name String [No Active Call] Adress String xxxxx City String xxxxx State String xxxxx ZipCode String xxxxx NearestStore String xxxxx - From the MainPrj, create project references to the CRMPrj and the ACMESearchPrj.
- Set the frmTest project item in ACMESearchPrj to Not to run.
- Create an automation, CRM_E_CRMChild_Created, to start an interaction from the CRMChild Created event
- Create an automation to add the customer's account number to the combo box after the interaction begins.
- Create an automation to close the interaction when the CRMChild window closes.
- Create an automation that removes the account number from the combo box when the CRMChild window closes.
Detailed Tasks
1 Create a new project and the user interface
- From the Solution Explorer, right-click the TrainingCertificationSln and select Add > New Project to display the Add New Project window.
- In the Add New Project window, select Empty Pega Robotics Project.
- In the Name field on the Add New Project window, enter MainPrj.
- Click OK to close the window and update the Solution Explorer with the new project.
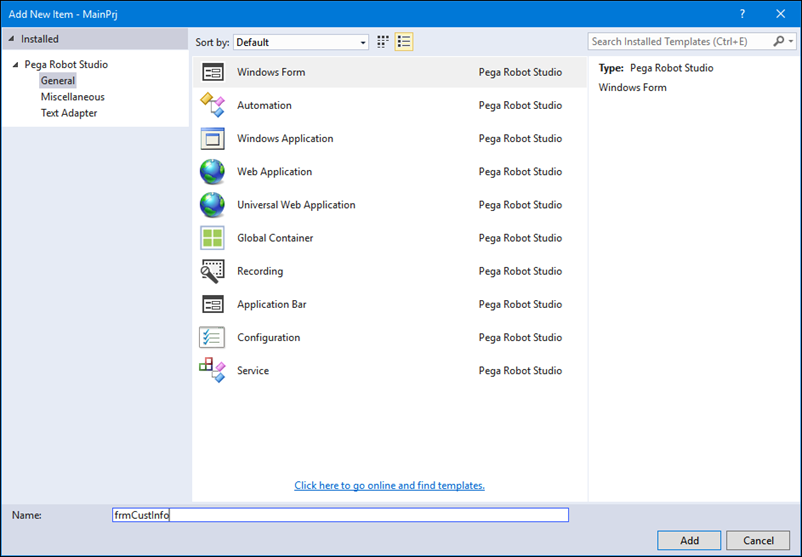
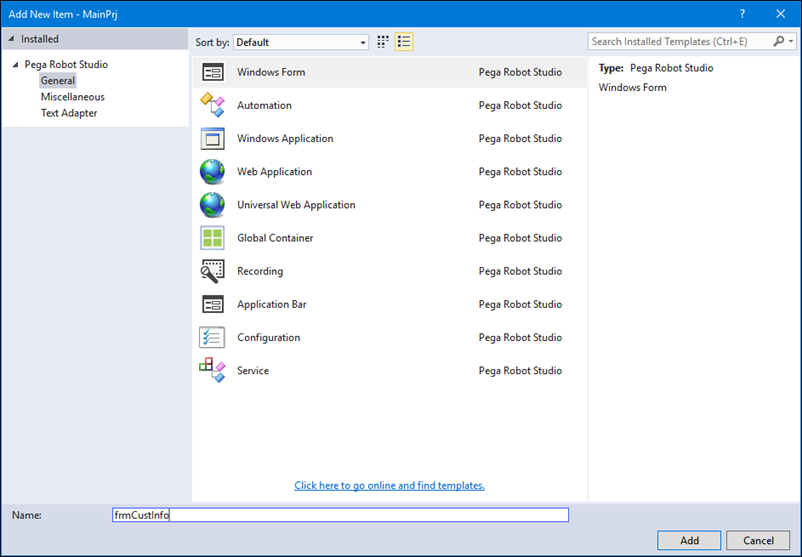
- From the Solution Explorer, right-click MainPrj and select Add > New Windows Form to display the Add New Item window with the Windows Form item highlighted.
- In the Name field on the Add New Item window, enter frmCustInfo.
- On the Add New Item window, click Add to close the window and open the frmCustInfo.os tab in the design area.
- In Object Hierarchy, click frmCustInfo to highlight the control and to update the Properties window.
- In the Properties window, locate the Text property and change the property name to Customer Information.
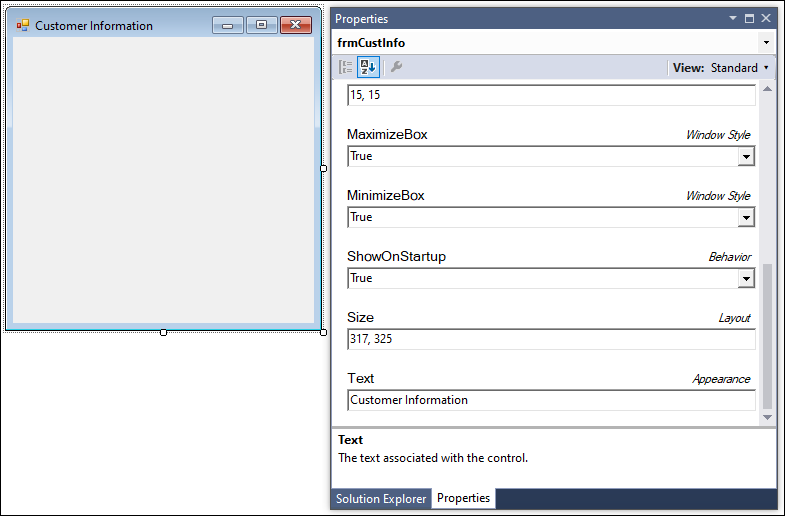
- In the Properties window, set the TopMost property to True.
- From the menu bar, select File > Save All to save the changes.
- In the Toolbox, expand the Common Controls and Containers sections to locate the needed controls.
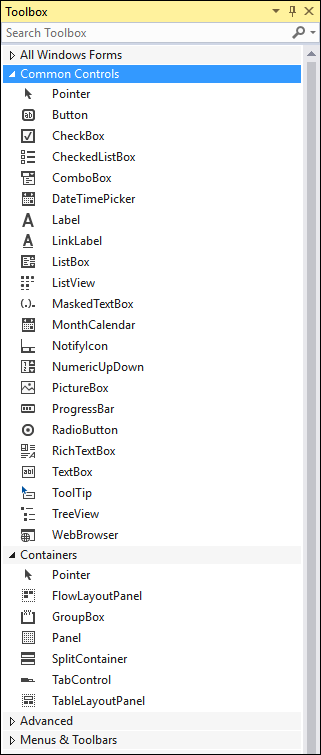
- From the Toolbox, drag and drop the following controls onto the Customer Information window and arrange the controls as shown in the following image.
- 8 Label controls
- 6 Textbox controls
- 1 ComboBox control
- 1 GroupBox control
- 1 Button control

- From the menu bar, select File > Save All to save the user interface.
- Using the Properties window, update the properties of each control after selecting each control in the Object Hierarchy.
Object Name
Properties to update
Property Value
label1
Design Name
Text
Font > Bold
Font > ForeColor -
MainlblCurrentAcct
Current Account
True
Highlight
label2
Design Name
Text
Text Font > Bold
Font > ForeColor
MainlblGetAcct
Get Account
True
Highlight
label3
Design Name
Text
Text Font > Bold
Font > ForeColor
MainlblName
Customer Name
(True)
Highlight
label4
Design Name
Text
Text Font > Bold
MainlblAddress
Address
True
label5
Design Name
Text
Text Font > Bold
MainlblCity
City
True
label6
Design Name
Text
Text Font > Bold
MainlblState
State
True
label7
Design Name
Text
Text Font > Bold
MainlblZip
ZIP Code
True
combobox1
Design Name
MaxDropDownItems
Sorted
MaincmbGetAcct
100
True
textbox1
Design Name
Text
MaintxtCurrentAcct
-------- (eight dashes)
textbox2
Design Name
MaintxtName
textbox3
Design Name
MaintxtAddress
textbox4
Design Name
MaintxtCity
textbox5
Design Name
MaintxtState
textbox6
Design Name
MaintxtZip
Groupbox1
Design Name
Text
MaingboxNearestStore
ACME Nearest Store
Button1
Design Name
Text
MainbtnNearestStor
Find Store
Label 8 Design Name
Text
MainlblNearestStore
----- (five dashes)
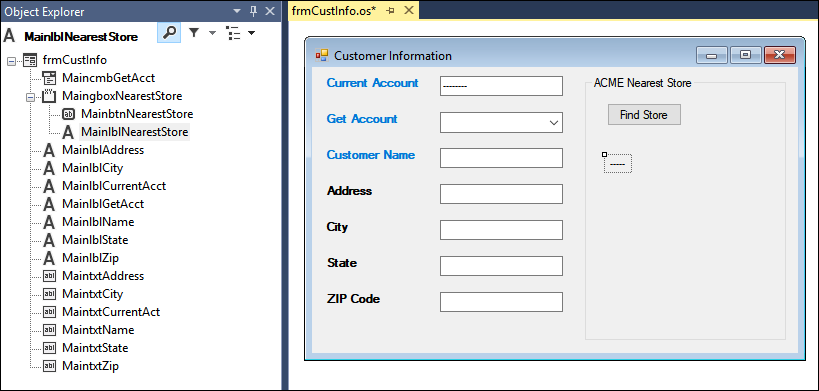
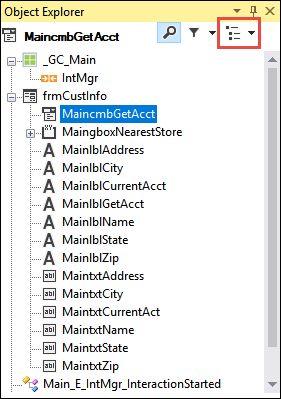
The Object Explorer window should look like the following image:
- From the menu bar, select File > Save All to save the edits to the user interface.
2 Add the Interaction Manager component
- In Solution Explorer, right-click CRMPrj and select Add > New Item to display the Add New Item window.
- In the Add New Item window, click Global Container to highlight the project item.
- In the Name field on the Add New Item window, enter _GC_CRM.
- On the Add New Item window, click Add to close the window and open the global container in the design area.
- Repeat steps 1-4 to create a global container for MainPrj named _GC_Main.
- Click to download the interaction-call.zip file.
- In the solution directory located in your My Documents, copy and paste the interaction-call.xml to the MainPrj project folder C:\Users\{userid}\Documents\Pega Robot Studio\Projects\TrainingCertificationSln\MainPrj.
- In Solution Explorer, double-click _GC_CRM.os to open the global container in a designer window.
- In the Interaction Management section of the Toolbox, drag and drop InteractionManager onto the _GC_CRM.os window.
- In the Properties window, in the (Name) field, rename interactionManager1 to IntMgr.
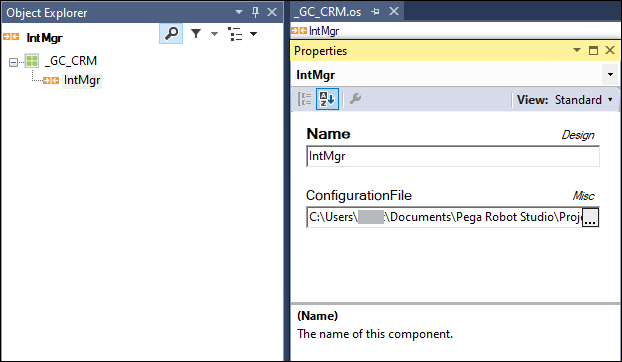
- In the Properties window for the IntMgr, click the Configuration File property to display an ellipses button.
- In the Configuration file property, click the ellipses to display the Open File window.
- In the Open File window, in the solution directory, navigate to the MainPrj project folder.
- In the MainPrj folder of the Open File window, click interaction-call.xml to select the file.
- On the Open File window, click Open to associate the file and close the Open File window.
- Repeat steps 8-15 to add an Interaction Manager component to the _GC_Main and _GC_ACME.
- From the menu bar, select File > Save All to save the new global containers to the projects and the Interaction Manager components.
3 Create project-to-project references
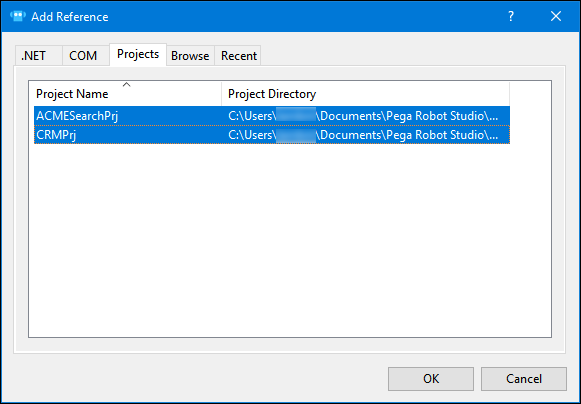
- In the Solution Explorer, right-click MainPrj project and select Add Reference to open the Add Reference window.
- On the Add References window, click the Projects tab.
- On the Project tab, select CRMPrj and ACMESearchPrj while holding down Shift.
- On the Add References window, click OK to close the Add Reference window and display the projects in the Reference folder under MainPrj in the Solution Explorer.
- In the Solution Explorer, right-click MainPrj and select Manage Imported Projects to open the Import Projects window.
- On the Import Projects window in the Available Projects list , click >> to move both projects into the Imports list.
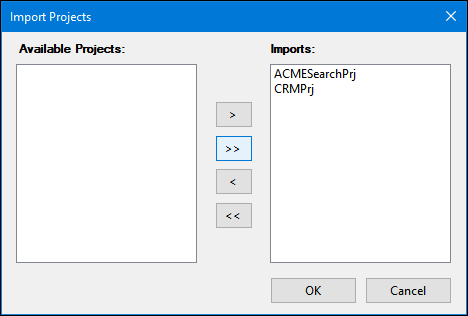
- On the Import Projects window, click OK to close the window and import projects to MainPrj.
- In the Solution Explorer, right-click MainPrj and select Set as StartUp Project. The MainPrj text turns bold.
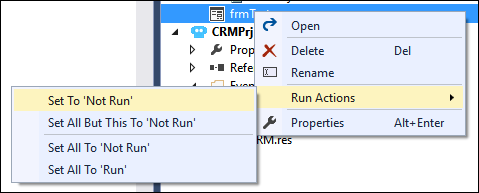
- In the Solution Explorer in ACMESearchPrj, right-click frmTest and select Run Actions > Set To 'Not Run' to display a small red stop icon on the project item in the Solution Explorer.
- From the menu bar, select File > Save All to save the editing.
4 Create an automation to add the account number to the combo box after the interaction starts
- In the Solution Explorer, right-click the MainPrj project and select Add > New Folder.
- In the Solution Explorer on the new folder, enter Events to rename the folder.
- In the Solution Explorer, right-click the Events folder and select Add > New Automation to open the Add New Item window.
- In the Name field on the Add New Item window, enter Main_E_IntMgr_InteractionStarted.
- On the Add New Item window, click Add to close the window and open the automation opens in the design area.
- From the Object Hierarchy in _GC_Main, click IntMgr to highlight the InteractionManager component.
- In the Object Inspector, click Show Events Only to filter for events.
- From the list of events, drag and drop InteractionStarted to the automation.
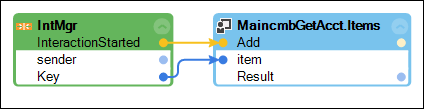
- In the upper-right corner of the IntMgr.InteractionStarted design block, click the up arrow to expose the Key parameter.
- In the Object Hierarchy in the frmCustInfo, select the MaincmbGetAcct control to highlight it.
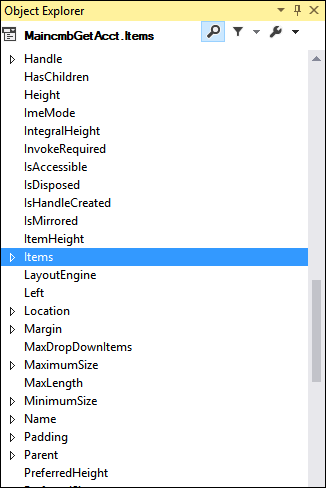
- In the upper-right corner of Object Explorer, select Explore Component Properties to refresh the Object Hierarchy for component properties.
- In the Component Properties results, scroll down the list of components and select Items to highlight the component.
- In Object Inspector, click Configure Type to display the Object Configuration window.
- In the Object Configuration window, expand the Methods category.
- From the Object Configuration window, select the Add (1 parameter) method check box and the Remove (1 parameter) method check box.
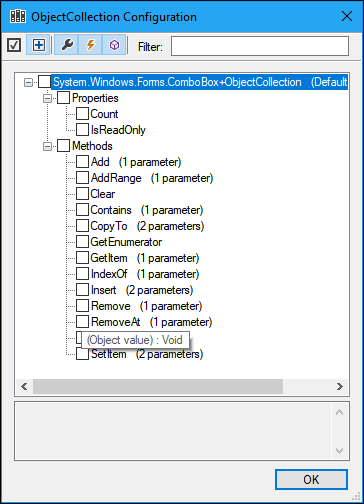
- On the Object Configuration window, click OK to close the window.
- In the Object Inspector, click Show Methods Only to display the object's methods.
- In the Object Inspector, drag and drop the Add method to the automation.
- In the automation, connect the design blocks as shown in the following image .
- From the menu bar, select File > Save All.
- From the menu bar, select Debug > Start Debugging. The combo box has the account number 23453.
- In the CRM application, click User 2. Account number 23454 populates the combo box.
- From the menu bar, select Debug > Stop Debugging to stop debugging and close the windows.
5 Modify the interaction-call.xml
- In Solution Explorer, double-click _GC_Main.os to open it in the design area.
- In the _GC_Main window, right-click IntMgr to display a context menu.
- In the context menu, select Modify Configuration to open the interaction-call.xml file in the design area.
- In the interation-call.xml, locate the Context section.
- In the context section, add the following new context values. For each new or edited line in the XML file, a yellow marker is displayed in the left margin.
Context Item Data Type Default Value AcctNum String 10000 Name String [No Active Call] Address String xxxxx City String xxxxx State String xxxxx ZipCode String xxxxx NearestStore String xxxxx 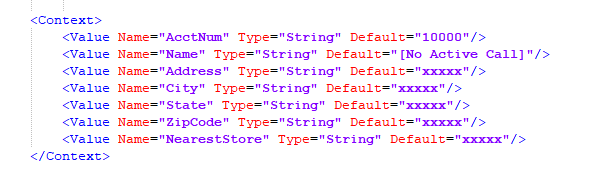
- From the menu bar, select File > Save All to save the edits to the XML file. The yellow markers in the file are displayed in green.
- From the menu bar, select Build > Clean Solution to remove any items from memory.
- When finished, from the menu bar, select Build > Rebuild Solution to ensures that the new XML entry is available to use in the solution and removes the old XML stored in the memory cache.
6 Create an automation to start an interaction from the CRMChild window
- In the Solution Explorer in the CRMPrj project, right-click the Events folder and select Add > New Automation to display the Add New Item window.
- In the Name field on the Add New Item window, enter CRM_E_CRMChild_Created.
- On the Add New Item window, click Add to close the window and open the automation in the design area.
- In the automation, add the following design blocks.
Note: If a property, event, or method does not exist for a control in the Object Inspector, click the Configure Type icon to select more options to display.
Project Item Source Control Description/Configuration CRM CRMChild.Created event For this solution, any time a New Call window displays, the automation logic runs. CRM CRMlblAcctNum.WaitForCreate method This method waits for the Account Number field to create before assigning its value to the Key property of the CRMChild. CRM CRMlblAcctNum.Text property The text of the account number is the key. CRM CRMChild.Key property Assign the Key property of the CRMChild as the account number text. _GC_CRM CRMIntMgr.StartInteraction (2 parameters) method On the design block, click Activate and set the property to True. - In the automation, connect the design blocks like the following image .

- From the Advanced section of the Toolbox, drag and drop a MessageDialog component in the automation to display the Overwrite window.
- On the Overwrite window, select the second radio button and click OK to add the design block to the automation.
- In the MessageDialog1 design block, click message and enter CRM Account is not available.
- In the automation, connect the CRMlblAcctNum.WaitForCreate False output to the MessageDialog1.Show input as shown in the following image.
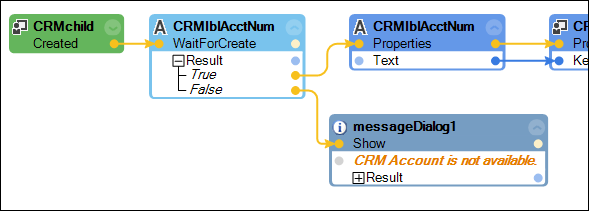
- From the menu bar, select File > Save All to save the automation edits.
7 Create an automation to close the interaction when the CRMChild window closes
- In the Solution Explorer in CRMPrj, right-click Events and select Add > New Automation to display the Add New Item window.
- In the Name field of the Add New Item window, enter CRM_E_CRMChild_Closing,
- On the Add New Item window, click Add to close the window and open the automation in the design area.
- From the Object Explorer, add the following design blocks to the CRM_E_CRMChild_Closing automation.
Project Item Source Control Description/Configuration CRM CRMChild.Closing event For this solution, any time a CRMChild window closes, the automation logic runs. CRM CRMlblAcctNum.Text property The text property provides the value of the interaction key in the framework CRM IntMgr.CloseInteraction method The Close Interaction method removes the any stored context values in memory based on the interaction key. - In the automation, connect the design blocks as shown in the following image. When connecting the CRMlblAcctNum to the IntMgr.CloseInteraction, a Key parameter is displayed that requests the identification of the interaction to close. Select None and change to Key. This allows you to define the interaction key as the account number.
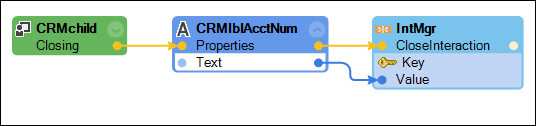
- From the menu, select File > Save All to save your automation.
8 Create an automation to remove the account number from the combo box when the CRMChild window closes
- In the Solution Explorer of the MainPrj, right-click Events and select Add > New Automation to display the Add New Item window.
- In the Name field of the Add New Item window, enter Main_E_IntMgr_InteractionClosed,
- On the Add New Item window, click Add to open the automation in the design area and close the window.
- From the Object Explorer, add the following design blocks to the Main_E_IntMgr_InteractionClosed automation.
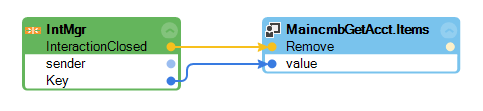
Project Item Source Control Description/Configuration _Main_GC IntMgr.InteractionClosed event Click the down arrow in the design block to expose the interaction key parameter. CustomerInformation MaincmbGetAcct.Items.Remove method Use the Explore Component properties button on the Object Explorer to access the Remove method. - In the automation, connect the design blocks as shown in the following image.
- From the menu bar, click File > Save All to save the automations
- From the menu bar, select Debug > Start Debugging. The combo box has the account number 23453.
- In the CRM application, click User 2. Account number 23454 populates the combo box.
- In the CRM Application, close a customer window. The account number associated with the window disappears from the combo box.
- From the menu bar, select Debug > Stop Debugging to stop debugging and close the windows.