Adding predictors to an adaptive model
6 Tasks
10 mins
Beginner
English
Scenario
U+ Bank is implementing cross-selling of their credit cards on the web by using Pega Customer Decision Hub™. The implementation team has set up the business taxonomy, contact policy rules, arbitration, and real-time containers in Next-Best-Action Designer.
After the initial setup, the team used Pega Customer Profile Designer to implement industry-specific best practice clickstream summaries. The summaries extend the customer profile with real-time behavioral data.
As a data scientist, you make this added data available to the adaptive models.
Simulate customer behavior on the U+ Bank website by clicking or ignoring the credit card offer and by visiting other pages on the website to capture customer behavior. Explore the results on the Model management landing page and in Customer Profile Viewer.
Use the following credentials to log in to the exercise system:
| Role | User name | Password |
|---|---|---|
| Data Scientist | DataScientist | rules |
Your assignment consists of the following tasks:
Task 1: Inspect the prediction configuration.
As a Data Scientist, inspect the settings of the Predict Web Propensity prediction.
Task 2: Inspect the adaptive model configuration.
Inspect the model update frequency and the advanced settings. Validate that most of the customer properties are already configured as predictors for the Web_Click_Through_Rate_Customer model that drives the prediction at the customer level.
Task 3: Add new predictor fields.
Enhance the predictor list with the recently added properties from the Custom page Customer pages. Add all fields from the FSClickstream.
Task 4: Simulate customer interactions.
Repeatedly log in to the U+ Bank website as Troy and click the credit card offer to generate a target outcome. Click on other pages of the website to record more customer behavior data.
Caution: Click the banner within one minute to record the target Clicked behavior, otherwise the alternative NoResponse behavior is recorded. Allow one minute between logins.
Task 5: Explore the Model management landing page.
Inspect the latest responses and the model list. Generate alternative outcomes by logging in to the U+Bank website and ignoring the credit card offer.
Task 6: Explore the Customer Profile viewer.
Use the Customer profile viewer > Decision history report to examine the Original model propensity values. Troy's subject ID is 14. Check that after target responses, the original model propensity of an offer increases and that after alternative responses, the original model propensity decreases.
Note: The final propensity calculated by the prediction does not only depend on the original model propensity but also on a mechanism that introduces noise while the evidence is low. As the model learns from the target and alternative responses, the noise decreases. This ensures that new actions do get some exposure, even when their models are still immature.
Challenge Walkthrough
Detailed Tasks
1 Inspect the prediction configuration
- On the exercise system landing page, click Pega Infinity™ to access Customer Decision Hub.
- Log in as a data scientist:
- In the User name field, enter DataScientist.
- In the Password field, enter rules.
- In the navigation pane on the left, click Intelligence > Prediction Studio to open the Prediction Studio portal.
- Click the Predict Web Propensity prediction tile to open the prediction.
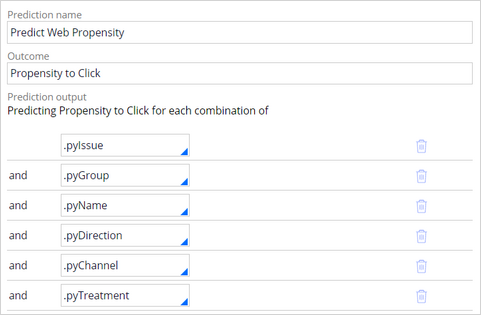
- On the Settings tab, in the Prediction details section, click Configure.
- Confirm that the prediction predicts the propensity to click for each combination of offer, direction, channel, and treatment.
- Click Cancel.
- In the Control group section, notice that the control group settings are not set from Prediction Studio.
Note: The control group settings determine the percentage of customers that receive an offer that is not based on AI. These fields are set in NBA Impact analyzer.
- In the Response labels section, confirm that the Target label is set to Clicked and that the Alternative label is set to NoResponse.
- In the Response timeout section, confirm that the timeout is set to a fixed time frame of 1 minute.
Note: After the timeout elapses, the alternative label NoResponse is recorded. The response timeout setting depends on the specific use case and is set to the minimum value of one minute in this exercise system for demonstration purposes.
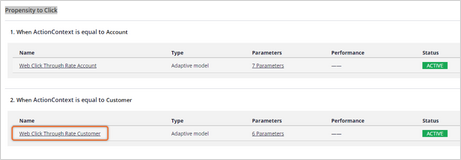
- On the Models tab, in the Propensity to Click section, click Web_Click_Through_Rate_Customer to open the model.
2 Inspect the adaptive model configuration
- On the Web_Click_Through_Rate_Customer form, click the Settings tab.
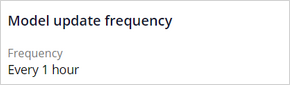
- In the Model update frequency section, check that the model instances are updated every hour.
- In the Recording historical data section, you can turn on the recording of the predictor values and the outcome for every decision.
- Inspect the advanced settings.
Caution: The advanced settings are based on best practices and should only be changed by a highly experienced data scientist.
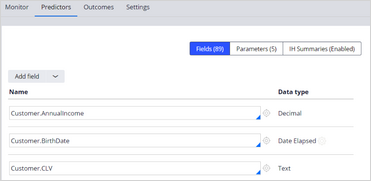
- Click the Predictors tab to view the lists of available types of predictors: regular fields, parameterized fields, and fields based on interaction history summaries.
3 Add new predictor fields
- On the Fields tab, expand the Add field menu and select Add multiple fields to open the Add predictors dialog box.
- In the Add predictors dialog box, expand the Custom page Customer, and then click Page FSClickstream.
- In the Page FSClickstream list, select the Name checkbox to select all fields.
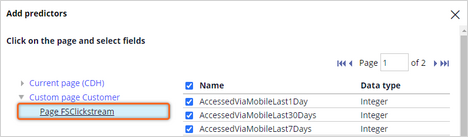
- Click Submit to add the predictors.
Note: The FSClickstream page represents the customer behavioral data that is introduced by the system architect after the installation of the Customer Profile Designer Accelerator component. The component is available from Pega Marketplace.
- In the upper-right corner, click Save.
4 Simulate customer interactions
- On the exercise system landing page, in the upper-left corner, open the Application Switcher and click the U+ Bank icon to open the website.
- On the U+ Bank website, in the upper-right corner, click Log in to log in as a customer.
- In the Username drop-down list, ensure that Troy is selected, and then click Sign in. A credit card offer is displayed. Troy is eligible for two credit offers: the Standard Card and the Rewards Card.
 Tip: Take note of the specific credit card that Troy receives to investigate the model details in a later task.
- Click the Learn more link below the offer to generate a target response.
- Visit some other pages on the website, and then log out.
Caution: Click the banner within one minute to record a target response, otherwise an alternative response is recorded. Allow one minute between logins.
- Repeat steps 2-5.
5 Explore the Model management landing page
- Return to Prediction Studio.
- In the navigation pane on the left, click Predictions to open the predictions landing page.
- In the upper-right corner, click Actions > Model management.
- In the upper-right corner, click Actions > Refresh.
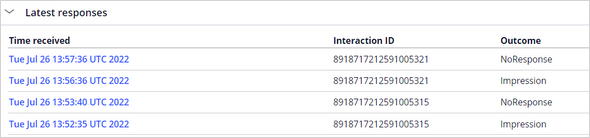
- Expand the Latest responses section and verify that for both interactions an Impression outcome, and then a Clicked outcome, are captured.

- In the models list, click Adaptive model rule to sort the table.
Note: The OmniAdaptive model configuration acts at the action level, and the Web Click Through Rate model rule acts at the treatment level.
- In the row for the Web Click Through Rate model that has received responses from Troy, click the More icon and then select Model details.
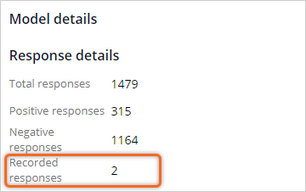
- Notice that the Recorded responses field shows the number of responses recorded since the last model update.
- Close the Model details window.
- On the U+ Bank website, generate two negative outcomes by logging in twice as Troy and ignoring the web banner.
Caution: Because the alternative NoResponse response is recorded after one minute, you need to wait for one minute between logins.
- Return to the Model Management landing page in Prediction Studio, and in the upper-right corner click Actions > Refresh.
- Expand the Latest responses section, and verify that for both interactions an Impression outcome, and then a NoResponse outcome are captured.
- In the lower-left corner, click Back to Customer Decision Hub.
6 Explore Customer profile viewer
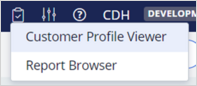
- In the upper-right corner, click Reports > Customer Profile Viewer.
- In Customer Profile Viewer, click the Type field, and select Customer name.
- In the Customer Name field, enter Troy, and select customer Troy Murphy.

- Click View to inspect the customer profile.
- On the Overview tab, in the Recent interactions section, confirm that for each click-through an Impression and a Clicked outcome are recorded, and that when you ignore the web banner, only an Impression outcome is recorded.
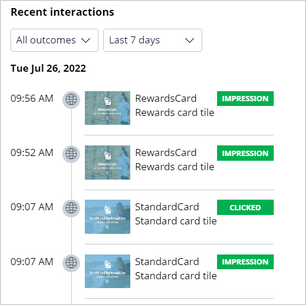 Note: The Impression outcome is recorded when the offer is presented to the customer.
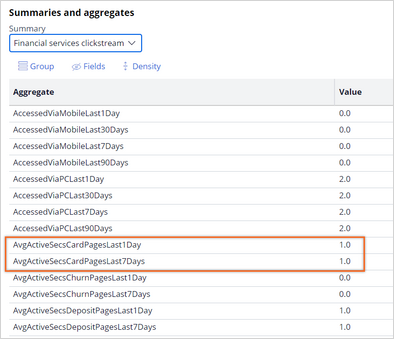
- On the Behavioral data tab, in the Summaries and aggregates section, select the Financial Services Clickstream.
- Verify that your visits to the other pages of the U+Bank website have been detected.
- On the Decision history tab, click Load all decisions.
- Click Fields to select the field displayed in the decisions table.

- Select the fields that you want to see in the decisions table but ensure that you include the following fields: Decision time, Name, Final propensity, Model control group, Original model propensity, and Model evidence.
- After the model updates, observe the new values of the Original model propensity and the Model evidence.
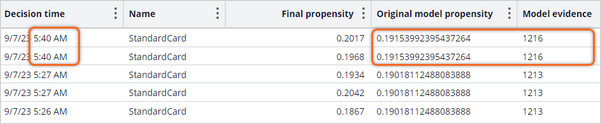 Note: The final propensity that the prediction calculates depends not only on the original model propensity but also on a mechanism that introduces noise when the evidence is low. As the model learns from the target and alternative responses, the noise decreases. This ensures that new actions do get some exposure, even when their models are still immature.
Available in the following mission:
If you are having problems with your training, please review the Pega Academy Support FAQs.
Want to help us improve this content?