Building a predictive model
Archived
11 Tasks
35 mins
Pega Customer Decision Hub 8.4
Beginner
English
Scenario
MyCo, a data service provider, would like to reduce the churn amongst its existing customers. You have been asked to create a predictive churn model, that will provide MyCo with means to identify the customers who are likely to defect to other suppliers. You decide to create the model in Prediction Studio.
Use the following credentials to log in to the exercise system:
| Role | Username | Password |
|---|---|---|
| Data Scientist | DataScientist | rules |
Your assignment consists of the following tasks:
Task 1: Create a predictive model
Create a new predictive model in the Retention category issue by using the Churn Modeling template.
Task 2: Select the data source
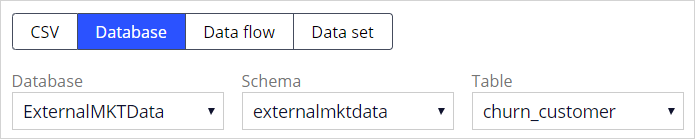
In the Data Preparation step, load the data by selecting database as your source of data. Use ExternalMKTData as the database, externalmktdata as the schema, and churn_customer for the table name.
Task 3: Set the sample size
Create a uniform sample that uses 100% of the data. Retain 20% for the test set and 20% for the validation set.
Task 4: Set the outcomes
In the Outcome definition, use a Binary model and churn as the outcome field. The value False. indicates loyal and True. indicates churned.
Task 5: Set the predictor roles
In the Data Analysis step, change the role for the customerid predictor to ignored.
Task 6: Examine predictors
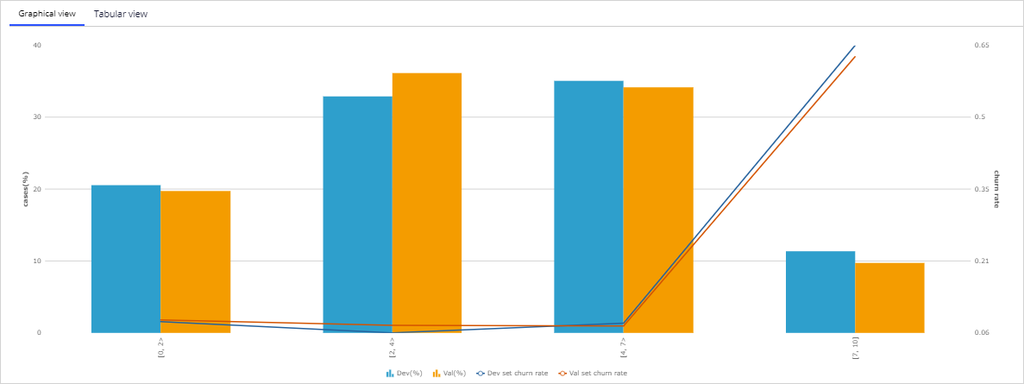
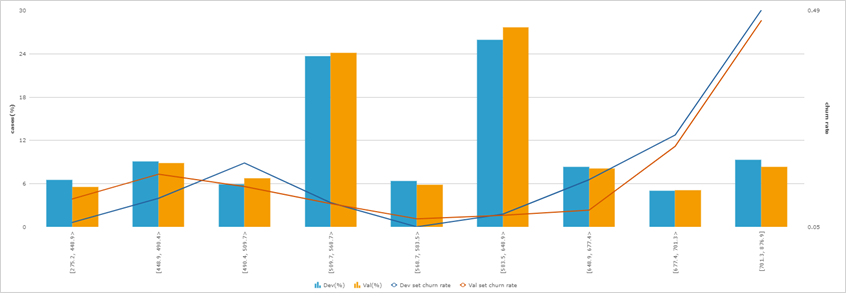
Examine the trends exhibited by predictors number_dropped_calls and total_day_minutes.
Task 7: Create a virtual field
Create a virtual field, total_minutes, which is a sum of total_day_minutes + total_eve_minutes + total_night_minutes. Examine the trend exhibited by this new predictor.
Task 8: Use the best predictor in each group
In the Model development step, for predictor grouping, use the best predictor of each group.
Task 9: Create a new decision tree model
Examine the Regression model in the Model creation step. Create a new decision tree model of type ID3 using all predictors except total_minutes and save it.
Task 10: Compare model scores
In the Model analysis step, compare the scores of the three models. Pay particular attention to Discrimination. Which model performs best?
Task 11: Save the selected model
In the Model selection step, save the Regression model as a predictive model rule. Use as Apply to class PegaMKT-Data-ChurnCustomer. Make sure all predictors are mapped to customer properties.
Challenge Walkthrough
Detailed Tasks
1 Create a predictive model
- Log in as a Data Scientist with user name DataScientist and password rules.
- In the navigation pane on the left, click Intelligence > Prediction Studio.
- In the navigation pane on the left, click Models.
- Click New > Predictive model.
- In the New predictive model dialog box, in the Name field, enter Churn Model as the name of the model.
- In the Category list, select Retention.
- In the Template field, select Churn Modeling as the template.
- Click Start
2 Select the data source
- In the Source selection section, click Database.
- In the three drop down lists, select the following values:
- Database: ExternalMKTData
- Schema: externalmktdata
- Table: churn_customer
- Check the data, and then click Next.
3 Set the sample size
- In the Select sampling method section, select Uniform sampling.
- Select 100 % of the sample.
- In the Hold-out sets section, retain 20 % of the sample for validation and 20 % of the sample for testing.
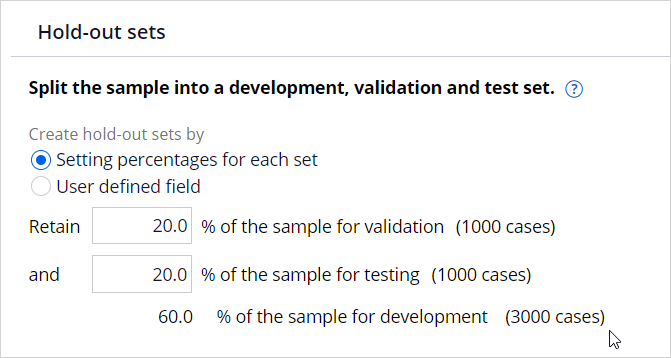
- Click Next.
4 Set the outcomes
- In the Outcome definition section, in the Model type list, select Binary.
- In the Outcome field to predict, select churn.
- In the Outcome category list for False., select loyal.
- In the Outcome category list for True., select churned.
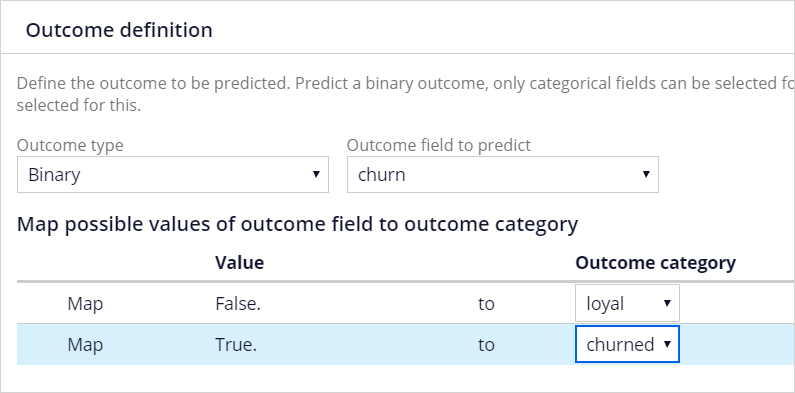
-
Note: Check the number of cases in the Development, Validation, and Test sets.
- Click Next.
5 Set the predictor roles
- In the Data analysis section, click the customerid check box.
- In the Change role list, select to IGNORED.
6 Examine predictors
- In the list of predictors, click number_dropped_calls and examine the grouping for this predictor.
- Click Cancel.
- Repeat steps 1-2 for the total_day_minutes predictor.
7 Create a virtual field
- In the Data analysis section, click New virtual field.
- In the Virtual field dialog box, in the Name field, enter total_minutes.
- Click Fields, select total_day_minutes, and then click Insert.
- Repeat this field selection step and build up the expression: {total_day_minutes} + {total_eve_minutes} + {total_night_minutes}.
- Click Validate.
- Click Save & close.
- Examine the newly created virtual field.
- Click Next.
8 Use the best predictor in each group
- In the Model development section, select Use best of each group.
- Click Next.
9 Create a new decision tree model
- In the Model creation section, click Regression.
- Scroll down and examine different ranges for the number_dropped_calls predictor. Notice that the band [7, 10] has far higher weight than others. What does this indicate?
- Click Cancel.
- In the Create model list, select Decision tree.
- Click Create model.
- Select ID3.
- In the total_minutes row, clear the Use predictor check box.
- Click Create.
- Examine the model created.
- Click Submit to save the model.
- Click Next.
10 Compare model scores
- Ensure that the check boxes next to all model names are selected.
- Click Analyze charts.
- Select the Discrimination tab, and then examine the results.
- In the upper left, click the arrow next to Model analysis charts.

- Click Next. Here, you can analyze the score distribution.
- Click Next. Here, you can analyze class comparison.
- Click Next.
-
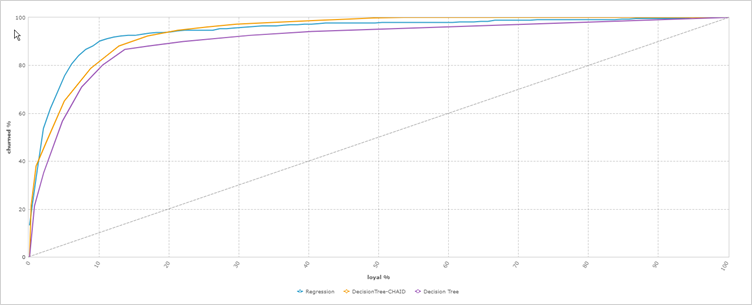
The results can be interpreted as follows:
- Both the Regression and DecisionTree-CHAID models outperform the Decision Tree model.
- For a low number of cases the Regression model outperforms the DecisionTree-CHAID model.
- As the number of cases increases the DecisionTree-CHAID overtakes the Regression model.
- However, before you choose the model you should also consider the number of predictors required by the model. Under certain circumstances you may decide to select a lower performing predicting model but one with fewer predictors. Note that all these models perform very well with a value around 90.
11 Save the selected model
- Confirm that the Regression model is selected.
- Under Save model, select Specify context.
- In the Apply to field, enter or select PegaMKT-Data-ChurnCustomer as the Apply to class.
- Click Finish.
- On the Model tab, inspect the training results.
- Click the Mapping tab and map all predictors to the appropriate fields.
-
Tip: Alternatively, click Create missing field to populate the field automatically. In a real life setting, this would require the consent of the system architect.
- Click Save.