Configuring conditional visibility in Constellation Views
3 Tasks
30 mins
Intermediate
Constellation
User Experience
English
Scenario
Work on the Tell Us More application from Sweet Life Inc. continues. In this challenge, you are tasked with configuring the View associated with the Contact Info Step. In addition to creating Customer data relationship for this View, you configure the conditional Visibility for the Address field.
The following table provides the credentials you need to complete the challenge:
| Role | User name | Password |
|---|---|---|
| System Architect | Author@SL | pega123! |
Note: Your practice environment may support the completion of multiple challenges. As a result, the configuration shown in the challenge walkthrough may not match your environment exactly.
Challenge Walkthrough
Detailed Tasks
1 Configure the Customer data relationship
- In the Pega instance for the challenge, enter the following credentials:
- In the User name field, enter Author@SL.
- In the Password field, enter pega123!
- In the navigation pane of App Studio, click Case Types > Incident to open the Incident Case Type.
- Click the Data Model tab.
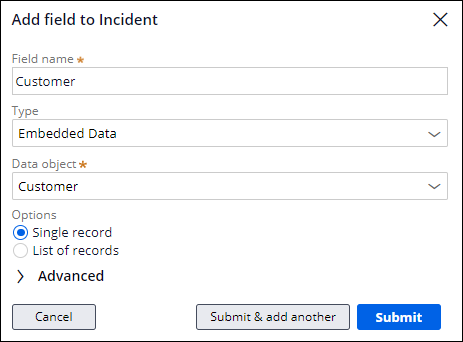
- Add a new data relationship field with the following details:
- In the Field name field, enter Customer.
- In the Type list, select Embedded Data.
- In the Data object list, select Customer.
- In the Options section, select Single record.
- Click Submit.
- Click Save.
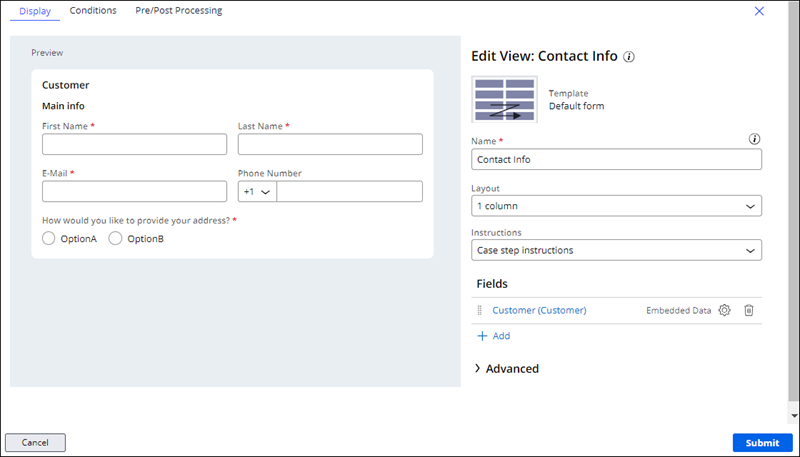
2 Create the Contact Info View
- In the Incident Case Type, click the Workflow tab.
- Click the Contact Info Step, and then in the contextual properties pane, click .
- In the Fields section, add the Customer data relationship field to the View.
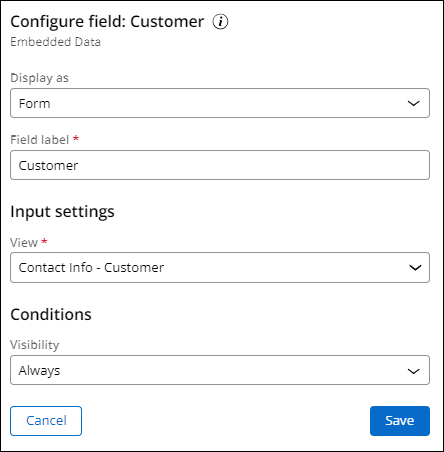
- In the Customer (Customer) row, click the Gear icon, and then confirm that the following settings are active:
- The value of the Display as field is Form.
- The value of the Field label field is Customer.
- The value of the View is Contact Info - Customer.
- Click Save.
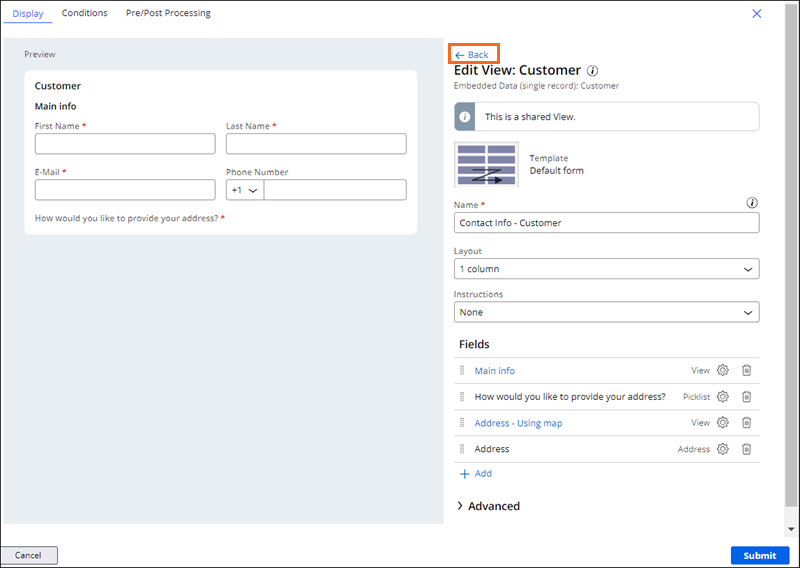
- Click Customer (Customer) to open the Edit View: Customer window.
Note that the Customer View already contains four fields. These fields were designated as Primary when the Customer data object was created.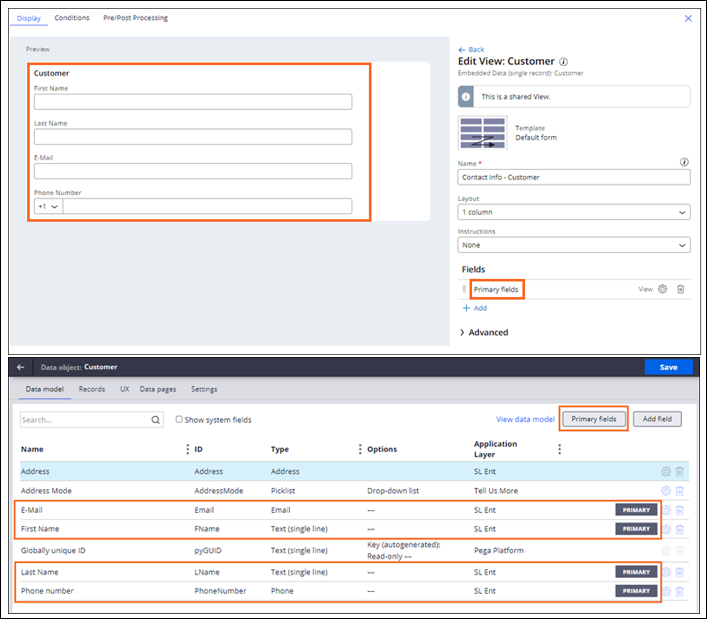
- In the Customer View, delete the Primary Fields field by clicking the Remove icon.
- Click Add > Views > Main Info > Add to add a previously-created View called Main info from the Customer data object.
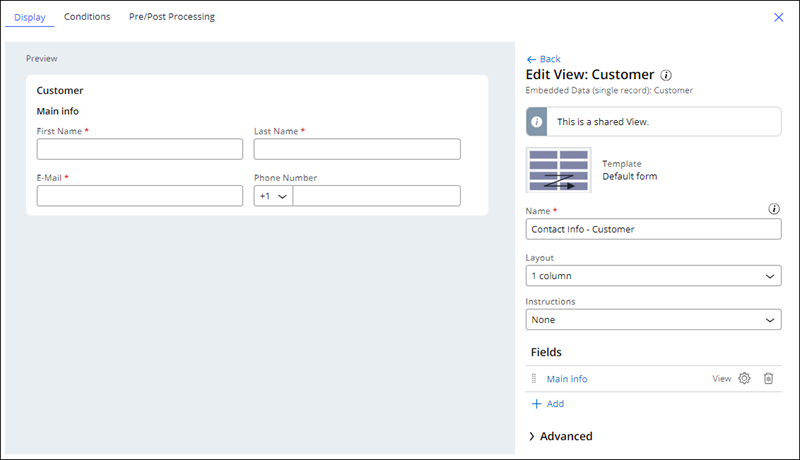
- Click Add > Fields > Address Mode > Add to add address information under the Main info View in the Customer View.
- In the Address Mode field row, click the Gear icon, and then configure the following settings:
- In the Display as list, select Radio buttons.
- In the Field label field, enter How would you like to provide your address?
- Select the Horizontal display checkbox.
- In the Required list, select Always.
- Click Save.
3 Add Address information to the Customer View
- Click Add > Views > Create new View to create a new View to collect the customer's address information by using a map, and then configure the following settings for the View:
- In the Name field, enter Address - Using map.
- Select Default form.
- Click Submit.

- In the Edit View: Address Using map window, click Add > Fields > Address > Fields > Location > Add to add a Location field.
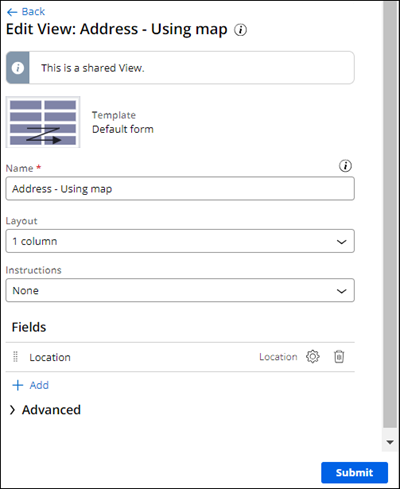
- In the Location field row, click the Gear icon, select the Show map checkbox, and then click Save.

- Click Back to return to the Edit View: Customer window.
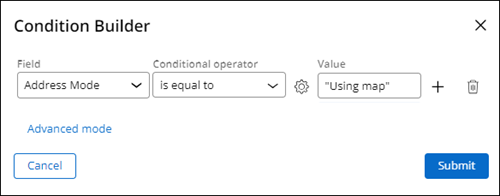
- Add conditional Visibility to the Address - Using map View:
- In the Address - using map field row, click the Gear icon.
- In the Heading field, enter Address.
- In the Visibility list, select Custom Condition.
- To the right of Visibility list, click the Gear icon.
- Set the Condition to Address Mode is equal to "Using map".
- Click Submit.
- Click Save.
- In the Fields section of the Edit View: Customer window, click Add > Fields > Address > Add to add the Address field from the Case Type Data Model to the Customer View.
Note: The Data-Address-Postal data type drives the Address field functionality.
- Configure conditional Visibility for the Address field:
- In the Address field row, click the Gear icon.
- In the Conditions section, in the Visibility field, select Custom Condition.
- To the right of the Visibility field, click the Gear icon.
- Set the Condition to Address Mode is equal to "Manually".
- Click Submit.
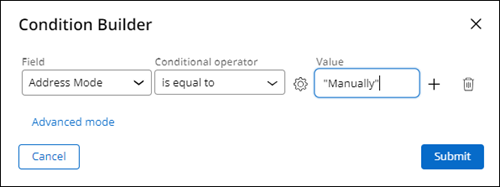
- Click Save.
- In the Edit View: Customer window, click Back to return to the Edit View: Contact info window.
- Click Submit to save the Contact Info View.
- Click Save.
This Challenge is to practice what you learned in the following Module:
Available in the following mission:
If you are having problems with your training, please review the Pega Academy Support FAQs.
Want to help us improve this content?