Constellation Viewsでの条件付き表示の設定
3 タスク
30 分
中級
ユーザーエクスペリエンス
Constellation
日本語
シナリオ
Sweet Life IncのTell Us Moreで操作します。このチャレンジでは、Contact Infoステップに関連付けられるビューを設定します。このビューのCustomer データリレーションシップの作成に加え、Addressビューの条件付き表示を設定します。
以下の表は、チャレンジに必要なログイン情報をまとめたものです。
| ロール | ユーザー名 | パスワード |
|---|---|---|
| System Architect | Author@SL | pega123! |
補足: 練習環境では、複数のチャレンジの完了をサポートする場合があります。その結果、チャレンジのウォークスルーに表示される設定は、お客様の環境と完全に一致しない場合があります。
チャレンジ ウォークスルー
詳細なタスク
1 Customerデータリレーションシップを作成する
- チャレンジのPegaインスタンスに、以下のログイン情報を入力します。
- User name フィールドに「Author@SL」と入力します。
- Password フィールドに「pega123!」と入力します
- App Studioのナビゲーションペインで、「Case Types > Incident」をクリックしてIncident ケースタイプを開きます。
- Data Modelタブをクリックします。
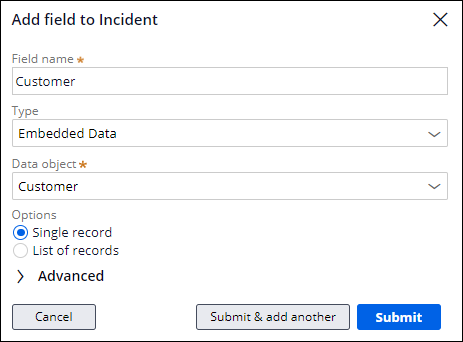
- 次の詳細を含む新しいデータリレーションシップフィールドを追加します。
- Field nameフィールドに「Customer」と入力します。
- Typeリストで「Embedded Data」を選択します。
- Data objectリストで「Customer」を選択します。
- Optionsセクションで、「Single record」を選択します。
- 「Submit」をクリックします。
- 「Save」をクリックします。
2 Contact Infoビューの作成
- Incident ケースタイプで、Workflowタブをクリックします。
- Contact Infoステップをクリックし、コンテキスチャルプロパティペインで「」をクリックします。
- Fieldsセクションで、Customer データリレーションシップフィールドをビューに設定します。
- Customer (Customer)行で、「Gear」アイコンをクリックし、次の設定がアクティブであることを確認します。
- Display asフィールドの値はFormです。
- Field labelフィールドの値はCustomerです。
- Viewデフォルトの値はCreateです。
- 「Save」をクリックします。

- 「Customer (Customer)」をクリックしてEdit View: Customer ウィンドウを開きます。
カスタマービューには、すでに4つのフィールドが含まれています。これらのフィールドは、Customer データオブジェクトが作成された時に「Primary」として指定されました。
- Customerビューで、「Remove」アイコンをクリックしてPrimary Fieldsフィールドを削除します。
- 「Add > Views > Main Info > Add 」をクリックして、Customer データオブジェクトからMain infoビューを追加します。

- Add > Fields > Address Mode > Add をクリックして、CustomerのMain infoビューで住所情報を追加します。
- Address Modeフィールド行で、「Gear 」アイコンをクリックして、次の設定を行います。
- Display asリストで「Radio buttons」を選択します。
- Field labelフィールドで、「Custom」を選択します。
- Custom field labelで、「How would you like to provide your address?」と入力します。
- Horizontal display チェックボックスを選択します。
- Requiredリストで「Always」を選択します。
- 「Save」をクリックします。
3 Customer ViewにAddress informationを追加する
- 「Add > Views > Create new View」をクリックして、マップを使用して顧客の住所情報を収集する新しいビューを作成し、ビューに対して次の設定を行います。
- Nameフィールドで、「Address - Using map」と入力します。
- 「Default form」を選択します。
- 「Submit」をクリックします。

- Edit View: Address - Using mapウィンドウで、「Add > Fields > Address > Fields > Location > Add 」をクリックしてLocationフィールドを追加します。

- Location フィールド行で、「Gear」アイコンをクリックします。
- Configure field: Locationウィンドウで、「Field label 」を「Custom」に、「Custom field label」を「Location」に設定します。
- Input settingsで、Show mapチェックボックスを選択し、「Save」をクリックします。

- 「Back」をクリックして、Edit View: Customerウィンドウに戻ります。
- Address - Using mapビューにConditional Visibilityを追加する
- Address - using mapフィールド行で、「Gear」アイコンをクリックします。
- Headingフィールドに、「Address」と入力します。
- Visibilityリストで「Custom Condition」を選択します。
- Visibilityリストの右側の「Gear」アイコンをクリックします。
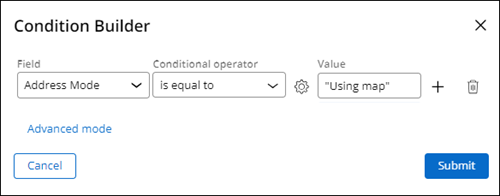
- 条件をAddress Mode is equal to "Using map"に設定します。
- 「Submit」をクリックします。
- 「Save」をクリックします。
- Edit View: CustomerウィンドウのFieldsセクションで、で、「Add > Fields > Address > Add 」をクリックして、ケースタイプデータモデルのAddressフィールドをCustomer ビューに追加します。
補足: Data-Address-Postalデータタイプは、アドレスフィールド機能を駆動します。
- Addressフィールドの条件付き表示を設定します。
- Addressフィールド行で、「Gear」アイコンをクリックします。
- ConditionsセクションのVisibilityフィールドで「Custom Condition」を選択します。
- Visibilityフィールドの右側の「Gear 」アイコンをクリックします。
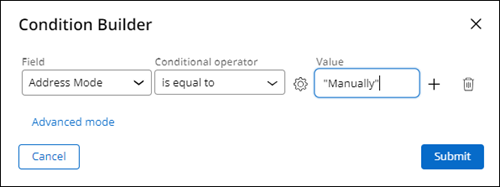
- 条件を「Address Mode is equal to "Manually"」に設定します。
- 「Submit」をクリックします。
- 「Save」をクリックします。
- Edit View: Customerウィンドウで、「Back」をクリックします。

- Edit View: Contact infoウィンドウで、「Submit」をクリックして、Contact Infoビューを保存します。

- 「Save」をクリックします。
このチャレンジは、下記のモジュールで学習したことを実践するための内容です。
このモジュールは、下記のミッションにも含まれています。
トレーニングを実施中に問題が発生した場合は、Pega Academy Support FAQsをご確認ください。