Creating an automation
Archived
2 Tasks
45 mins
Beginner
Robotic Process Automation
English
Scenario
Based on the business case, you have created the necessary projects and interrogated the applications needed to search for the nearest store based on the customer's ZIPcode. Now, the solution must log in into the CRM application and click the User 1 button to access the customer's ZIPcode.
For the ACME Search System, the business case states that the user must begin the search process and all other processes from the ACME Search System home page. The business case requires the solution to check the running of the web adapter, sign the user in to the ACME Search System automatically, and ensure the user is on the home page.
Your assignment
In this part of the solution, complete the following tasks:
- Create an Events folder in the CRMPrj to store event automations.
- Create an automation, CRM_E_CRMfrmMain_Created to complete the login process and click the CRMbtnUser1.
- Create a Procedures folder in ACMESearchPrj to store the procedure automations .
- Create an automation, ACME_P_NavToHome, to check the location of the user in the web application, navigate the user to the home page, confirm the adapter is running, and call a sign-in automation.
- Create a procedure automation, ACME_P_SignIn, to sign in to the web application.
Detailed Tasks
1 Create the CRM_E_CRMfrmLogin_Created automation
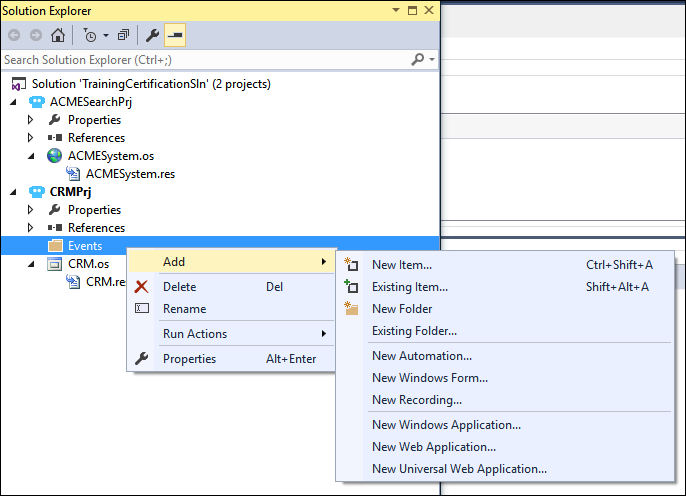
- In the Solution Explorer, right-click the CRMPrj project and select Add > New Folder.
- In the Solution Explorer, enter Events in the text box of the highlighted folder.
- In the Solution Explorer, right-click the Events folder and select Add > New Automation.
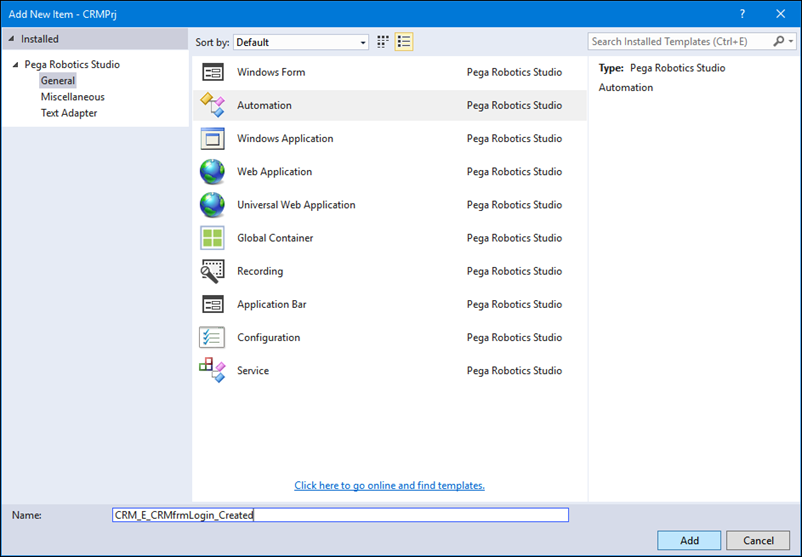
- In the Name field, enter CRM_E_CRMfrmLogin_Created.
- On the Add New Item window, click Add to add the automation to the project, open the automation in the design area, and display the Properties window for the automation.
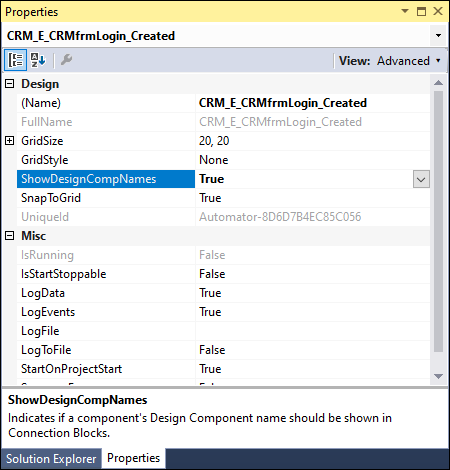
- In the Properties window, change the ShowDesignCompNames from False to True.
- In the Properties window, right-click the ShowDesignCompNames text and select Default Value from the context menu.
- On the Automator pop-up window, in the Default value drop-down, select True .
- Click OK to set the default value to True for all automations from this point forward.
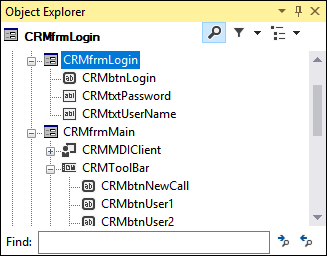
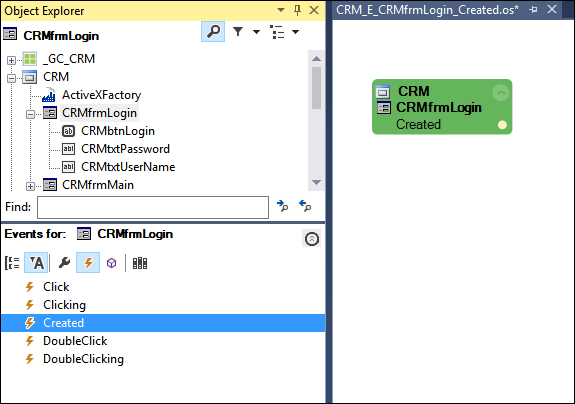
- In the Object Hierarchy, click the CRMfrmLogin control.
- In the Object Inspector, click the Show Events Only icon to display the available events for the CRMfrmLogin control.
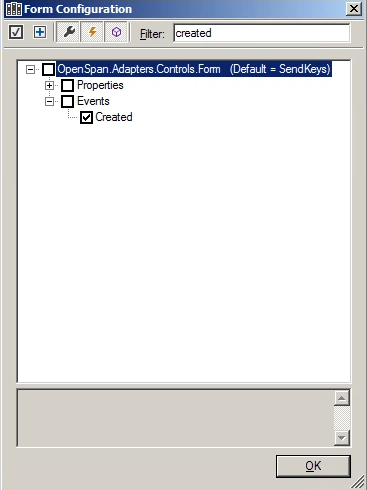
- In the Object Inspector, click the Configure Type icon to display the Form Configuration window.
- In the Filter field, enter Created to filter the results to only those containing the entered text.
- In the Results frame, expand Events to display the event results.
- In the Results frame, select the Created check box.
- On the Form Configuration window, click OK to add the event to the Object Inspector and close the window.
- In the Object Inspector, with Show Events Only enabled, click the Created event, then drag and drop it to the CRM_E_CRMfrmLogin_Created automation. This automation will execute when the CRMfrmLogin object gets created by the application.
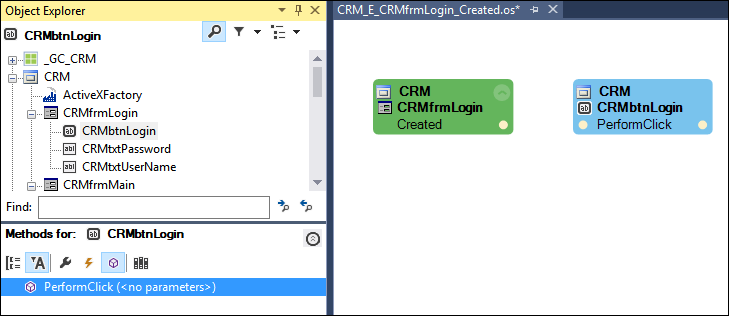
- In the Object Hierarchy, click CRMbtnLogin to highlight the control.
- In the Object Inspector, click the Show Methods Only icon.
- In the Object Inspector, drag and drop the PerformClick method to the automation.
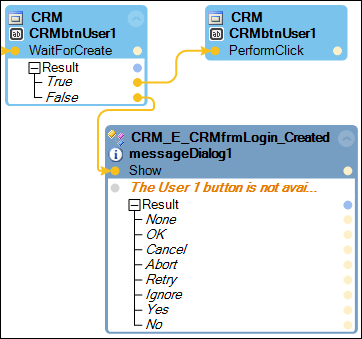
- In the Object Hierarchy, highlight the CRMbtnUser1 control.
- In the Object Inspector, click the Configure Type icon to display the Button Configuration window.
- In the Filter field, enter create to filter the result to show only the items with create in the name.
- In the Results frame, expand Methods to display the filtered results.
- In the Methods node, select the WaitForCreate method.
- On the Button Configuration window, click OK to add the method to the Object Inspector for all buttons and to close the window.
- In the Object Inspector with the Show Methods Only selected, drag the WaitForCreate (<no parameters>) method on the automation.
- On the WaitForCreate design block, expand the Result to display a Boolean response.
- In the Object Hierarchy, highlight the CRMbtnUser1 control.
- In the Object Inspector, click Show Methods Only and then drag the PerformClick method to the automation.
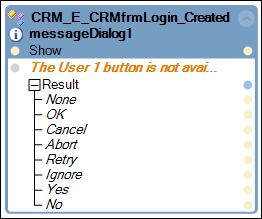
- From the menu bar, select File > Save All to save your work. The automation should resemble the following image.

- In the automation, connect the design blocks as shown in the following image.

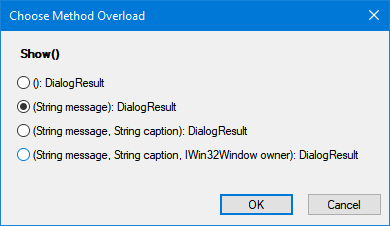
- In the Advanced section of the Toolbox window, drag and drop a MessageDialog component on to the automation to display the Choose Method Overload dialog box.
- On the Choose Method Overload dialog, select the second option, (String Message): DialogResult and click OK to close the dialog window and add the messageDialog1 component to the automation.
- On the messageDialog1 component, click message and enter The User 1 button is not available.
- In the automation, connect the design blocks as shown in the following image.
- On the keyboard, press F5 to begin the debugging process and display the CRM window.
- From the menu bar, select Debug > Stop Debugging to close the CRM window and return the IDE to development mode.
2 Create procedure automations
Note: This automation validates the web application and navigates users to the home page to begin the search in the same spot each time. It also calls another automation to sign in to the web application.
- In the Solution Explorer, right-click the ACMESearchPrj project and select Add > New Folder to add a new folder in the project.
- In the Solution Explorer, enter Procedures in the in the text box of the highlighted folder.
- In Solution Explorer, right-click the Procedures folder and select Add > New Automation to display the Add New Item window.
- In the Add New Item window, name the automation ACME_P_NavToHome.
- Click Add to open the automation in the design area.
- In the automation, add the following design blocks.
Note: Remember to use the Configure Type icon in the Object Inspector to locate properties, events, and methods.
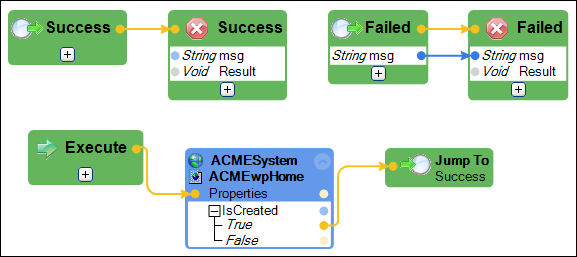
Source project Items Property, Event, Method Description Right-click in the automation Add Entry Point ACMESystem ACMEwpHome.IsCreated property Expand the result. If the home page exists, the user has logged in to the web application. The automation exists if the result is True. Right-click in the automation Add two labels - Rename one label Success and one Failed.
- On the Failed label, click + to add one parameter.
- Change param1 to String and rename it msg.
Right-click in the automation Add two exit points - Rename one Success and one Failed.
- On the Failed Exit point, click + to add one parameter.
- Change param1 to String and rename it msg.
Right-click in the automation Select Jump To > Success.
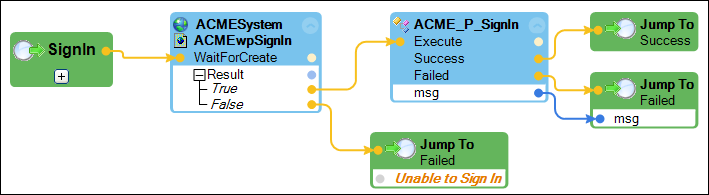
- In the automation, connect the automation links as shown in the following image.
- In the automation, add the following design blocks.
Note: Use the Configure Type icon in the Object Inspector to locate properties, events, and methods.
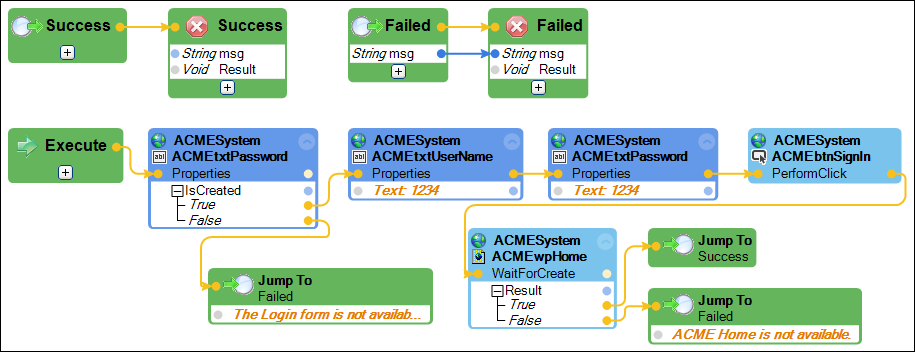
Source project Items Design Name Description ACMESystem ACMESystem.IsRunning property If the home page does not exist, check to see if the adapter is running. Click to expand the result. ACMESystem ACMESystem.Start method This starts the adapter and launches the StartPage property. ACMESystem ACMEwpSignIn.WaitForCreate method If the automation starts the adapter, wait for the sign-in page to create before signing in. Right-click in automation Add label Rename Label1 to SignIn.
Right-click in automation Select Jump To > SignIn twice. - In the automation, connect the automation links as shown in the following image.

- From the menu bar, select File > Save All.
- In the Solution Explorer, right-click Procedures and select Add > New Automation to display the Add New Item window.
- In the Name field of the Add New Item Window, enter ACME_P_SignIn.
- Click Add to close the window and open the automation in the design area.
- In the automation, add the following design blocks.
Note: Use the Configure Type icon in the Object Inspector to locate properties, events, and methods.
Source project Items Property, Event, Method Description Right-click in the automation Add Entry Point Right-click in the automation Add two labels - Rename one label Success and one Failed.
- On the Failed label, click + to add one parameter.
- Change param1 to String and rename it msg.
Right-click in the automation Add two exit points - Rename one Success and one Failed.
- On the Failed Exit point, click + to add one parameter.
- Change param1 to String and rename it msg.
ACMESystem ACMEtxtPassword.IsCreated property ACMESystem ACMEtxtUserName.Text property Click Text and enter 1234. Use four characters for the user name and password fields. ACMESystem ACMEtxtPassword.Text property Click Text and enter 1234. ACMESystem ACMEwpSignIn.PerformClick method After entering the user name and password, click Sign In to access the application. ACMESystem ACMEwpHome.WaitForCreate method When the automation logs in the user, wait for the home page to create before exiting the function to find the nearest store. Right-click in the automation Select Jump To > Success.
Right-click in the automation Select Jump To > Failed.
Add one message to string parameter for each Jump To.Failed
- The Login form is not available.
- ACME Home is not available.
- In the automation, connect the automation links as shown in the following image.
- From the menu bar, select File > Save All.
- In the design area, click the ACME_P_NavToHome tab to activate the window.
- In the Object Explorer, click ACME_P_SignIn to highlight the automation.
- In the Object Inspector, click Show Methods Only to display the methods for the automation.
- In the Object Inspector, drag and drop Execute on to the ACME_P_NavToHome automation.
- Add the following design blocks to the automation.
Source project Items Design Name Description Right-click in the automation Select Jump To > Success.
Right-click in the automation Select Jump To > Failed twice.
Add a message to the string parameter for one Jump To.Failed
- Unable to find page Sign In.
- Connect the automation links as shown in the following image.
- From the menu bar, select File > Save All to save the automations.