Configuring and managing a deployment pipeline
8 Tasks
15 mins
Beginner
DevOps
English
Scenario
As a Release Manager, you are responsible for managing the application deployment pipelines with the help of the Deployment Manager. You have an Orchestrator instance from where you manage these pipelines. The Development, Staging, and Production environments are available for the life cycle of your application release.
The PegaGP Development team has requested the creation of a new Quality Assurance (QA) environment with a separate pipeline of its own. This Quality Assurance (QA) environment is used to validate the development changes.
You are the Release Manager for the following applications:
- HRApps
- ITApproval
- PegaGP
This challenge focuses on the PegaGP application. The PegaGP application has the following environments on Pega Cloud® Services:
- Development
- Staging
- Production
Simon is new to your team and is assigned to manage the pipelines and deployments for the PegaGP Release pipeline to the Quality Assurance environment only.
As a PegaGP Release Manager, you must address the following tasks:
- Provide Simon, the new team member, access to the Deployment Manager with the AppAdmin role.
- Add the PegaGP application to the list of allowed applications.
- Assist and guide Simon to independently create a pipeline, enable deployments for the new Quality Assurance environment, and manage deployments.
- The Release pipeline for the PegaGP application is used to release enhancements on the PegaGP application to Production. A new Beta build is requested, which the stakeholders reject in the staging environment. Ensure that the deployment is rejected and the environment rolls back to a previously approved version.
As Simon, the new team member, you must address the following task:
- Access Deployment Manager studio with the new credentials and change your password on first login.
Follow the instructions to create a deployment pipeline and conduct the required approvals.
The following table provides the credentials you need to complete the challenge:
|
Role |
User name |
Password |
|
Release Administrator |
DMReleaseAdmin |
rules123! |
| Deployment Manager | [email protected] | rules123! |
Detailed Tasks
1 Add a new user for PegaGP application
Simon, the new team member is responsible for managing pipelines on the PegaGP application.
As the Release Manager, you must provide Simon access to the Deployment Manager with the AppAdmin role.
- Log in to Deployment Manager as the PGPRelease Admin with User name DMReleaseAdmin and Password rules123!
- In the navigation pane of Deployment Manager, click to access the People page.
- On the People page, click to add a new user.
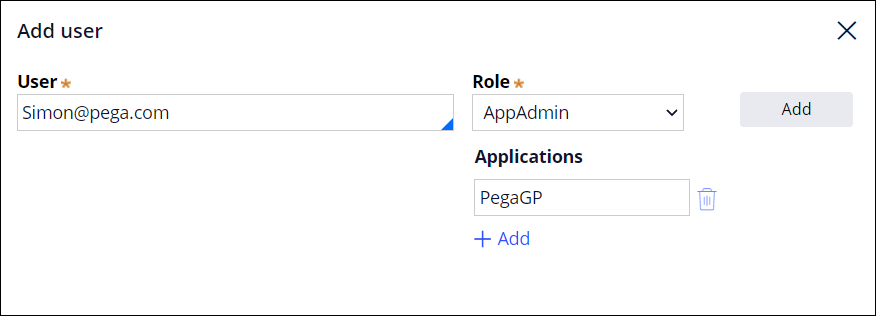
- In the Add user dialog box, enter the following details:
- In the User field, enter [email protected].
- In the Role list, select AppAdmin to provide Simon with access to manage pipelines and users for specified applications.
- In the Applications field, enter PegaGP.
- Click to give Simon access to Deployment Manager.
- Copy the password.
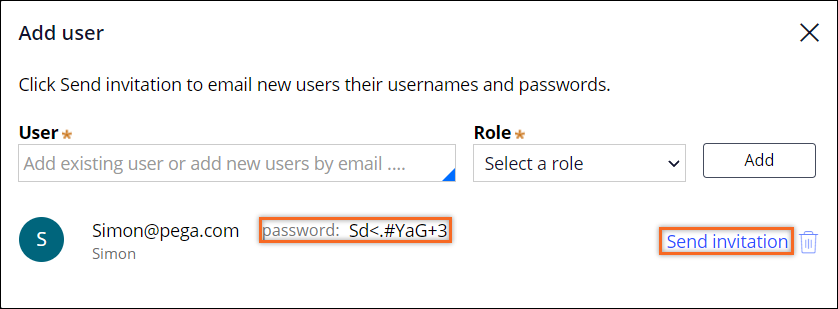
- Close the Add user dialog box.
- In the lower-left corner of Deployment manager, click the user icon, and then select Log off.
- Log in to Deployment Manager with User name [email protected] and the randomly generated password to receive a prompt to change your password.
- In the Current Password field, enter the randomly generated password.
- In the New Password and Confirm Password fields, enter rules123!
2 Add a new deployment pipeline
The Development team has requested a new environment dedicated to QA for the new feature development work in the PegeGP application. The feature is a minor enhancement on version 8 of the PegaGP application.
Simon, as a member of the Release Management team, is responsible for setting up a new pipeline enabled with the new QA environment only.
Note: If you are not already logged in to the Deployment Manager, log in as Simon.
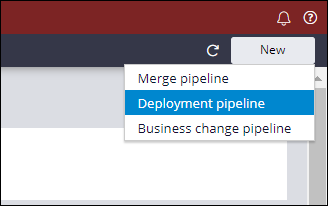
- In the Deployment Manager, in the upper right, click > to create a new deployment pipeline.
- On the Application Details tab, enter the following information:
- In the Application packaging environment field, enter the URL of the Pega instance you are using (for example, https://pegainstaceid.pegacea.net/prweb).
- In the Authentication profile list, enter or select DMAppAdmin.
 Note: The URL noted in the Application packaging environment field is for example purposes only. This URL will not work in your environment.
 - In the Application details section, specify the application details for the PegaGP application.
- In the Application field, enter PegaGP.
- In the Version field, enter 8.
- In the Access group field, enter PegaGP:Administrators.
- In the Product rule field, enter PegaGP.
- In the Version field, enter 08.05.01.
- In the Pipeline name field, enter PegaGPRelease2QA.

- Click to proceed to the Environment Details page.
- In the Environments section, to the right of the Staging and Production stages, click the Delete icon.
- Enter the following details for the Quality Assurance stage:
- Environment URL: enter the URL of the Pega instance you are using (for example, https://pegainstaceid.pegacea.net/prweb).
- Authentication Profile: DMAppAdmin
- In the Artifact management section, enter or select the following details:
- Development repository: NEXREP
- Production repository: DMFilesystem
- Click to proceed to the Model Pipeline page.
- Review the details in the Model Pipeline and confirm that the Development and Quality Assurance stages are displayed.
- Click to create the pipeline and display the prompt.
3 Run diagnostics on the newly created pipeline
Simon has unknowingly added an incorrect repository in the Artifact management section in the Development repository. Because he is creating a new pipeline, the system prompts him to run diagnostics. Simon needs to uncover and correct the issue.
- On the status page of the deployment pipeline, click .
- Review errors that are displayed in the Verifying repository connections section that occurred.
Note: The error occurs because the repository rule to store the Deployment Manager artifact, DMFilesystem, is configured incorrectly as NEXREP.
- In the header of the diagnostic results, click the arrow.
- In the upper right, click to edit the deployment pipeline.
- Click the Artifact management tab.
- In the Development repository field, enter DMFilesystem.
- Click to correct the configuration.
- On the status page of the deployment pipeline, click Run Diagnostics.
- In the Verifying repository connections section, review the results to ensure that the connectivity of the Development repository is healthy.
4 Trigger a deployment
Simon triggers a test deployment to ensure the latest version of PegaGP application is deployed on the Quality Assurance environment.
Note: To complete this task, log in to the Deployment Manager as Simon.
- In the navigation pane of Deployment Manager, click Pipelines to open the Application Pipelines dashboard.
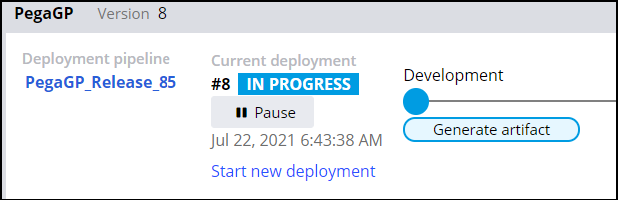
- On the PegaGPRelease2QA deployment pipeline, click Start new deployment.
- In the Description text box, enter Testing version 1 of the deployment pipeline to Quality Assurance.
- Click to start the pipeline.
5 Pause and resume a deployment
Simon wants to pause a deployment to review the configuration on the Quality Assurance environment.
- In the navigation pane of Deployment Manager, click Pipelines to open the Application Pipelines dashboard.
- On the Application Pipelines dashboard, click PegaGPRelease2QA deployment pipeline to access the pipeline dashboard.
Note: You see the option to Pause a deployment when a deployment is active. If the deployment is inactive, consider creating a deployment on the PegaGPRelease2QA pipeline.
- On the PegaGPRelease2QA deployment pipeline dashboard, click More > Pause to pause the deployment. The deployment completes the current task and then pauses.
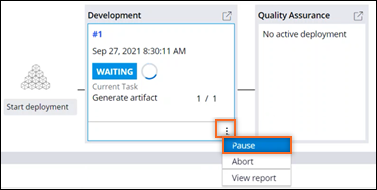
- In the Description text box, enter Check QA repository rule.
- Click .
- On the deployment timeline of the pipeline, click View Report to navigate to the Deployment Report and confirm that the deployment status is paused.
- In the upper left, click the arrow, on the screen, to return to the Pipeline dashboard.
- On the Development stage, click the More icon on the stage.
- Click Resume to resume the deployment process.
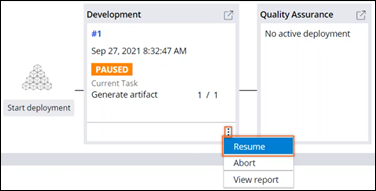
- In the Description text box, enter Validated.
- Confirm that the status moves from Paused to In-Progress and is promoted to Quality Assurance.
6 Configure approvals on a deployment
The deployment process requires additional approval from the Release Manager before completing the deployment as successful. Simon will perform this change in the Quality Assurance stage after all the automated quality checks are performed.
- In the navigation pane of Deployment Manager, click Pipelines to open the Application Pipelines dashboard.
- On the Application Pipelines dashboard, click the PegaGPRelease2QA deployment pipeline to access the pipeline dashboard
- On the pipeline dashboard, in the upper right, click > to edit the pipeline.
Tip: In order to edit the pipeline, the user must ensure that there are no active deployments. Wait for the current deployment to complete or abort the in-progress deployment.
- On the Pipeline model tab, in the Quality Assurance stage, click >to add a new task to the Quality Assurance stage.
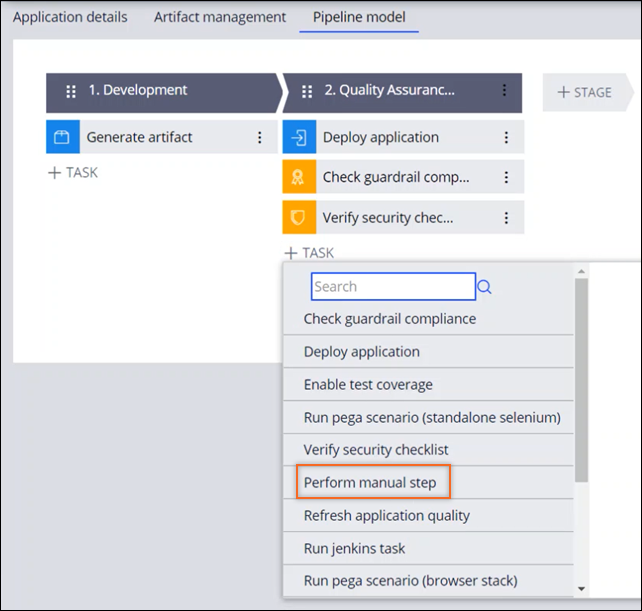
- Click to add the task to the Stage.
- In the Task details pane, in the Label field, enter QA Approval.
- In the Assign to field, enter Simon@DevOps.
- Click to save the pipeline.
Note: You skip the diagnostics because no changes to the environment configurations occurred.
- In the upper left, click the arrow to return to the Pipeline dashboard.
- Click to begin a deployment to check the changes.
- In the Description text box enter, Approval added at QA stage.
- Click to start the deployment and let the deployment progress until it moves to the Action Required state.
- Click to approve the task.
- In the Description text box enter, Approved QA results.
- Click .
7 Add a stage on the pipeline
The stakeholders of the PegaGP application decide to enable the path to Staging.
Simon needs to configure the PegaGPRelease2QA deployment pipeline with a stage for Staging and configure a manual transition or multispeed deployment as the action to promote the application to Staging.
Note: To complete this task, log in to the Deployment Manager as Simon.
- In the navigation pane of Deployment Manager, click Pipelines to open the Application Pipelines dashboard.
- On the Application Pipelines dashboard, click the PegaGPRelease2QA deployment pipeline to access the pipeline dashboard.
- On the Pipeline dashboard, in the upper right, click to edit the pipeline.
- On the Pipeline model tab, in the Quality Assurance stage, click STAGE to add a new stage.
- In the text box of the stage enter Staging.
- On the right, in the Stage details pane, enter the following details:
- In the Environment URL field, enter https://tumqbidx.pegacea.net/prweb.
- In the Authentication profile field, enter or select DMAppAdmin.
- In the Environment Template list, select Staging.
- Click the Quality Assurance stage to enable controlled and on-demand promotion of validated artifacts to the Staging environment.
- In the Stage details pane, in the When all tasks on the stage complete section, select Wait for a user action to provide an option of controlled promotion.
- Click to save your changes.
- Test your changes by starting at least three deployments.
- In the lower left, click the User icon, and then select Log offto exit Deployment Manager.
Note: While the deployment pipeline can be enabled with the Production deployment, it is not in the scope of this challenge.
8 Roll back a deployment
The PegaGP Release Manager starts a new deployment, which waits for a stakeholder's approval at the Staging environment. The stakeholder decides to reject the deployment into Production and requests the Release Manager to rollback the environment to the pre-deployment state.
- Log in to Deployment Manager as the Release Manager with User name DMReleaseAdmin and Password rules123!
- On the Application Pipelines dashboard, in the PegaGP section, click Start new deployment to initiate the request.

- In the Description field, enter Beta build request #1.
- Click to observe the deployment status for the PegaGP_Release_85 pipeline.
- On the deployment status, click PegaGP_Release_85 to open the pipeline and observe the deployment progress through the Development phase to the Quality Assurance stage.
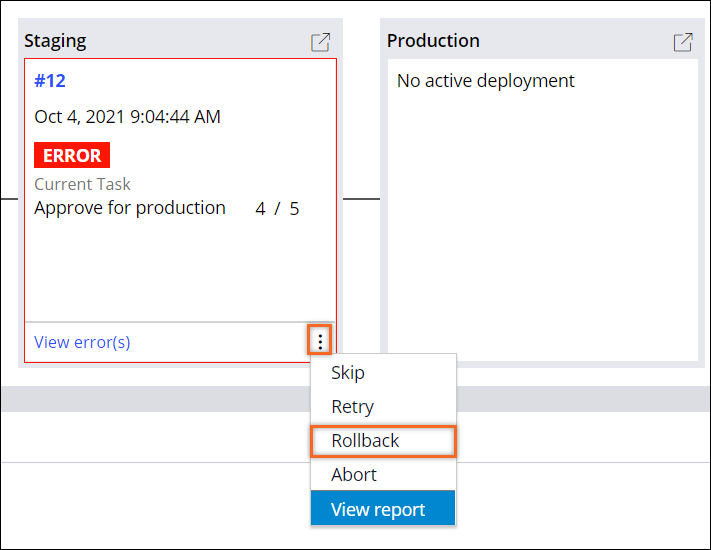
Note: In the Staging environment, the deployment has completed the first three tasks successfully (that is, Deploy application, Check guardrail compliance, and Verify security checklist). The fourth task in the stage, Approve for production, is pending approval from the PegaGP Release Manager.

- On the pipeline dashboard, on the Staging stage, click the icon, and then select Reject to open the Reject dialog box.
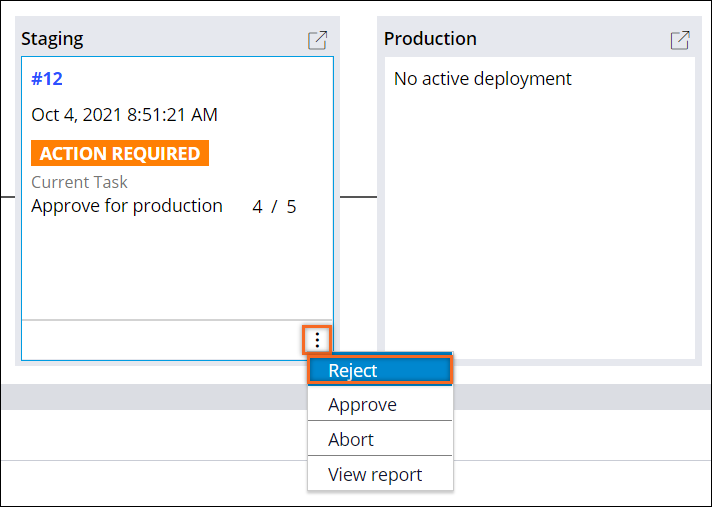
- In the Reject dialog box, in the Rejection note field, enter Reject and roll back the deployment.
- Click to close the Reject dialog box.
Note: When the deployment is rejected, the deployment can now be rolled back to the application restore point created by Deployment Manager before the deployment.
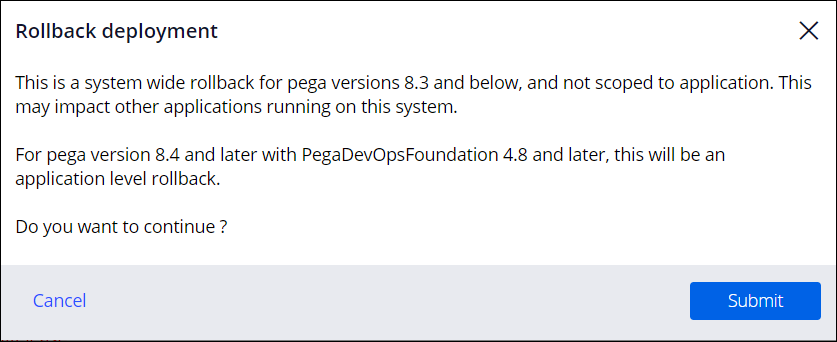
- On the Staging stage, click the More icon, and then select Rollback to open the Rollback dialog box.
- In the Rollback deployment dialog box, click to proceed with the rollback.
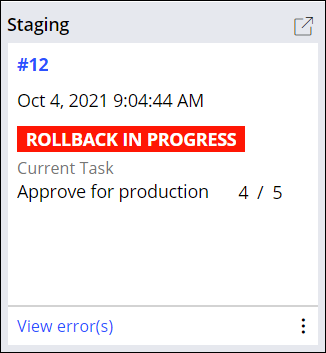
- Observe the status of the Rollback on the stage.
- In the lower left, click the User icon, and then select Log off to exit Deployment Manager.
This Challenge is to practice what you learned in the following Module:
Available in the following mission:
If you are having problems with your training, please review the Pega Academy Support FAQs.
Want to help us improve this content?