
Creating an enterprise change pipeline
Archived
3 Tasks
10 mins
Beginner
English
Scenario
The development team at U+ Bank team worked on core application changes to meet project requirements. As they completed the initial development phase and unit-tested the changes in the development environment, they want to configure Deployment Manager to deploy the initial changes of the core application from the development environment to the higher environments.
The application has a guardrail score of 85%, contains test rulesets and branches, and the test coverage stands at 75%.
Use the following credentials to log in to the exercise system:
| Role | User name | Password |
|---|---|---|
| ReleaseManager | ReleaseManager | rules |
Your assignment consists of the following tasks:
Task 1: Verify the Orchestrator URL
Ensure that your exercise system URL is the orchestrator URL in the Deployment Manager settings.
Note: The URL is automatically updated for you.
Task 2: Create an enterprise change pipeline
Create a new enterprise change pipeline to deploy core application changes from the development environment to the higher environments.
Note: For training purposes, the five production environments that you use in a typical enterprise are combined into a single environment that acts as the orchestrator and four candidate systems. As a result, the training system uses Localhost. However, in real-life implementations, you provide the URLs of the five environments.
Task 3: Run the pipeline diagnostics
Run diagnostics to check that the orchestrator can communicate with the development, staging, Business Operations Environment (BOE), and production systems and that the provided overlay application details are correct.
Note: When the pipeline verifies the intersystem connections, a warning is displayed that recommends you use the IP address in the environment URLs instead of the Localhost system. You can ignore the warning as you configure all the environments in the same exercise system for training purposes.
Challenge Walkthrough
Detailed Tasks
1 Verify the Orchestrator URL
- On the exercise system landing page, click Pega CRM suite to log in to Deployment Manager.
- Log in as the Release Manager with username ReleaseManager and password rules.
- In the navigation pane of Deployment Manager, click Settings > General settings to ensure that the Orchestrator URL field is set to your exercise system URL.
Note: The URL is environment-specific and automatically updates for you.
2 Create an enterprise change pipeline
- In the upper-right corner of the Deployment Manager landing page, click New > Deployment pipeline to open the Application Details page.
- In the Select the source environment for application packaging section, in the Application packaging environment field, enter https://env-xxxx.pegaenablement.com/prweb.
- Replace XXXX with the value that is specific to your exercise environment by copying value from the URL that is displayed in your browser.
 Note: Typically, you add the URL of the development environment because it acts as the system of record and contains the product rule that defines the application package. For training purposes, the five production environments that you use in a typical enterprise are combined into a single environment that acts as the orchestrator and four candidate systems. As a result, the training system uses Localhost.
- In the Authentication profile list, select DMAppAdmin.
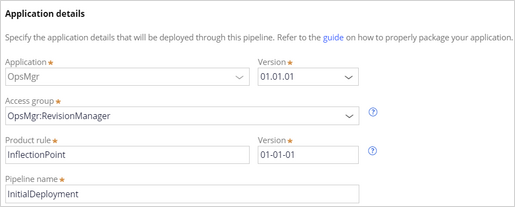
- In the Application details section, add the details for the overlay application:
- In the Application field, enter OpsMgr.
- In the Version field, enter 01.01.01.
- In the Access group field, enter OpsMgr:RevisionManager.
- In the Product rule field, enter InflectionPoint.
- In the Version field, enter 01-01-01.
- In the Pipeline name field, enter InitialDeployment.
- Click Next to open the Environment Details page.
- In the Environments section, in the Stage Name column, update the environment names:
- In the Quality Assurance cell, enter Staging.
- In the Staging cell, enter Business Operations.
- Enter the enter the URLs and authentication profiles of the environments for each of the stages:
Stage Name Actions Development
- In the Environment URL field, enter https://env-xxxx.pegaenablement.com/prweb.
- In the Authentication Profile field, enter or select DMAppAdmin.
Staging
- In the Environment URL field, enter http://localhost/prweb.
- In the Authentication Profile field, enter or select DMAppAdmin.
Business Operations
- In the Environment URL field, enter http://localhost/prweb.
- In the Authentication Profile field, enter or select DMAppAdmin.
Production
- In the Environment URL field, enter http://localhost/prweb.
- In the Authentication Profile field, enter or select DMAppAdmin.
Note: For training purposes, the five production environments that you use in a typical enterprise are combined into a single environment that acts as the orchestrator and four candidate systems. The training system uses Localhost for all the environments except development.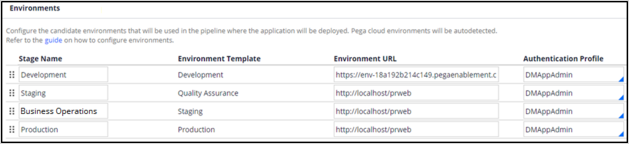
- In the Artifact management section, modify the repositories:
- In the Development repository field, enter or select DMRepo.
- In the Production repository field, enter or select DMRepo.
Note: Deployment Manager stores application artifacts that are created throughout the life cycle of deployment in a repository. Deployment Manager requires the use of a supported artifact repository.
For training purposes, the challenge uses DMRepo repository. In a real-life implementation, you might use an S3 bucket or another storage source.
- Click Next to open the Model Pipeline page.
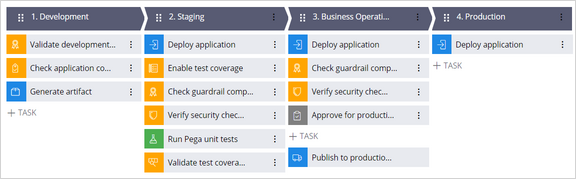
- In the pipeline model, modify the deployment process:
- In the Development stage, click the Check application compliance step.
- In the Task details pane, in the Input parameters section, clear the following checkboxes:
- Validate if test rulesets exist
- Validate application branches
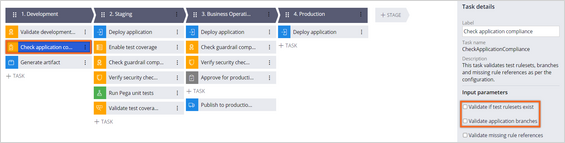
Clearing the Validate if test rulesets exists and Validate application branches checkboxes ensures that the application package includes the existing test rulesets and the application branches.
- In the Staging stage, click the Check guardrail compliance step.
- In the Task details pane, in the Input parameters section, in the Threshold guardrail score field, enter 80.
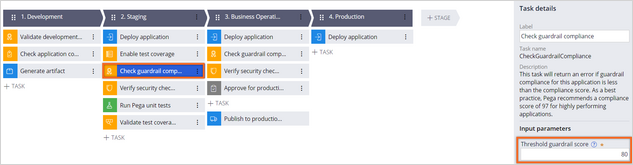
As the U+ Bank application compliance score is 85, lowering the guardrail score threshold will ensure the task is completed successfully. - In the Stagingstage, click the Validate test coveragestep.
- In the Task details pane, in the Input parameters section, in the Application test coverage %, Data type test coverage %, and Case type test coverage % fields, enter 72.
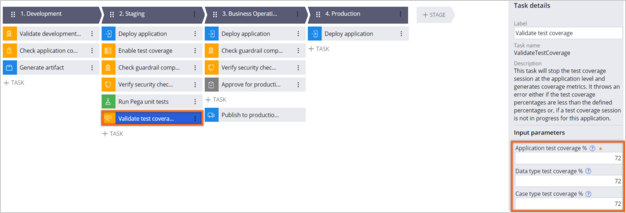
As the U+ Bank application has a 72% test coverage, you modify the validate test coverage % to match the application test coverage to ensures that the task completes successfully. - In the Business Operationsstage, click the Check guardrail compliance step.
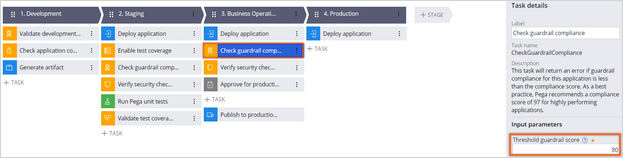
As the U+ Bank application compliance score is 85, you lower the guardrail score threshold to ensure that the task completes successfully. - In the Task details pane, in the Input parameters section, in theThreshold guardrail score< field, enter samp>80.
- Click Create to create the pipeline.
3 Run the pipeline diagnostics
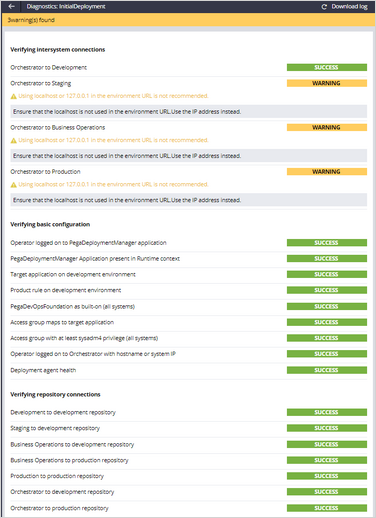
- In the deployment pipeline, click Run Diagnostics to ensure that the pipeline is configured successfully and the Orchestrator can communicate with the candidate environments.
 Note: When the pipeline verifies the intersystem connections, a warning is displayed that recommends you use the IP address in the environment URLs instead of the Localhost system. You can ignore the warning as you configure all the environments in the same exercise system for training purposes.
- Verify that the orchestrator can communicate with all the candidate systems and that the overlay application details are correct, as shown in the following figure:
- In the upper-left corner, click the back arrow to view the pipeline.
 Note: In standard use cases, clicking Start deployment initiates the initial deployment and moves the application package from the development environment to higher environments. However, for training purposes, you do not initiate the initial deployment process because all your environments are in a single exercise system.