
Extending a data model in a Pega Government Platform application
6 Tasks
40 mins
Pega Government Platform 8.7
Beginner
English
Scenario
GrantsCo wants to increase customer engagement in public services and support ideas and projects that provide public services and stimulate the economy. To achieve this goal, the services coordinator wants to build a workflow that can engage the residents in the town and create awareness about grants. To begin the process, the coordinator has outlined a workflow so that it meets divisional needs such as critical recovery initiatives, innovative research, and many other programs listed in the Catalog of Federal Domestic Assistance (CFDA).
Pega Government Platform™ provides you with a robust public sector centric data model, features, and components that users can use to capture and manage information, and search and view the details of various entities (such as person, business, vehicle, facility, and household) that are widely used across government agencies.
The coordinator wants to extend the person data model in the Grants case workflow to capture the details of resident interactions in the town. This configuration also involves creating the confirmation email for application submissions and adding associations for the residents that interact with the application.
The following table provides the credentials you need to complete this challenge:
| Role | User name | Password |
|---|---|---|
| System administrator | pgpcosmossysadmin | rules |
Challenge Walkthrough
Detailed Tasks
1 Extend the Person data model with the basic details flow component
- Log in to the App Studio as the system administration:
- In the User name field, enter PGPCosmossysadmin
- In the Password field, enter rules.
- In the navigation pane of App Studio, click Case types > Grants to open the workflow of the case life cycle.
- In the case life cycle, in the Create stage, on the Create process, click the Delete icon to remove the process from the case life cycle.
- In the Create stage, click Step > More > Processes > Manage person with basic details > Select to add the step.
- In the upper-right corner, click Save.
- In the navigation pane of App Studio, click Data to view the list of data objects and integrations.
- In the list of data objects and integrations, click Person to open the data model.
- In the Person data model, click Add field in the upper-right corner to add a new field.
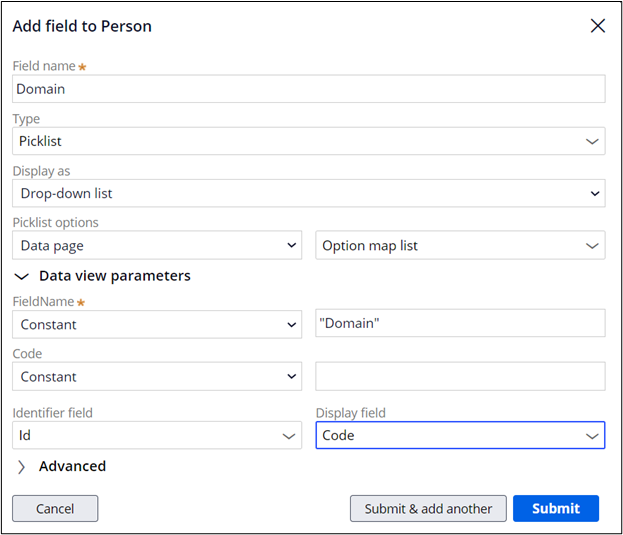
- Complete the Add field to Person window:
- In the Field name field, enter Domain.
- In the Type list, select Picklist.
- In the first Picklist options list, select Data page.
- In the second Picklist options list, select Option map > Option map list.
- In the Data view parameters section, in the second FieldName field, enter "Domain".
- In the Display field list, select Code.
- Click Submit to complete the configuration for the field.
- In the upper-right corner of the Person data model, click Save.
2 Enter the option map record details
- In the navigation pane of App Studio, click Data to view the list of data objects and integrations.
- In the list of data objects and integrations, click Option map to open the data model.
- Click the Records tab to display the list of records.
- At the bottom of the list of records, click Add record to create the following records:
Record Actions Domain_A - In the ID field, enter Domain_A.
- In the Code field, enter Human Resources.
- In the Display value field, enter Human Resources.
- In the Display order field, enter 1.
- In the Field name field, enter Domain.
Domain_B - In the ID field, enter Domain_B.
- In the Code field, enter Marketing and Sales.
- In the Display value field, enter Marketing and Sales.
- In the Display order field, enter 2.
- In the Field name field, enter Domain.
Domain_C - In the ID field, enter Domain_C.
- In the Code field, enter Finance.
- In the Display value field, enter Finance.
- In the Display order field, enter 3.
- In the Field name field, enter Domain.
Domain_D - In the ID field, enter Domain_D.
- In the Code field, enter Others.
- In the Display value field, enter Others.
- In the Display order field, enter 4.
- In the Field name field, enter Domain.
- In the upper-right corner, click Save.
3 Update the view of the Basic person details
- In the navigation pane of App Studio, click Case types > Grant to open the workflow of the case life cycle.
- In the upper right, click Save and run to begin a new grant application.
- In the New Grant window, click Configure this view to modify the view of the form.
- In the Capture person basic details pane on the right, click the Basic person details section and modify the template:
- In the A section, click the Add icon to open the list of fields that you can add to the form.
- In the list of fields, in the Domain row, click the Add icon to add the field to the Basic person details pane.
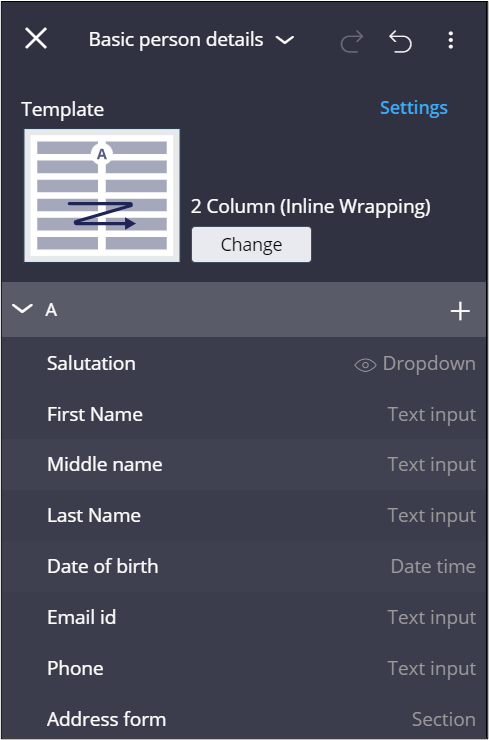
- In the A section, drag Domain above the Phone field.
- Click the Close icon to close the Basic person details pane.
- In the New Grant dialog box, complete the form details:
- In the Person ID list, select PERSONS-6.
- In the Domain list, select Human Resources.
- Click Submit to create a Grant case.
- In the Grant case, in the Capture person basic details section, click Configure this view to edit the view.
- In the configuration pane on the right, click More > Configure form to add a view to the case.

- In the Case information dialog box, click Views > Capture person basic details, and then click Select to add the view.
- Click Done to close the Case information dialog box.
- Click the Close icon to close the configuration pane and return to the Grant case.
4 Create the application submission confirmation email
- In the header of App Studio, click on Exit Preview to go back to Grant case type or navigate to Case types landing page in App Studio and click Grant to open the workflow of the case life cycle.
- In the Create stage, click Step > More > Automations > Send email, and then click Select to add the step.
- In the Step pane on the right, in the first Send to list, select Participants, and then, in the second Send to list, select All participants.
- In the Subject field, enter Application submitted.
- In the Message content section, click Compose.
- In the Compose message window, click Choose template > Application submitted, and then click Select to apply the email message template.
- Click Done to close the Compose message window.
- In the upper right, click Save and run to begin a new grant application.
- In the New Grant window, complete the form details, and then click Submit.
The email is generated in the Files and Documents utility pane on the right. As the email account is not configured, ignore if there is any failure in sending the email.
5 Add the association utility to the case view
- In the header of App Studio, click on Exit Preview to return to the Grant case type.
- In the upper-right corner, click Save and run to begin a new grant application.
- In the New Grant window, complete the form details, and then click Submit to view the Grant case.
- In the Person view section of the Grant case, click Configure this view to modify the view of the form.
- In the Case information pane on the right, add the Association utility:
- Click Case information > Case main inner to update the utility view.
- In the Case main inner pane, in the Utils section, click the Add icon which opens the list of utilities and sections that you can add to the case.
- In the list that is displayed, hover over Association utility, and then click the Add icon to add the field to the Case main inner pane.
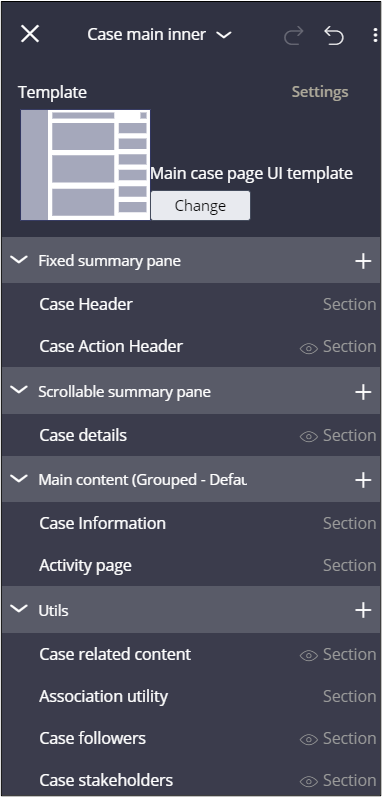
- In the Utils section, drag Associations utility above Case related content.
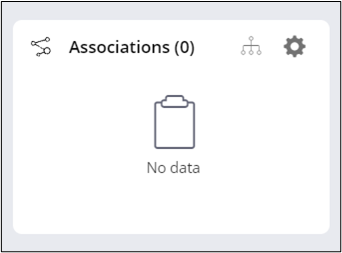
- Click the Close icon to close the configuration pane and return to the Grant case.
- In the case, click Actions > Refresh to reload the case.
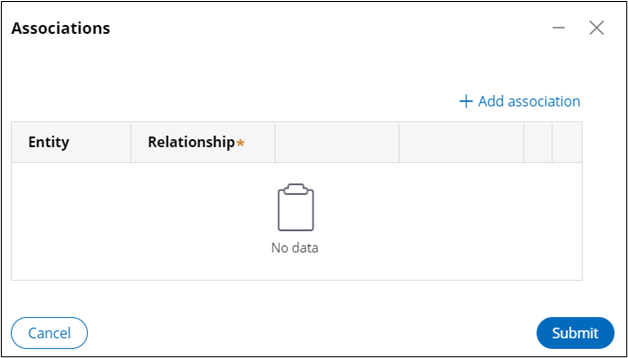
- On the case view, on the Associations widget, click the Gear icon.
- In the Associations window, click Add association.
- In the Add association dialog box, in the Type of association list, select Person, and then click Search to display the list of entities.
- In the list of results, in the Persons4 row, in the Action column, click Select, and then click Submit.
- In the Associations window, in the Relationship list, select Related, and then click Submit.
- Repeat steps 8-11 to add a business association.
- Verify that the newly added associations are displayed in Associations widget.
6 Restrict countries and change state labels
- In the navigation pane of App Studio, click PGP > Internationalization to configure the countries that the Grant application supports.
- In the list of countries, clear the following checkboxes:
- India
- Australia
- Spain
- In the United States row, in the State label column, enter County.
- Click Save to submit your changes.
- Logoff from the application.
If you are having problems with your training, please review the Pega Academy Support FAQs.
Want to help us improve this content?