AttendedRPAChallenge_Start_0.zip
(514.37 KB)
Integrating an attended RPA project with a Pega application
7 Tasks
45 mins
Beginner
Robotic Process Automation
English
Scenario
U+ Bank has developed a customer support application to process credit card transaction disputes. The application does not communicate easily with the Banker Insight application because of the difficulty in maintaining an API. The goal of the application is to streamline the time of the client and the CSR. The business requirement states that the CSR can copy and paste customer information from the customer support application into Banker Insight to perform a search, and then copy and paste the transaction information back into the UBank application to dispute the transaction. At this time, the portion of the application that collects the customer data in the customer support application is still in development, so you manually input the data first until that development finishes. The security and user credentials for accessing the Banker Insight application will be added after the basic search and retrieve functions are completed. Automations that create and parse the data to send back to the Pega application are in the starting project.
Complete the following tasks:
- Add boolean exits and Message Manifest parameters for the Login application method automation, add then add logic if the login does not succeed.
- Create an application method, Start Application, to confirm a running instance of Banker Insight on whether to start or log in to the application.
- Update Customer Search automation to confirm the account is found, verified with the customer SSN, and exists using the record data from the UBank customer support application.
- Create a sub-automation to retrieve the transactions from Banker Insight to the Pega application and close.
- Create a robot activity automation that incorporates the other autos to complete the request.
- Debug automations locally.
- Test and run the package.
Detailed Tasks
1 Add Boolean and Message Manifest exit parameters on Banker Insight Login application method
The modification of the Banker Insight Login automation checks to see if the login credentials are correct or not before exiting. Note that the third-party authentication automations are added later; therefore, the user credentials here are for debugging purposes only.
- Download the Attended RPA Challenge project:
- Save the file to your desktop and unzip the file to extract the project folder to your C:\Users\<username>\Documents\Pega Robot Studio\Projects\.
- On the Home screen in Pega Robot Studio, click Open Project, and then navigate to the projects folder and open AttendedRPAChallenge.pegaproject.
Note: The starter project includes a configured BankerInsight application. The value of the Path field must match the location of BankerInsight on your local computer for the project to function properly. In the BankerInsight application, change the value of the Path to the location of your BankerInsight application.
- In Project Explorer, expand BankerInsight, click the Login automation.
- On the automation surface, select the arrow between the btnLogin and txtCustNum.WaitForCreate, and then press the Delete key.
- On the btnLogin.PerformClick design block automation output, click and drag an automation link, and then release to open the Quick Add dialog box.
- In the Quick Add dialog box, click Toolbox > Data Handling > Strings > Compare > Equals, and then double-click the Equals method to add it to the automation.
- On the Palette, drag the lblNotification from the Banker Insight Login Form to the automation surface to open the Select Action dialog box.
- In the Select Action dialog box, add the Text property to the automation surface:
- Click More, and then click the Properties tab.
- Select the Text property, and then click Add.
- On the automation surface, click and drag an arrow from the lblNotification data output to the String.Equals.string1 data input.
- On the String.Equals design block, configure the remaining two method parameters:
- Click string2, and then enter Invalid Credentials!.
- Click stringComparisonType, and then select CurrentCultureIgnoreCase.
- On the automation, click and drag an arrow from the String.Equals False output to the txtCustNum.WaitForCreate input, as shown in the following figure:

- On the automation surface, update the design blocks with Message Manifest parameters:
- On the Exit label, click the Add icon, and then select String to add the parameter.
- Click param1, and then enter msgDetails.
- On the Exit point, click the Add icon, and then select String to add the parameter.
- Click param1, and then enter msgDetails.
- On the automation surface, on the Jump To > Exit design block, click msgDetails, and then enter BI001.

- On the automation surface, right-click, click Jump To > Exit to add a new block, and then update the following parameters:
- In the Status list, select False.
- Click msgDetails, and then enter BI002.
- On the automation surface, click and drag an automation link from the String.Equals True output to the Jump To Exit design block with BI002, as shown in the following figure:

- In the Toolbar, click Save all.
- Debug the automation and modify the automation for each debugging run to validate all logical paths:
- Right-click the first automation link, and then select Toggle Breakpoint to add a breakpoint to the automation.
- On the automation toolbar, click .
- If prompted in the Test debug dialog box, enter any necessary input parameters and ensure the selection of the Start applications before testing to start or not start the application automatically.
- On the automation toolbar, click the buttons to step through the automation.
- Repeat steps 18a-d to run the debug process and test other logical paths on the automation by changing input parameters or changing the starting of the application.
2 Create the application method to check for a running instance of Banker Insight
This automation verifies whether Banker Insight is running. If it is not, start the application and wait for the LoginForm to match. If it is running, stop and then restart it so that it begins in the proper position.
- In Project Explorer, click the Start Application automation.
- On the automation surface, update the following design blocks with Message Manifest parameters:
- On the Exit label, click the Add icon twice.
- In the Type list of each, select String for one and Boolean for the other.
- For the string, click param1, and then enter msgDetails.
- For the boolean, click param2, and then enter status.
- On the Exit point, click the Add icon, and then click String to add the parameter.
- Click param1, and then enter msgDetails.
- On the Void type list, select Boolean.
- On the automation surface, click and drag a data link from the Exit Label msgdetails data output to the Exit Point String data input, as shown in the following figure:
- On the automation, click and drag an automation link from the Run entry point automation output, and then release it to display the Quick Add dialog box.
- In the Quick Add dialog box, on the Palette, in the Applications section, add the following property to the automation surface:
- Double-click BankerInsight.
- In the Section action dialog box, click More, and then click the Properties tab.
- Select the IsRunning property, and then click Add.
- Double-click the automation surface to access the Quick Add dialog box, and then repeat steps 5a-5c to add the following design blocks to the automation surface:
- A BankerInsight Stop method.
- A BankerInsight Stopped event.
- On the automation surface, right-click the Stopped block to display a context menu.
- On the context menu, click Wait for this event to convert the design block to a WaitForEvent method design block, as shown in the following figure:

- On the automation surface, right-click, and then select Add > Label.
- On the Label design block, click Label1, and then enter Start.
- On the automation surface, right-click and select Jump To > Start and repeat to add a second Jump To Start.
- On the automation surface, create the following automation links:
- Click and drag an automation link from the IsRunning.True output to the WaitForEvent input.
- Click and drag an automation link from with WaitForEvent.Setup output to the BankerInsight.Stop input.
- Click and drag an automation link from the WaitForEvent.Fired output to a Jump to Start input.
- Click and drag an automation link from the IsRunning.False output to a Jump to Start input.

- Double-click the automation surface to access the Quick Add dialog box, and then repeat steps 5a-5c to add the following design blocks to the automation surface:
- The BankerInsight Start method.
- The LoginForm WaitForCreate method.
- On the automation surface, right-click, and then select Jump To > Exit.
- On the Jump To Exit block, click status, and then select True.
- On the automation surface, right-click, and then select Jump To > Exit.
- On the Jump To Exit block, click status, and then select False.
- On the Jump To Exit block, click msgdetails, and then enter BI003.
- On the automation surface, click and drag an automation link from the Start label to the design blocks, as shown in the following figure to start the application and wait for the system to create the Login Form.
Note: If the Login form is created, then go to Success; otherwise, the automation fails.

- On the Toolbar, click , and then confirm that your automation matches the following figure:

- Debug the automation and modify the automation for each debugging run to validate all logical paths:
- Right-click the first automation link, and then select Toggle Breakpoint to add a breakpoint to the automation.
- On the automation toolbar, click .
- If prompted in the Test debug dialog box, enter any necessary input parameters and ensure the selection of the Start applications before testing to start or not start the application automatically.
- On the automation toolbar, click the buttons to step through the automation.
- Repeat steps 18a-d to run the debug process and test other logical paths on the automation by changing input parameters or changing the starting of the application.
3 Create application method to perform a customer search
This automation performs a search by using the customer number from the Pega application and wait for the text to change in the Search Message. If the automation finds the account, it confirms the account by comparing the last name and the last four digits of the social security number of the customer.
Note: This connection shortens the Banker Insight txtSSN to the last four characters and compares the SSNs and the last names.
- In Project Explorer, click the Customer Search automation to display the Customer Search automation tab.
- On the entry point, configure the entry point parameters:
- Click the Add icon, select a Sensitive Data parameter, click param1, and then enter custNumber.
- Click the Add icon, select a String parameter, click param1, and then enter lastName.
- Click the Add icon, select a Sensitive Data parameter, click param1, and then enter persID.
- On the automation surface, configure the Exit label and Exit point:
- On the Exit label, click the Add icon, select a String parameter, click param1, and then enter msgDetails.
- Repeat step 3a to add a Boolean parameter as a status.
- On the Exit point, click the Add icon, select a String parameter, click param1, and then enter msgDetails.
- On the Exit point, click the Result parameter type drop-down, and select Boolean.
- On the automation surface, click and drag an automation link from the msgDetails data of the Exit label to the msgDetails data of the Exit point, and the status data of the Exit label to the Result data of the Exit point, as shown in the following figure:

- On the Run entry point automation output, click and drag an automation link, and then release it to display the Quick Add dialog box.
- In the Quick Add dialog box, add the PerformClick method to the automation surface:
- On the Palette, in the Applications section, click BankerInsight > BankerInsight > grpClientDetail > btnClear.
- Double-click btnClear to display the Select Action dialog box.
- In the Select Action dialog box, click More, and then click the Methods tab.
- Select the PerformClick (no parameters) checkbox, and then click Add.
- Double-click the automation surface to open the Quick Add dialog box, and then add the following design block:
- On the Palette, in the Locals section, double-click custNumber to display the Select Action dialog box.
- In the Select Action dialog box, click More, and then the Properties tab.
- Select the This checkbox, and then click Add.
- Repeat steps 7a-7c to add the following Property or Method design blocks:
- On the Palette, in the Applications section, add a txtCustNum.Text property.
- On the Palette, in the Applications section, add a lblSearchMessage.TextChanged event.
- On the Palette, in the Applications section, add a btnSearch.PerformClick method.
- On the Palette, in the Applications section, add a lblSearchMessage.Text property.
- Double-click the automation surface to access the Quick Add dialog box, and then add the following Strings.Equal design block:
- On the Toolbox, in the Data Handling section, click Strings > Compare > Equals.
- Double-click Equals.
- On the String.Equals block, update the parameters:
- Click string2, and then enter Customer: Not Found!.
- Click stringComparisonType, and then select CurrentCultureIgnoreCase.
- On the automation, add the following Label and Jump to pair:
- Right-click the automation surface, select Add > Label, click Label1, and then enter CustCompare.
- Right-click the automation surface, and then select Jump To > CustCompare.
- On the automation surface, right-click the lblSearchMessage.TextChanged design block, and select Wait for this event.
- On the automation surface, click and drag automation and data links to perform a customer search:
- Connect the btnClear.PerformClick output to the txtCustNum.Properties input.
- Connect the custNumber.This data output to the txtCustNum.Text data input.
- Connect the txtCustNum.Properties output to the lblSearchMessage.TextChanged WaitForEvent input.
- Connect the lblSearchMessage.TextChanged Setup output to the btnSearch.PerformClick input.
- Connect the lblSearchMessage.TextChanged Fired output to the String.Equals input.
- Connect the lblSearchMessage.Text data output to the String.Equals data input.
- Connect the String.Equals False output, to the Jump To Cust Compare input.
- Confirm that your automation matches the following figure::

- Repeat steps 7a-7c to add the following Property and Method design blocks:
- On the Pallete, in the Locals section, add a persID.This property
- On the Pallete, in the Locals section, add a lastName property.
- On the Pallete, in the Application section, add a txtSSN.Text property.
- On the Pallete, in the Application section, add a txtLastName.Text property.
- In the Toolbox, in the Data Handling, add a Strings.Find.Right method.
- On the Strings.Right method, click the Length parameter, and then enter 4.
- On the String.Right design block, right-click on the Result data output, and select Extract Proxy.

- On the Palette, in the Locals section, click and drag the StringProxy1 to the automation surface.
- In the Select action dialog box, click More > Method.
- In the results section, expand Equals, select the first Equals (1 parameters) option, and then click Add.
- On the automation surface, click and drag an automation link from the CustCompare label to the automations and data connectors:
- Connect the Banker Insight txtSSN data output to the str data input to concatenate.
- Connect the Strings.Right output to the persID.Properties input.
- Connect the persID.Properties output to the StringProxy1.Equals input.
- Connect the persID.Properties This data output to the StringProxy1.value data input.
- Connect the StringProxy1.Equals.True output to the txtLastName.Proprety input.
- On the txtLastName.Property.Text data output, click and drag a connector to access Select action dialog.
- On the Select action dialog, click More, and in the Search field enter Equal to filter the methods.
- From the filtered results, expand Equals, click the first Equals (1 parameters) option, and then click Add
- On the automation surface, click and drag automation and data links to complete the automation as shown in the following figure:

- On the automation surface, add the following three design blocks:
- Right-click, select Jump To > Exit, click status, and then select True.
- Right-click, select Jump To > Exit, click msgDetails, and then enter BI004.
- On the Jump To Failed BI004 block, click status, and then select False.
- Right-click and select Jump To > Exit twice, click msgDetails, and then enter BI005.
- On the Jump To Failed BI005 blocks, click status, and then select False.
- On the automation surface, click and drag to draw an automation link:
- Connect the String.Equals True output to the Jump To Exit BI004 input.
- Connect the StringProxy1.Equals False output to the Jump to Exit BI005 input.
- Connect the txtLastName.Equals True output to the Jump To Exit True input.
- Connect the txtLastName.Equals False output to the Jump to Exit BI005 input.
- On the Toolbar, click , and then confirm that your automation matches the following figure:

- Debug the automation and modify the automation for each debugging run to validate all logical paths using the following steps:
- Right-click the first automation link, and then select Toggle Breakpoint to add a breakpoint to the automation.
- On the automation toolbar, click .
- If prompted in the Test debug dialog box, enter any necessary input parameters and ensure the selection of the Start applications before testing to start or not start the application automatically.
- On the automation toolbar, click the buttons to step through the automation.
- Repeat steps 29a-d to run the debug process and test other logical paths on the automation by changing input parameters or changing the starting of the application.
4 Modify the ReadGrid automation to retrieve the transactions and to send to Pega application
The ReadGrid automation creates the new data type format to loop through the transaction rows and retrieve the data while adding it to the correct data type for return to the Pega application. The ReadGrid automation contains a subautomation that parses each data row into the correct JSON format and adds it to the newjArray data type.
- On the Project tab, click the ReadGrid automation.
- On the automation surface, add and configure the following design blocks:
- Right-click and then select Add > Label.
- Click on the Label1 text and enter Loop.
- Right-click and then select Jump to > Loop.
- From the json.Properties output, draw a connector arrow to the Jump To > Loop input.
- Double-click the automation surface to open the Quick Add dialog box, and then add the following design block:
- In the Applications section of the Palette, navigate to BankerInsight > BankerInsight1 > tabAccountMgmt > tabAccountTypes > dbvAcctTrans.
- Double-click dbvAcctTrans to open the Select Action dialog box.
- In the Select Action dialog box, click More, and then click the Properties tab.
- Select the RowCount checkbox, and then click Add.
- In the Toolbox, click the Search field, and then enter Loop.
- In the list of results, click and drag the ForLoop component to the automation surface.
- On the ForLoop design block in the automation, right-click Limit, and then select Reset Changes.
- In the Locals section of the Palette, click and drag the ForLoop1 to the automation surface to add the Index property to the automation:
- In the Select Action dialog box, click More, and then click Properties.
- Select the Index checkbox, and then click Add.
- On the ForLoop1 block, click and drag an automation link from the Yielded output, and then release it to display the Quick Add dialog box.
- In the Quick Add dialog box, add the following method to the automation surface:
- In the Applications section of the Palette, click BankerInsight > BankerInsight1 > tabAccountMgmt > tabAccountTypes > dbvAcctTrans.
- Double-click dbvAcctTrans to open the Select Action dialog box.
- In the Select Action dialog box, click More, and then click Methods.
- Select the GetCellValue checkbox, and then click Add.
- On the dbvAcctTrans.GetCellValue design block, click column, and then enter 3.
- On the automation surface, right-click the dgvAcctTrans.GetCellMethod block, and then select Copy.
- On the automation surface, right-click, and then click paste three times to add three instances of the dgvAcctTrans.GetCellMethod block for a total of four design blocks.
- On the three new dgvAcctTrans.GetCellMethod blocks, repeat step 9 to edit the column parameter, and then enter the following values in each of the three-column indexes:
- 2
- 1
- 0
- On the automation surface, click and drag an automation link to complete the following connections:
- Connect the Loop output to the ForLoop1.StartLoop input.
- Connect the GetCellValue.3 output to the GetCellValue.2 input.
- Connect the GetCellValue.2 output to the GetCellValue.1 input.
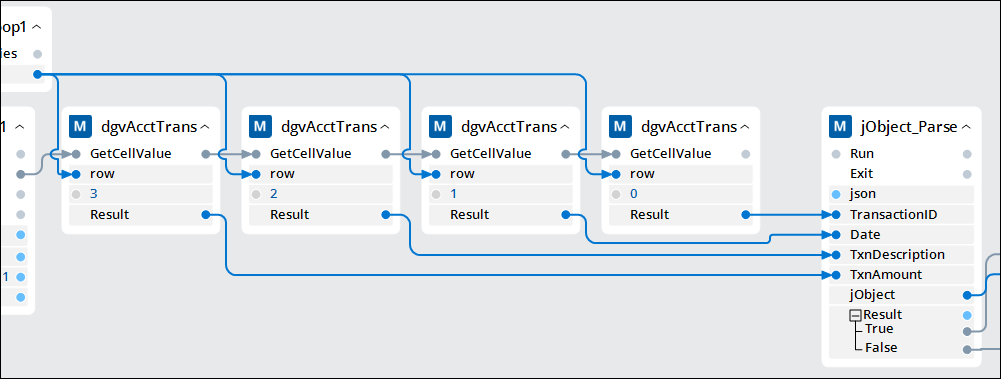
- Connect the GetCellValue.1 output to the GetCellValue.0 input, and then confirm that your automation matches the following figure:

- On the automation surface, click and drag to draw data links to set the loop limit and get the cell value from each column and row:
- From the dgvAccoutTrans.RowCount data output to the ForLoop1.StartLoop.Limit data input.
- From the ForLoop1.Properties.Index data output to the dgvAcctTrans.GetCellValue.Row data input.
- Repeat Step 14b to connect the three remaining dgvAcctTrans.GetCellValue.Row data inputs, and then confirm that your automation matches the following figure:

- On the automation surface, click and draw data links to send the result of each cell to its corresponding jObject_Parse input parameter:
- Connect dgvAcctTrans.Column 0 to jObject_Parse.TransactionID.
- Connect dgvAcctTrans.Column 1 to jObject_Parse.Date.
- Connect dgvAcctTrans.Column 2 to jObject_Parse.TxnDescription.
- Connect dgvAcctTrans.Column 3 to jObject_Parse.TxnAmount.
- On Palette, in the Locals section, click and drag the json component to the automation surface, and then add its Value property.
- On the automation surface, click and drag automation and data links as described as follows:
- Connect the last GetCellValue.Column 0 output to the json.Value input.
- Connect the json.Value output to the jObject_Parse.Run input.
- Connect the json.Value data output to the jObject_Parse.Run.json data input.
- On the automation surface, right-click, and then select Jump To > Success.
- On the ForLoop1.StartLoop Completed output, click and drag an automation link to the Jump To.Success input.
- On the automation toolbar, click , and then confirm that your automation matches the following figure:

- Debug the automation and modify the automation for each debugging run to validate all logical paths using the following steps:
- Right-click the first automation link, and then select Toggle Breakpoint to add a breakpoint to the automation.
- On the automation toolbar, click .
- If prompted in the Test debug dialog box, enter any necessary input parameters and ensure the selection of the Start applications before testing to start or not start the application automatically.
- On the automation toolbar, click the buttons to step through the automation.
- Repeat steps 21a-d to run the debug process and test other logical paths on the automation by changing input parameters or changing the starting of the application.
5 Create a subautomation to check the credit card automation and call the ReadGrid subautomation
This automation confirms a credit card account with the customer, runs a subautomation that retrieves the credit card transactions, runs a subautomation that parses the data to the correct data format to return to the Pega application, and then clears the customer to prepare for the next transaction in Banker Insight.
- In the Project Explorer, click Retrieve Transactions to open the automation.
- On the automation surface, configure the following Success label and Success exit point.
- On the Success label, click the Add icon.
- In the Type drop-down box, select Browse....A Pick type dialog box is displayed.
- In the Search field, enter jarray.
- In the results, left double-click JArray.
- For the JArray data type, click param1, and then enter jsonOutput.
- On the Success exit point, repeat steps 2a-2e.
- On the automation surface, configure the following Failed label and Failed exit point.
- On the Failed label, click the Add icon, select a String parameter, click param1, and then enter msgDetails.
- On the Failed exit point, click the Add icon, select a String parameter, click param1, and then enter msgDetails.
- On the automation surface, click and drag an automation link to connect the string parameters from the labels to the exit points:
- Connect the Success label jsonOutput output to the Success exit point jsonOutput input.
- Connect the Failed label msgDetails output to the Failed exit point msgDetails input, and then confirm that your automation matches the following figure:

- On the Run entry point automation output, click and drag an automation link, and then release it to display the Quick Add dialog box.
- In the Quick Add dialog box, add the following property to the automation surface:
- On the Pallete, in the Application section, click BankerInsight > BankerInsight1 > tabAccountMgmt > tabAccountTypes > rbtnCreditCard.
- Double-click rbtnCreditCard to display the Select Action dialog box.
- In the Select Action dialog box, click More, and then click the Methods tab.
- Select the WaitForCreate (no parameters), and then click Add.
- On the automation surface, click and drag an automation link from rbtnCreditCard.WaitForCreate True automation output, and then release it.
- Repeat steps 6a-d to add the rbtnCreditCard.Enabled property, the rbtnCreditCard.CheckedChanged event, and the rbtnCreditCard.PerformClick method to the automation surface.
- On the rbtnCreditCard.CheckedChanged event design block, right-click, and then select Wait for this event.
- Connect the designs blocks as in the following image:

- On the automation toolbar, click to open the Include in Palette dialog box.
- In the Include in Palette dialog box, add ReadGrid automation:
- Click Automations.
- Click ReadGrid, and then click Add.
- Click Done.
- On the automation surface, click and drag an automation link from rbtnCreditCard.CheckChanged Fired automation output, and then release.
- Repeat steps 6a-d to add the ReadGrid.Run method to the automation surface from the Automations section of the Palette.
- On the automation surface, add the following design blocks:
- Right-click, and then select Jump To > Success.
- Right-click, and then select Jump To > Failed.
- Repeat step 13b to add two more Jump To Failed blocks.
- On the automation surface for two of the Jump To Failed block, click msgDetails, and then enter BI006.
- On the automation surface, click and drag automation and data links to complete the Boolean logic at each True/False endpoint:
- Connect the rbtnCreditCard.WaitForCreate False output to Jump To Failed BI006 input.
- Connect the rbtnCreditCard.Enabled False output to Jump To Failed BI006 input.
- Connect the ReadGrid.Run.Success output to the Jump To Success input.
- Connect the ReadGrid.Run.jsonOutput data output to the Jump To Success jsonOutput data input.
- Connect the ReadGrid.Run.Failed output to the Jump To Failed input.
- Connect the ReadGrid.Run.msgDetails data output to the Jump To Failed msgDetails input.
- On the Toolbar, click , and then confirm that your automation matches the following figure:

- Debug the automation and modify the automation for each debugging run to validate all logical paths using the following steps:
- Right-click the first automation link, and then select Toggle Breakpoint to add a breakpoint to the automation.
- On the automation toolbar, click .
- If prompted in the Test debug dialog box, enter any necessary input parameters and ensure the selection of the Start applications before testing to start or not start the application automatically.
- On the automation toolbar, click the buttons to step through the automation.
- Repeat steps 17a-d to run the debug process and test other logical paths on the automation by changing input parameters or changing the starting of the application.
6 Create robot activity automation that incorporates the other application methods and subautomations
This automation, starting with the robot activity, runs each application method and sub-automations to log in, search for the customer, retrieve the credit card transactions, and send all necessary data back to the Ubank customer support application. This automation version is developed for local debugging. The final version of this automation differs when it is ready to deploy to Pega Robot Manager.
- On the Project Explorer, click BankerInsight to open the Banker Insight application tab.
- On the BankerInsight tab, in the Palette, click the Interface.
- In the Methods section, click CustomerSearch.
- From the Visibility type list, select Public.

- In the Toolbar, click .
- Repeat steps 2-4 for the two following application methods:
- Login
- Start Application
- In Project Explorer, click mainRetrieve Transacations to open the automation.
- On the Toolbar, click to open the Include in Palette dialog box.
- In the Include in Palette dialog box, add the Retrieve Transactions automation:
- Click Automations.
- Click to highlight Retrieve Transactions, and then click Add.
- Click Done to close the Include in Palette dialog box.
- Double-click the automation surface to display the Quick Add dialog box.
- In the Quick Add dialog box, add the Start Application method from the Banker Insight application:
- On the Palette, in the Applications section, double-click the BankerInsight application to display the Select Action dialog box.
- In the Select Action dialog box, click More, and then click the Methods tab.
- Click Start Application, and then click Add.
- Repeat steps 10a-c to add the two following Banker Insight application methods:
- Login
- Customer Search
- On the automation surface, click and drag automation links for the following items:
- Connect the Run point to Start Application.
- Connect the True output to Login.
- Connect the True output to Customer Search.
- On the BankerInsight.Login block, update the following parameters:
- Click Username, and then enter pega.
- Click Password, and then enter pega.
- In the BankerInsight.Customer Search block, update the following parameters:
Note: The hard coding of values is for local debugging only, where you can change these values to test the logical paths. The automation requires adjustment for further testing with a Security login and with the UBank Customer Support application. During before the project is deployed to production these values should be changed to Sensitive Data.
- Click custNumber, and then enter 1234500078963456.
- Click lastName, and then enter Connor.
- Click persID, and then enter 2836, and then confirm that your automation matches the following figure:

- Double-click the automation surface to open the Quick Add dialog box.
- On the Quick Add dialog box, add the Run method for the Retrieve Transactions automation:
- On the Palette, in the Automations section, click and drag Retrieve Transactions to the automation surface.
- On the dialog box, click More, and then click the Methods tab.
- Click to select Run, and then click Add.
- On the Toolbox, add a message box to display the transaction data returned from the Retrieve Transactions automation as follows:
- In the Search field, enter message.
- In the list of results, click and drag the ShowMessageBox method to the automation surface to open the Choose Method Overload dialog box.
- In the Choose Method Overload dialog box, select the second radio button, and then click Submit.
- On the automation surface, right-click, and then select Jump To > Success.
- On the automation surface, click and drag automation and data links:
- Connect the BankerInsight.Customer Search.True output to the Retrieve Transactions input.
- Connect the Retrieve Transactions.Success output to the MessageBox.MessageBox input.
- Connect the Retrieve Transactions.jsonOutput data output to the MessageBox.message data input
- Connect the MessageBox.OK output to the Jump To Success input.
- On the Toolbar, click , and then confirm that your automation matches the following figure:

7 Update the robot activity automation to add the completion of the robot activity status and information
This automation completes the mainRetrieve Transactions automation by adding the appropriate labels and exit points with parameters.
- On the automation surface, add and configure a label as follows:
- Right-click, and then select Add > Label.
- On the Label1 block, click Label1, and then enter ErrorMsg.
- On the ErrorMsg label, click the Add icon.
- In the Type list, select String.
- Click param1, and then enter msgDetails.
- On the automation surface, add the following parameters to the Failed label, and then configure the label:
- On the Failed Label, add a String parameter, and then enter msgDetails.
- On the Failed Label, add a Boolean parameter, and then enter result.
- On the automation surface, right-click, and then select Jump To > ErrorMsg.
- Repeat step 3 to add three Jump To.ErrorMsg blocks.
- On the automation surface, click and drag automation and data links:
- Connect the BankerInsight.Start Application False automation output to a Jump To.ErrorMsg label.
- Connect the BankerInsight.Start Application msgDetails data output to the Jump To.ErrorMsg msgDetails data input.
- Connect the BankerInsight.Login False automation output to a Jump To.ErrorMsg label.
- Connect the BankerInsight.Login msgDetails data output to a Jump To.ErrorMsg msgDetails data input.
- Connect the BankerInsight.Customer Search False automation output to a Jump To.ErrorMsg label.
- Connect the BankerInsight.Customer Search msgDetails data output to a Jump To.ErrorMsg msgDetails data input.
- Connect the Retrieve Transaction.Run Failed automation output to a Jump To.ErrorMsg label.
- Connect the Retrieve Transaction.Run msgDetails data output to a Jump To.ErrorMsg msgDetails data input, and then confirm that your automation matches the following figure:

- On the automation surface, right-click, and then select Jump To > Failed.
- On the Jump To Failed block, click result, and then select False.
- In the search field of the Toolbox, enter Message to filter the results.
- In the Toolbox search results, in the
MessageManifestfolder, click and drag the GetMessageDetails method. - Double-click the automation surface to open the Quick add dialog box.
- On the Palette, in the Locals section, double-click the ErrorMsg.msgDetails component to the automation surface.
- On the automation surface, click and drag automation and data links to complete the error message logic:
- Connect the ErrorMsg label output to the MessageManifest.GetMessageDetails.code input.
- Connect the ErrorMsg.msgDetails data output to the MessageManifest.GetMessageDetails code input.
- Connect the MessageManifest.GetMessageDetails output to the Jump To Failed input.
- Connect the ErrorMsg.msgDetails data output to the Jump To Failed.msgDetails data input, and then confirm that your automation matches the following figure:

- On the Failed exit point, add a String parameter and change the Result to a Boolean:
- Click the Add icon.
- In the Type list, select String.
- Click param1, and then enter msgDetails.
- Click Void, and then select Boolean.
- On the automation surface, click and drag an arrow to connect the Failed label parameters to their corresponding Failed exit parameters.
- On the Toolbar, click , and then confirm that your automation matches the following figure:

This Challenge is to practice what you learned in the following Module:
Available in the following mission:
If you are having problems with your training, please review the Pega Academy Support FAQs.
Want to help us improve this content?