
Linking Cases and Case Types in Constellation applications
4 Tasks
35 mins
Intermediate
Constellation
User Experience
English
Scenario
During the application design phase, the business stakeholders for Sweet Life determined the need to establish relationships between Cases. For example, Sweet Life must recognize similar Incident Cases easily so that the management at Sweet Life can evaluate its Caseload more efficiently.
Another business requirement of the Tell Us More application specifies that data related to the shipping process must transfer between the Incident and Ship Parcel Cases.
To facilitate this functionality, you are tasked with configuring the Link Similar and Shipping Service Views in the Incident Case Type.
The following table provides the credentials you need to complete the challenge:
| Role | User name | Password |
|---|---|---|
| System Architect | Author@SL | pega123! |
Note: Your practice environment may support the completion of multiple challenges. As a result, the configuration shown in the challenge walkthrough may not match your environment exactly.
Challenge Walkthrough
Detailed Tasks
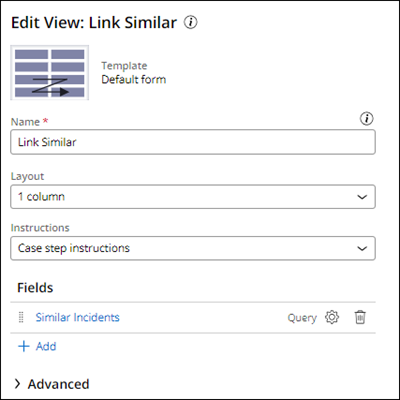
1 Configure the Link Similar View
- In the Pega instance for the challenge, enter the following credentials:
- In the User name field, enter Author@SL.
- In the Password field, enter pega123!
- In the navigation pane of App Studio, click Case Types > Incident to open the Incident Case Type.
- Click the Data Model tab, and then create a new field:
- In the Name field, enter Similar Incidents.
- In the Type field, select Query.
- In the Options field, select List of records.
- In the Data Page field, select Incident > Similar Incidents.
- Complete the Parameters section:
- in the IncidentType field, select Field, and then select Incident Type.
- In the IncidentSubType field, select Field, and then select Incident SubType.
- In the CaseID field, select Field and then select ID.
- Click Submit
- Click Save.
- Click the Workflow tab.
- Click the Link Similar Incidents Step, and then click Configure View.
- Add the Similar Incidents field to the Link Similar View.
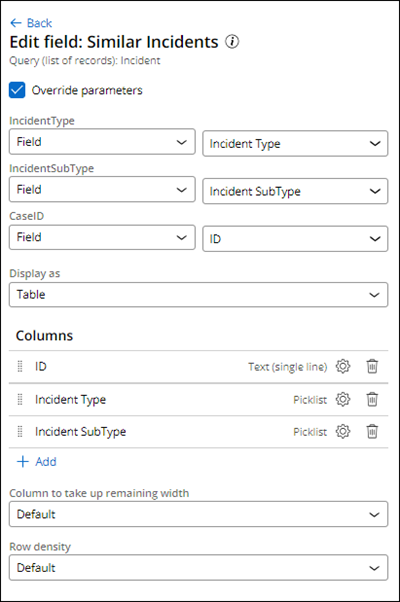
- Click Similar Incidents to edit the field configurations:
- Select the Override parameters checkbox.
- In the Display as field, select Table.
- In the Columns section, delete Primary Fields.
- Add the following fields:
- ID
- Incident Type
- Incident SubType
- Click Back to return to the Link Similar View.
- In the Instructions list, select Override Case Step instructions.
- In the Instructions text field, enter Link this Incident Case to similar Incident Cases in past for better root cause analysis.
- Click Submit, and then click Save.
2 Add the Shipping Service data type to the Incident Case Type
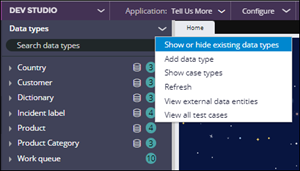
- Switch to Dev Studio, and then in the navigation pane, click Data types.
- Expand the arrow next to Data types, and then select Show or hide existing data types.
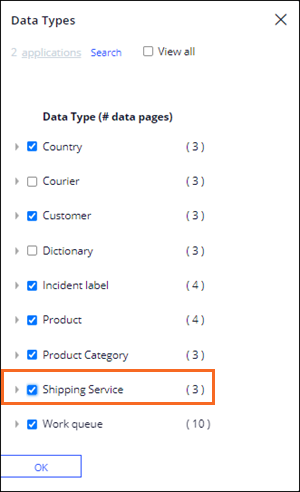
- In the Data Types window, click applications, select the Shipment checkbox, and then click Apply.
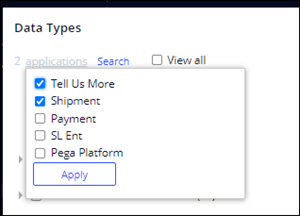
- Select the Shipping Service checkbox, and then click OK.
Note: Log out of the Sweet Life application, and then log back in for the changes to take effect.
3 Configure the Shipping Service View
- In the navigation pane of App Studio, click Case Types > Incident to access the Incident Case Type.
- Click the Data Model tab, and then create a field with the following details:
- In the Name field, enter Shipping Service.
- In the Type list, select Picklist.
- In the Display As list, select Drop-down list.
- In Picklist options list, select Data Page, and then select Shipping Service > List Shipping Service.
- In the Display field list, select Service Name.
- Click Submit.

- Click Save.
- Click the Workflow tab.
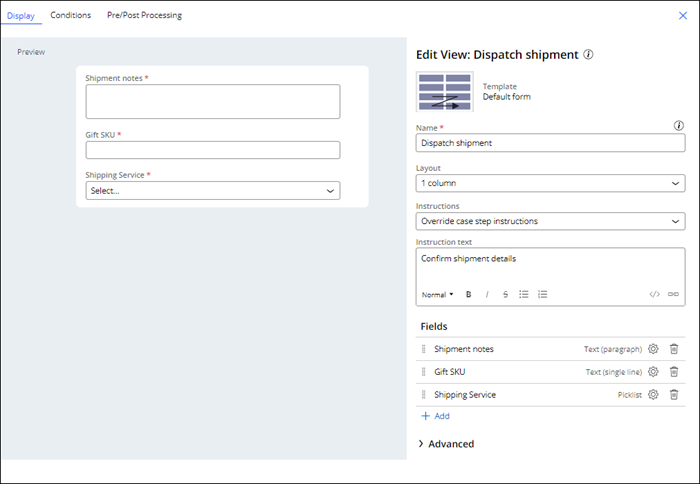
- Click the Dispatch shipment Step, and then Configure View.
- Add the following fields to the Dispatch Shipment View:
- Gift SKU
- Shipment notes
- Shipping Service
- Drag the Gift SKU field to the second position.
- In the row for each field, click the Gear icon to configure all three fields as always required.
- In the Instructions list, select Override Case Step instructions.
- In the Instructions text field, enter Confirm shipment details.
- Click Submit.
- Click Save.
4 Configure the Ship Parcel Case
- Switch to Dev Studio.
- In the App Explorer, expand SL-TellUsMore-Work-ShipParcel > Data model > Data Transform, and then click the CreateShipmentCase Data Transform.
- Click Save As, and then click Create and open to open an editable version of the CreateShipmentCase Data Transform.
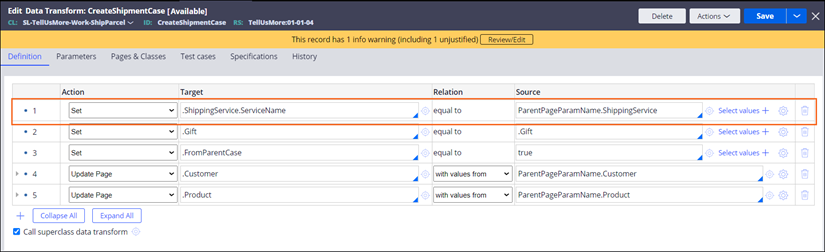
- Pass the Shipping Service property from the Incident Case to the Ship Parcel Case by adding the following row to the CreateShipmentCase Data Transform:
- Create a set action with a .ShippingService.ServiceName target equal to a ParentPageParamName.ShippingService source.
- Move the set action to line 1 of the Data Transform.
- Click Save.
 Note: The ShippingService property in the Incident Case Type is a scalar property and in the Shipment Case Type it is defined as page.
- Switch to App Studio, open the Ship Parcel Case Type, and then click the UX tab.
- Click the Other Views tab, and then open the Schedule deliver View.
- In the Schedule deliver View, delete the Shipping Service and Courier fields.
Note: These fields are now included in the Shipment details field group.
 Note: If you receive an error message and see a Save Failed status for the View, click Back, and then reopen the Schedule deliver View. The Shipping Service and Courier fields are no longer displayed, and the View saves as originally intended.
 - Click Save.
This Challenge is to practice what you learned in the following Module:
Available in the following mission:
If you are having problems with your training, please review the Pega Academy Support FAQs.
Want to help us improve this content?