Routing email based on content
Archived
4 Tasks
15 mins
Scenario
U+ is a major company in the financial industry that wants to improve engagement with customers. U+ has recently opened an email channel where customers can initiate contact for any needs or issues. Issues include administrative emails (for example, an address or email change), transaction disputes, and complaints. Due to the large volume of incoming emails, U+ has decided to use AI and use intelligent email routing to simplify their work.
Currently, only a basic email routing system is in place — all emails are routed to a single department. A human must scan through the email and manually route it to the appropriate department. Also, several entities, such as account numbers and email addresses, are extracted.
In this phase of the implementation, U+ wants to set up automatic routing for two topics. Emails detected as address changes must be routed to the Account Maintenance department, and emails detected as transaction disputes must be routed to the Dispute Transactions department.
Use the following credentials to log in to the exercise system:
|
Role |
Username |
Password |
| Email Client user | Customer1 | password |
|
Customer Service Representative |
CACSR |
rules |
|
Customer Service Application Administrator |
CS AppAdmin |
password123! |
Your assignment consists of the following tasks:
Task 1: Send emails to test current routing rules
As a customer, send two emails to U+. In the first email, you request an address change. In the second email, you dispute a transaction.
Task 2: Verify that the emails are routed to the same queue
As a Customer Service Representative, verify that both emails are routed to the same work queue. Also, notice that the current system can already use text analytics to detect the Account Address Change topic in the email requesting an address change.
Task 3: Add a new topic and configure keywords
As a CS Application Administrator, add a new topic called Dispute Transaction, which is valid when the keywords wrong, invalid, false, credit card, transaction are found.
Task 4: Route emails based on the topic detected
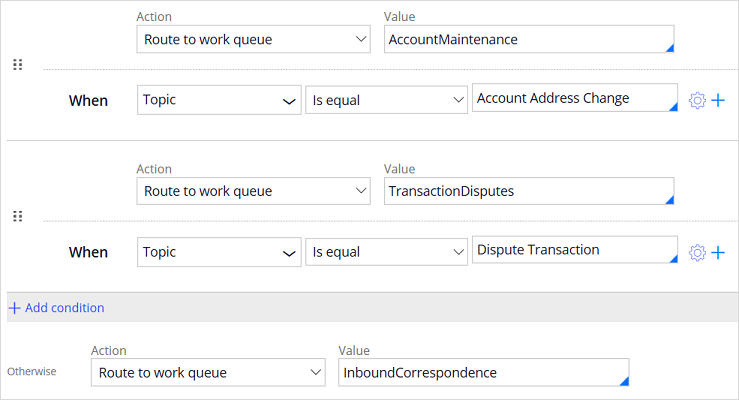
Configure the email interface to route emails to Account Maintenance department when the topic detected is Account Address Change and to route emails to the Transaction Disputes department when the topic detected is Dispute Transaction.
Challenge Walkthrough
Detailed Tasks
1 Send emails to test current routing rules
- Open the exercise system landing page, and then click Email.
- Log in as the Email client user with user name customer1 and password password.
- In the left pane, click Mail to access the Inbox.
- In the header, click Write email to compose a new email.
- Compose the first email.
Subject: Moving to a new house
Body:
Dear U+,
My customer number is: 123456789.
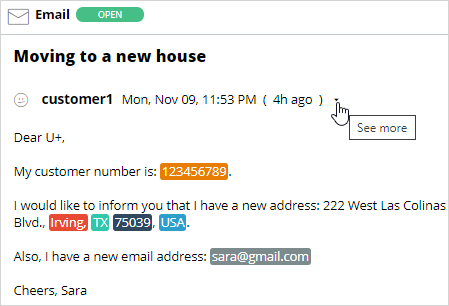
I would like to inform you that I have a new address: 222 West Las Colinas Blvd., Irving, TX 75039, USA.
Also, I have a new email address: [email protected]
Cheers, Sara
- Click Send message.
- Compose the second email.
Subject: Something went wrong
Body:
Dear U+,
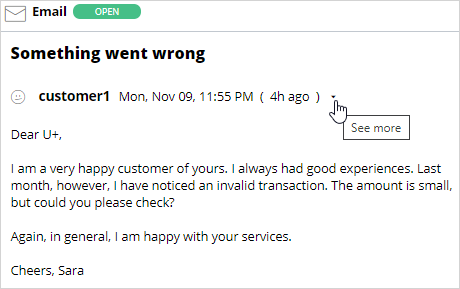
I am a very happy customer of yours. I always had good experiences. Last month, however, I have noticed an invalid transaction. The amount is small, but could you please check?
Again, in general, I am happy with your services.
Cheers, Sara
- Click Send message.
- In the left pane, click Log off to leave the email client.
2 Verify that the emails are routed to the same place
- Log in as a Customer Service Representative with user name CACSR using password rules.
- At this time, the user does not have any assigned cases in the My Cases tab. Click the My Workbaskets tab.
- In the View Queue for list, select Inbound correspondence.
- Verify that two cases are created for the emails sent. This is because the Intelligent routing is set-up for all types of emails to be routed to a single queue: Inbound correspondence.
Note: Note: It can take up to 2 minutes for the case to get created after you send the email.
- In the ID column, click the case ID link to open the Moving to a new house email case.
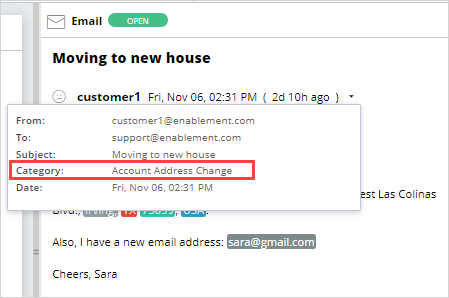
- In the case, click the See more icon next to Customer1.
- Note that the email is correctly categorized as Account Address Change and that entities like the account number and email address are identified.
- On the tab, click Close icon to close the case.
- In the My workbaskets tab, click the Something went wrong case.
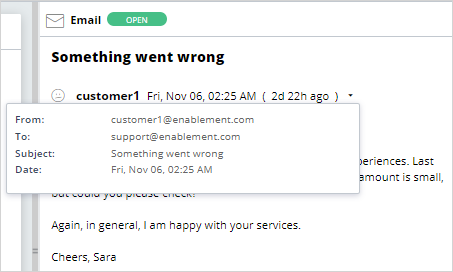
- In the case, click the See more icon next to Customer1.
Notice that no topic is detected.
- In the upper-right corner, click CC > Logout.
3 Add a new topic and configure keywords
- Log in to App Studio as CS Application Administrator with user name CSAppAdmin using password password123!
- In the navigation pane of App Studio, click Channels.
- On the Channels landing page, click My Support to open the email channel configuration.
- In the MySupport channel, click the Behavior tab. Notice the five case types configured, including Account Address Change.
- In the Suggested cases section, click Add suggested case.
- In the Case type list, select Dispute Transaction.
- Click the Text Analysis tab.
- In the Approximate match field, enter the keywords wrong, invalid, false, credit card, and transaction.
- Click Submit to add the keywords.
- Click Save to update the configuration.
- In the upper-right, click Test and retest the same emails. Use any value for the From (email), To (email) and From (name) fields.
Note that the topic is Dispute Transaction.
4 Route emails based on the topic detected
- In the Intelligent routing section, click Add condition.
Note: Observe the routing configuration for all emails. They are currently routed to a single queue: Inbound Correspondence.
- In the Action list, select Route to work queue.
- From the Value list, select Account Maintenance.
Tip: In a value field like this, just place the cursor in the field and press the down arrow button to select a valid value from the list.
- In the When list, select NLP > Topic.
- To the right of the condition drop-down list, click in the text box, and then enter or select Account Address Change.
- Similarly, route the topic Dispute Transaction to the TransactionDisputes work queue.
- In the header of the MySupport channel, click Save.
- Click Test and retest the two emails.
- In the Outcomes section, verify that the email requesting an address change is routed to the AccountMaintainance work queue, and the email disputing a transaction to the TransactionDisputes work queue.

