
Validating data against a pattern
3 Tasks
10 mins
Intermediate
Data Integration
English
Scenario
TGB has decided to open a branch office in India. Candidates from India must provide an Aadhaar ID for identification purposes. Ensure that candidates located in India enter an Aadhaar ID that satisfies the following requirements:
- The ID does not contain alphabetic or special characters.
- The ID consists of three groups of four numbers, with a space separating each group of four.
- The ID does not start with either a "0" or "1".
Configure the Candidate information layout on the Collect personal details step to display a field for the Aadhaar ID. Configure the form so that the field is displayed and is required only if the user provides the three-character country code for India (IND).
Note: For more information about the Aadhaar ID program, see https://en.wikipedia.org/wiki/Aadhaar.
The following table provides the credentials you need to complete the challenge.
| Role | User name | Password |
|---|---|---|
| Senior System Architect | SSA@TGB | pega123! |
Challenge Walkthrough
Detailed Tasks
1 Create an Edit validate rule to test the Aadhaar ID pattern
- In Dev Studio, on the Create menu, click Data Model > Edit Validate to display the Create Edit Validate form.
- On the Create Property form, in the Label field, enter Validate Aadhaar ID.
- Click Create and open to create the edit validate rule.
- On the Validate Aadhaar ID edit validate form, in the Java Source field, enter the following Java code.
// Regex to check valid Aadhaar number
String regex= "^[2-9]{1}[0-9]{3}\\s[0-9]{4}\\s[0-9]{4}$";// Compile the ReGex
java.util.regex.Pattern p = java.util.regex.Pattern.compile(regex);// If the string is empty, return false
if (theValue == null || theValue.trim().equals("")) return false;// Pattern class contains matcher() method to match the given string and the regular expression
java.util.regex.Matcher m = p.matcher(theValue);// Return if the string matched the ReGex
return m.matches(); - Click Save to complete the configuration of the Edit validate rule.
2 Create the Aadhaar ID property
- On the Create menu, click Data Model > Property to display the Create Property form.
- On the Create Property form, in the Label field, enter Aadhaar ID.
- In the Class field, enter TGB-HRApps-Data-Candidate.
Note: By default, only classes that correspond to data types listed in the Data Explorer are presented in the list of available classes. You can expose the data type in the Data Explorer to add the TGB-HRApps-Data-Candidate class to the list of choices.
- Click Create and open to create the property rule.
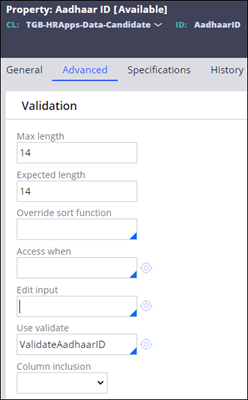
- On the Aadhaar ID property form, click the Advanced tab.
- On the Advanced tab, in the Max length field, enter 14 to prevent the user from entering a value longer than 14 characters.
- In the Expected length field, enter 14.
- In the Use validate field, enter or select ValidateAadhaarID to apply the Validate Aadhaar ID edit validate rule when the user provides a value for the property.
- Click Save to complete the configuration of the Aadhaar ID property.
3 Add the Aadhaar ID field to the Collect personal information step
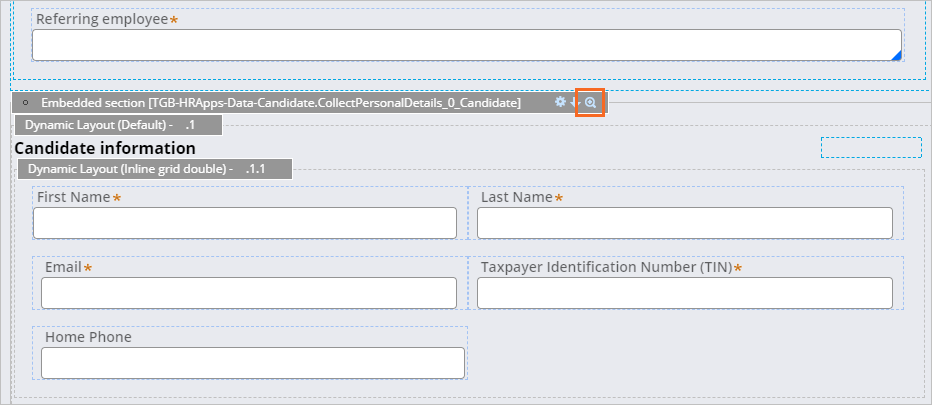
- In the App Explorer, select Candidate > User Interface > Section > CollectPersonalDetails_0 to open the Collect personal details section.
- Click the header of the CollectPersonalDetails_0_Candidate embedded section layout.
- In the layout header, click the Open Rule icon to open the embedded CollectPersonalDetails_0_Candidate section on a new tab.
 Note: When you open the embedded section, your browser presents a warning stating that changes to the embedded section are not reflected in the CollectPersonalDetails_0 section until the section is refreshed. Click OK to dismiss the dialog.
 - Save a copy of the CollectPersonalDetails_0_Candidate section in an unlocked ruleset version.
- In the Data capture list, select Text input.
- Drag the cursor to the Candidate information layout, and place the text input control to the right of the Home Phone field.
- Double-click the text input field to open the Cell Properties dialog box.
- In the Cell Properties dialog box, in the Property field, enter or select .AadhaarID.
- In the Visibility list, select Condition (expression). The Cell Properties dialog box updates to display the Condition for visibility field under the Visibility field.
- In the Condition for visibility field, enter .pyCountryCode='IND'.
- In the Required list, select Condition (expression). The Cell Properties dialog box updates to display the Condition for required under below the Visibility field.
- In the Condition for required field, enter .pyCountryCode='IND'.

- Click Submit to close the Cell Properties dialog box.
- Click Save to complete the configuration of the section rule.
- Click Check in to check in the rule and prevent further editing of the section.
This Challenge is to practice what you learned in the following Module:
If you are having problems with your training, please review the Pega Academy Support FAQs.
Want to help us improve this content?