Other interrogation techniques
Other interrogation techniques
Because application development is inconsistent, you can interrogate an application in three other ways if the standard method does not work. You can:
- Use Create Control
- Add Menu Items
- Use Web Controls
Using the Create Control for Windows applications
You may encounter a target that is visible but positioned so the Target icon cannot focus on the object. Follow these steps to use the Create Control interrogation method.
- Start the Interrogation process.
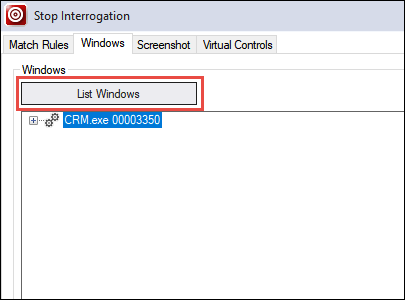
- On the Adapter Designer window, click the Windows tab.
- Click the List Windows button to show all available processes within the selected adapter.
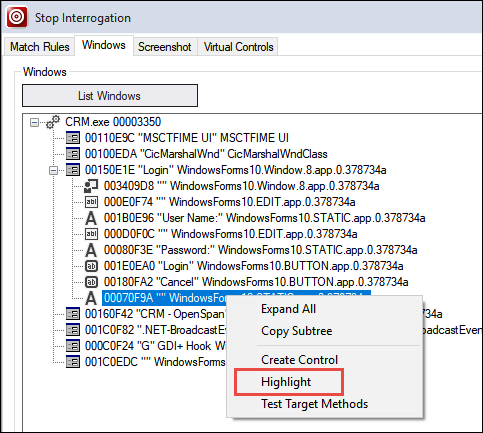
- From the list of processes, click the Plus to expand the objects.
- Continue expanding the different levels as needed.
- Right-click on an object and select Highlight. The application appears with the selected object outlined and flashing.
Nota: Using the Highlight feature is helpful when you are trying to determine the location of a control within the application interface.
- Return to the Windows tab on the designer window.
- Right-click on the desired object and select Create Control. The control appears in the Object Explorer along with associated parents with the matching green checkmark.
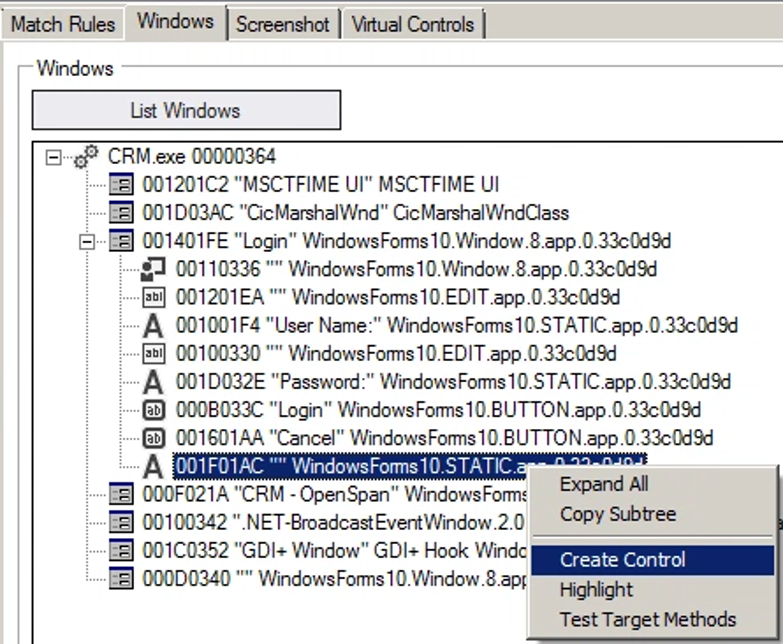
Repeat these steps for each object required for the solution and business case.
Using Add Menu Items
There are times that the business case requires a menu option for the solution. Using the interrogation target disables the menu options on the application window.
Follow these steps to use the Add Menu Items.
- Start the Interrogation process.
- Navigate to the main windows form that contains the menu.
- In the Object Hierarchy, highlight the windows form.
- Right-click the windows form object in the Object Hierarchy. The object must show as matched to display the Add Menu Items option.
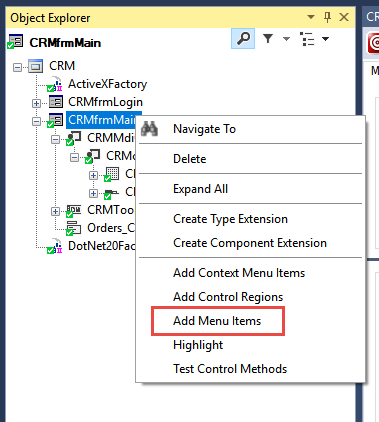
- On the context menu, select Add Menu Items. The Add Menu Items window displays.

- Select the desired menu items from the list.
- Click Refresh to display dynamically created menu items after navigating to a window that creates them.
- Stop the interrogation process.
As long as the main window form matches, the menu items from the form match, Pega Robot Studio™ uses the Menu Item Path match rule to match these controls. The path refers to the hierarchy of the menu options.
For example, the path for the Exit menu option is File > Exit. When using sub-options, such as Exit, in an automation, select the Exit option from the Add Menu Items window, the full path of File > Exit is not needed.
Using Web Controls
Developers often use hidden controls in websites to store data or important information needed for the application but not for the eyes of the user. Since you cannot see the label, you cannot drop the target icon on it.
Use the Web Controls tab on the Adapter Design window to locate the hidden object and add it to your solution. The Web Controls tab also provides a convenient way to list all web targets from a page currently open and matched in the interrogator.
- In the Solution Explorer, double-click on a web adapter project to open it in the design window.
- In the design window, click Start Interrogation. The Interrogation form window displays and the browser opens.
- Navigate in the web application to the desired web page.
- Minimize the browser window to bring the Adapter Design window into view.
- On the Adapter Design window, click the Web Controls tab.
- On the Web Controls tab, click List Browsers and Frames. The browser list populates.
- In the browser list, select the webpage to highlight it.
- In the Filter combo box on the Web Controls tab, select Input type = "Hidden". You can use this method to search for any web object from the list.

- On the Web Controls tab, click List Web Controls. A list populates.
- If needed, right-click on the object in the web controls list to highlight it on the web page.
- On the web control list, right-click on the control and select Create Control. The matched object appears in the Object Hierarchy.
- Complete the interrogation process.