Verify the version tags to ensure you are consuming the intended content or, complete the latest version.

Additional tasks for designing a mobile app experience

The following related tasks are not covered in the challenge that accompanies this module. Please review this content, which identifies different use cases and describes procedures for completing these additional tasks. These tasks are in scope for certification. Your exam may include questions on these tasks.

Authoring mobile list pages

Pega Community logo

Note: The following content, referenced from Pega Community, is included here to help you better achieve the module learning objectives.

Improve the responsiveness and load time of the user interface in your mobile app by displaying the content of your app as a mobile list page. This way you enhance your app with a native screen that has fluent transitions and a search bar in the header by default.

For example, you can create a native list page that displays all expenses in the Lodging category. A manager who uses your app can search for a specific employee name to get results that include all the lodging expenses of that employee.

Before you begin: Prepare the framework for your list page:
  • Create a mobile channel for your app. For more information, see Setting up mobile apps.
  • Ensure that you have a case type that you can use to populate the page screen. For example, create a case type for expense reporting. For more information, see Case types.
  • If you want to add custom swipe actions for the users to perform on list items, configure a case-wide action first. For more information, see Adding optional actions to cases.
In prescriptive low-code authoring for list pages, you simply leverage case types from your Pega application. You can then fine-tune how your app displays the case type data on mobile devices. Tip: If you create a mobile list page by using an offline-enabled case type, and then add that list page to the navigation of your app, the automatic packaging process ensures that all cases that the list page references are available for use in offline mode. For more information about enabling offline support for case types in your app, see Enabling case processing in offline-enabled mobile apps.
  1. Open your mobile channel:
    1. In the navigation pane of App Studio, click Channels.
    2. In the Current channel interfaces section, click the tile that represents a mobile channel for your app.
  2. On the mobile channel page, on the Content tab, click the List pages category.
  3. Create a new list page by clicking Add.
  4. In the Edit page section, in the Page name field, enter the name of the list page.
  5. Optional: To change the default icon of the mobile list page, select an icon from the image catalog:
    1. Next to the Page name field, click the current icon.
    2. In the Icon class picker window, select the icon that you want to use.
  6. In the Case type list, select the case type that supports your business process. For example: For a list page where users submit expenses in different categories, such as the Lodging category, select the expense reporting case type.
  7. In the Data page list, select the list data source that you want to use to populate the page screen. For example: Select the data view that stores all expense reports from the Lodging category.
    Note: When you create a case type, Pega Platform automatically creates a list data source, which you can use in mobile list pages.
  8. In the List item information section, configure how the page displays the work items:
    Choices Actions
    Add a field to the work item
    1. In the List item information section, click Add field, and then select a field type.
    2. In the list next to the field, select the property that you want to use to populate the field at run time.
    Remove a field from the work item In the List item information section, next to the field that you want to remove, click the Delete this row icon.
    For example: You can use the following field and property configuration to display the page with expense reports:
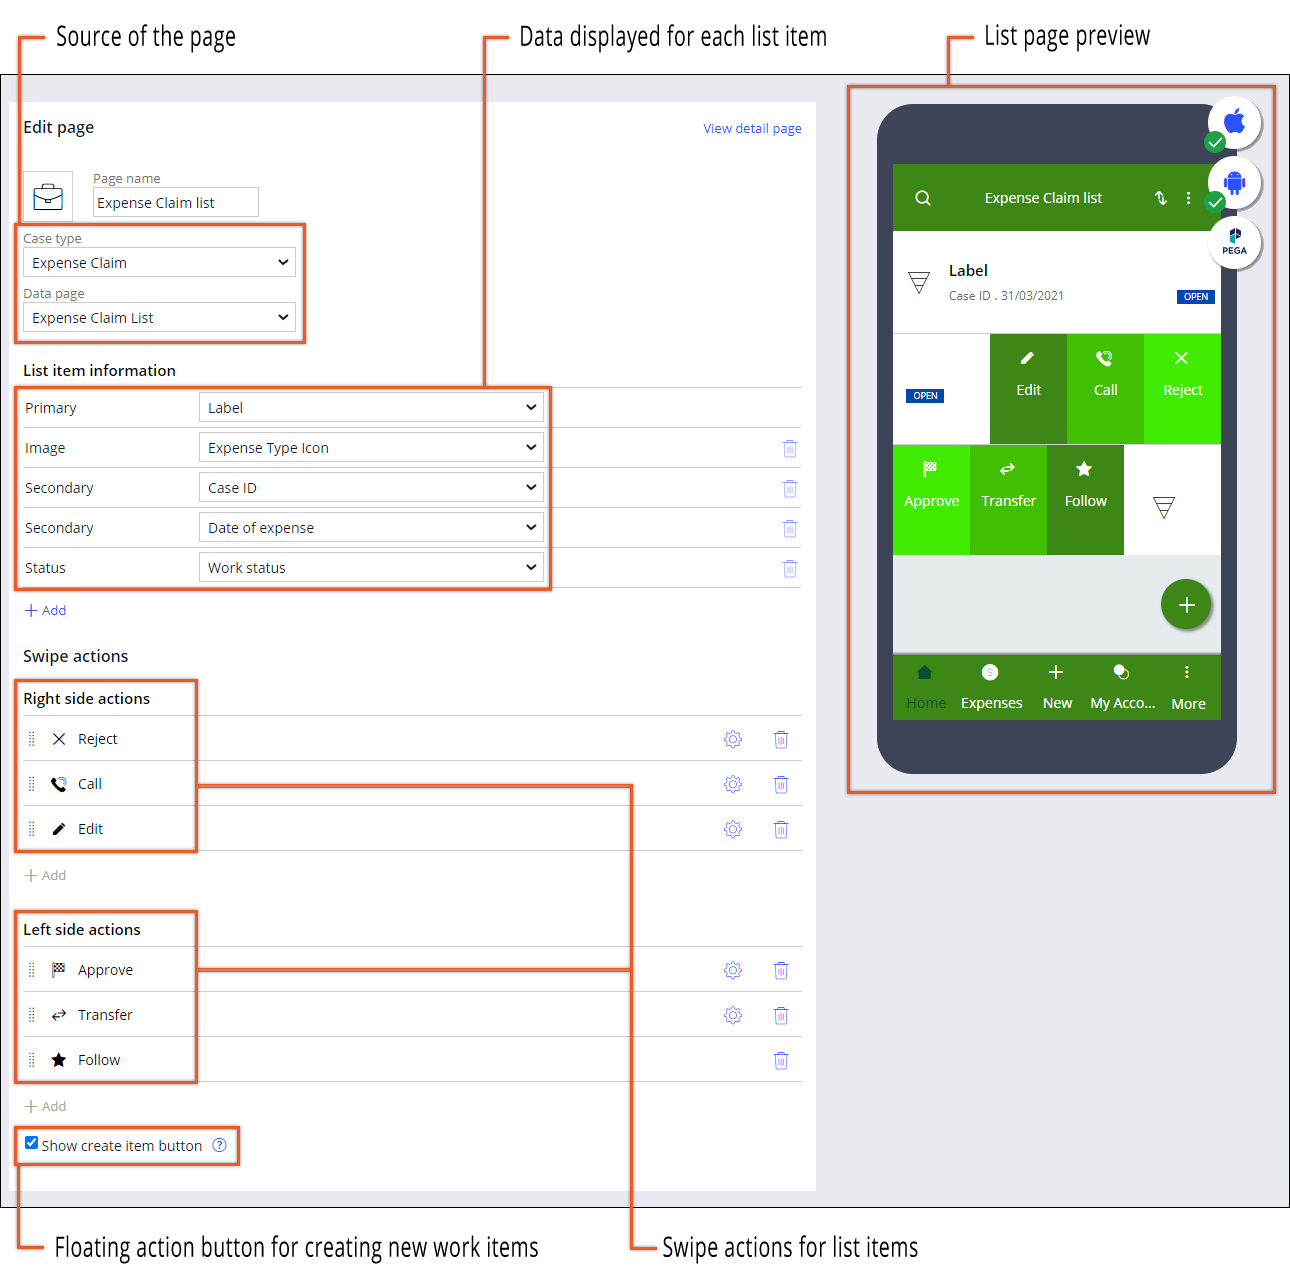
    • For the Primary field, select the Label property that defines the report name.
    • For the Secondary field, select the Amount property that defines the total amount of the expense.
    • For the next Secondary field, select the Create Date/Time property that defines the date and time when the expense is submitted.
    • For the next Secondary field, add a custom property that defines the category of the expense, such as Lodging.
    • For the Status field, select the Work status property that defines the status of the report.
  9. In the Swipe actions section, specify what happens when users swipe across selected work items at run time:
    Choices Actions
    Add a right-to-left swipe action In the Right side actions category, click Add action, and then select the action that you want to add.
    Add a left-to-right swipe action In the Left side actions category, click Add action, and then select the action that you want to add.
    Remove a swipe action Next to the action that you want to remove, click the Remove icon.
    Change the name of the swipe action
    1. Next to the action for which you want to change the name, click the Click to edit configuration icon.
    2. In the Name field, enter a new name for the action.
    3. Click Submit.
    Change the icon of a swipe action
    1. Next to the action for which you want to change the icon, click the Click to edit configuration icon.
    2. In the Icon section, click Change.
    3. In the Icon class picker window, select the icon that you want to use.
    4. Click Submit.
    Change the swipe direction for the action Drag the selected action to the corresponding swipe direction category.

    For example, to change the swipe direction to right-to-left, drag the action to the Right side actions category.

    Change the order of the swipe actions Note: This option is available if you add more than one action for a swipe direction.Drag the selected action up or down the swipe direction list.Tip: Ensure that the more important action for your page is displayed closest to the edge of the screen to make the item more accessible to the users of your mobile app.
    For example: For a page with expense reports, you can configure the following swipe actions:
    • In the Right side actions category, add an Edit details action so that users can edit selected expense reports by swiping left.
    • In the Right side actions category, add an Attach file case-wide action so that users can attach files, such as an invoice, to selected expense reports by swiping left.
    • In the Left side actions category, add a Follow action so that users can start receiving notifications about a selected expense report by swiping right.
  10. Optional: To add a floating action button that creates a new work item when users tap the button, select the Show create item button checkbox.
    The floating action button is a button that appears at the bottom of the page in the mobile app.
    For example: For the mobile list page with a list of expense reports, the floating action button creates a new expense report.
  11. Click Save.
For example: A mobile app developer designs a list page for the uPlus expense reporting app that enables users to scroll through expenses and examine the most relevant information, such as expense label and type.
Design of a custom expense list page with swipe actions and a floating action button
Pega Platform view for configuring a native mobile list page.
What to do next: Add your mobile list page to the menu bar, and then verify the changes to your mobile app. For more information, see Adding items to the menu bar and Previewing mobile apps.
  • Authoring mobile case pages for Cosmos React applications

    Customize case pages in the low-code authoring environment to highlight the most relevant information in one, user-friendly mobile view. This way, you ensure that users can efficiently view and edit cases on their mobile devices.

  • Adding a search gadget

    Improve the usability of your mobile app by configuring and enabling the search functionality. You can guarantee more meaningful search results and increase search speed by limiting the scope of searches to specific case types.

  • Adding a floating action button

    Promote the most important action on a page by adding a floating action button to your mobile app. For example, you can add a floating action button that starts a case flow for creating a new expense report in your Expenses mobile app.

  • Adding items to the menu bar

    Create effective navigation experience in your mobile app by adding pages and actions to the menu bar. For example, you can add a custom profile page to the menu bar of your Expenses app so that users can conveniently access the screen with their basic contact information.

Customizing the image assets of mobile apps

Match the icons in your mobile app with the branding requirements of your company or project by replacing the default image assets with a set of custom graphics.

By uploading your custom assets in a single .zip file, you can customize the icons that appear on the home screen and on the launch screen when the mobile app starts.
Before you begin: Create a mobile channel for your mobile app. For more information, see Setting up mobile apps.Note: Perform this procedure only in the following scenarios:
  • To specify different icons for iOS and Android apps.
  • To upload icon images in a format other than the default SVG format, for example, .png.
  • To upload icon images in a resolution other than the recommended 512 x 512 pixels.
  • For Android apps, to upload a custom notification icon for the status bar of your mobile app.

Otherwise, customize the icon and launch screen of your mobile app in a low-code environment. For more information, see Customizing the icon and launch screen of mobile apps.

Important: When you replace the default image files in the assets .zip file, ensure that you keep the directory structure, file names, and image dimensions of your custom assets .zip file identical to the setup in the default .zip file. If a specific image asset is missing in your custom assets .zip file, the operating system of the mobile device rescales the existing assets (Android), or replaces the missing assets with the system-default resources (iOS).
  1. Download the simplified assets .zip file that matches your version of Pega Mobile Client.
  2. Extract the contents of the .zip file.
  3. Replace the image assets in the folders that you extracted from the .zip file to customize any of the following graphics:
    Choices Actions
    Mobile app icon (iOS)
    1. In the common_assets folder, replace the icon.svg file with the image file that you want to use.
      Note: If you plan to publish your mobile app in the Apple App Store, use a rectangular icon. iOS mobile devices also rescale the icon.svg file and use it as an icon to display notifications on the status bar of your mobile app.
    Mobile app icon (Android)
    1. In the common_assets folder, replace the icon.svg file with the image file that you want to use.
    2. In the android folder, replace the icon_round.svg file with the image file that you want to use.
      Note: Use a circular icon. Android devices that support circular launcher icons use the icon_round.svg file instead of the icon.svg file as the app icon.
    3. In the android folder, replace the notification_icon.svg file with the image file that you want to use.
      Android mobile devices use this icon to display notifications on the status bar of your mobile app. Note: Use an icon that matches the following requirements:
      • Image format – 32-bit .png (with alpha)
      • Transparent image
      • Transparency Color Index – White (#FFFFFF)
    4. Optional: To enable adaptive icons for your mobile app, in the android folder, replace the icon_background.svg and icon_foreground.svg files with the image files that you want to use.
      For more information about adaptive icons in Android operating systems, see the Adaptive icons article on the Android Developers website.
    Splash screen logo (iOS and Android) In the common_assets folder, replace the splashlogo.svg file with the image file that you want to use.
  4. Select the folders that you extracted from the .zip file that now contain your custom assets, and then compress them into a single .zip file.
  5. Open your mobile channel:
    1. In the navigation pane of App Studio, click Channels.
    2. In the Current channel interfaces section, click the tile that represents a mobile channel for your app.
  6. On the mobile channel page, on the Layout tab, click Branding.
  7. In the Branding section, click the Configure advanced branding icon, and then select the Advanced Branding checkbox.
  8. In the Upload custom branding file section, click Choose file, and then select the .zip file that contains your custom assets.
  9. Confirm your selection by clicking OK.
  10. Click Save.
Result: At run time, your mobile app now uses the custom image assets from the .zip assets file that you uploaded in the mobile channel.What to do next: Verify the changes to your mobile app by generating, installing, and launching the app. For more information, see Generating native mobile apps.

Previewing mobile apps

Before you generate an executable file for your mobile app, verify that the pages and layout correspond with your design, and that the application logic functions in line with your expectations. Use a mobile device with the Pega Mobile Preview app to preview a mobile channel that you configure for an application.

With Pega Mobile Preview, you do not have to obtain certificates or generate executable files before you access the contents of your mobile app.
Before you begin: Prepare for previewing a mobile app:
  • Configure the mobile channel. For more information, see Setting up mobile apps.
  • On your mobile device, download and install Pega Mobile Preview from the App Store or Google Play.

When you develop a mobile app for an application, preview the mobile channel on a mobile device after each change that influences the application. For example, generate a preview after you add a page, change the layout, or modify the flow.

Attention: Do not use Pega Mobile Preview for production purposes.

Pega Mobile Preview shows an approximation of user experience that can help you develop and test your mobile app, until you build an executable file. Pega Mobile Preview does not support certain features, for example, push notifications.

Mobile channels that you add to Pega Mobile Preview expire after 30 days.

  1. In the navigation pane of App Studio, click Channels.
  2. In the Current channel interfaces section, click a tile that corresponds to the mobile channel that you want to modify.
  3. In the upper-right corner of the mobile channel configuration page, click the Pega mobile preview icon.
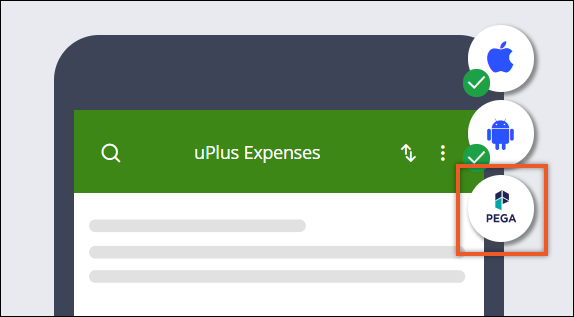
    The Pega mobile preview icon in the mobile channel configuration page
    The image shows the highlighted icon in the upper-right corner of the mobile
                channel configuration page
    The image shows the highlighted icon in the upper-right corner of the mobile
                channel configuration page
    Result: The Preview your application pane with a QR code appears.
  4. On your mobile device, open Pega Mobile Preview, and then tap Start configuring.
  5. On the channel definition screen, add your mobile channel to the list of available mobile channels:
    Choices Actions
    Scan the QR code Tap Scan the QR code, point the camera to the QR code on the Preview your application pane, and then wait for the reader to recognize the code.
    Enter the URL of the mobile channel
    1. In App Studio, on the mobile channel configuration page, in the Preview your application pane, click Email me instructions. Result: An e-mail message opens in your default e-mail client.
    2. With your default e-mail client, send the e-mail message to a mailbox that you can access from your mobile device.
    3. On your mobile device, open the message, and then copy the URL of the mobile channel.
    4. In Pega Mobile Preview, tap Enter URL manually, and then paste the mobile channel address.
    In the Active list, you can add more channels to by tapping the Add icon, or remove channels by swiping them left or right.
  6. In the Active list, tap the channel that you want to access.
  7. On the authentication screen, log in to the channel.
  8. Test the mobile channel to ensure that the layout and functionality of the mobile app meet the requirements.
  9. Optional: To update the mobile channel after you modify the mobile app in Pega Platform, refresh the channel:
    Choices Actions
    Refresh the current screen
    1. Swipe down the contents of the screen.
    Refresh the mobile channel
    1. On any screen of the current mobile channel, tap the Back icon.
    2. In the Active list, tap the name of the mobile channel.

    This Topic is available in the following Module:

    If you are having problems with your training, please review the Pega Academy Support FAQs.

    Did you find this content helpful?

    Want to help us improve this content?

    We'd prefer it if you saw us at our best.

    Pega Academy has detected you are using a browser which may prevent you from experiencing the site as intended. To improve your experience, please update your browser.

    Close Deprecation Notice