Creating Pega unit test cases
Unit tests play an important role during application testing. As these tests are authored for the lowest component of an application, unit tests run extremely fast and are highly reliable due to the limited scope of the component being tested.
Running unit tests at frequent intervals helps users identify defects early in the cycle, thus saving time and money. It is also easy to debug failures of unit tests as the scope of each unit test is limited. When compared with integration and system tests, unit tests are relatively less complex to author and understand. This quality makes it easy to maintain the test cases.
It is highly recommended to author unit tests in a large quantity to gain the above mentioned benefits, while performing application testing.
You can use the Pega unit framework to author unit test cases for all supported rule types of the Pega application using one of the following two methods:
- Open and run a rule manually, and then convert the manual run to an automated test.
- Navigate to the Test cases tab of a rule, and then click Add test case. This action runs the rule and converts the manual run to an automated test. You can view all the test cases for a rule on the Test cases tab of that rule.
Creating Pega unit test cases based on the rule type
You can create unit test cases by using one of the following three methods, depending on the rule type for which you want to configure the test.
Converting a manual rule run to test case and define validations
In this process, you run the rule manually by providing the necessary inputs or parameters. When the results are satisfactory, you can add any number of validations, such as Property, Expected runtime, List, Page, and so on to the unit test, and then save the test case. These validations verify the functionality of the rule that is being tested as part of the test case, and mark the test case as pass or fail.
Follow the steps mentioned below to create a test case using this method.
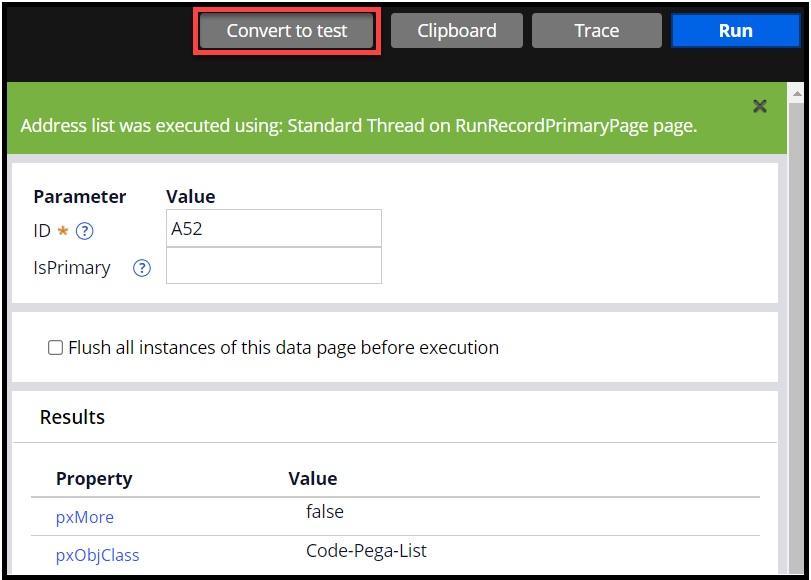
- Open the rule and run it manually.
- Verify the results in the Run dialog box.
- When the results are correct, click the Convert to test button as shown in the following image, to open the Pega unit test case rule form.
- On the Pega unit test case rule form, fill the Description field by entering the purpose of the test.
- Add the validations that you want to configure for this test under Expected results section. For example, if you want to add a property validation, select Property from the dropdown and configure the data for that step.
- Once all the required validations are configured, save the test case by selecting a ruleset to store the test case.
Use this method to create test cases for the following rule types:
- Date page
- Data transform
- Activity
- Collection
- Declare expression
- Report definition
Converting a manual rule run to test case and define multiple input and output combinations
In this process, you run the rule manually by providing the necessary inputs or parameters. When the results are satisfactory, you can define multiple input and output data combinations for the default Decision result validation so that these combinations help to run the same test with different input and output combinations, or configure additional validations. These validations verify the functionality of the rule that is being tested as part of the test case and mark the test case as pass or fail.
Follow the steps mentioned below to create a test case using this method.
- Open the rule and run it manually.
- Verify the results in the Run dialog box.
- When the results are correct, click the Convert to test button to open the Pega unit test case rule form.
- On the Pega unit test case rule form, fill the Description field by entering the purpose of the test.
- The rule form contains a default Decision result validation under the Expected results section, which displays the input data for testing the Decision rule and the result that the rule returned. This validation is considered as a single input-output data combination for the test.
- If you want to include additional input-output data combinations for the test, select the checkbox Multiple input combinations and then click on +Add. The rule runs once for every input-output data combination configured.
Optional: If a single input-output data combination is configured in a test case, you can configure other validations such as, , , and so on, under the Expected results section. - Once all the required validations are configured, save the test case by selecting a ruleset to store the test case.
Use this method to create test cases for the following Decision rule types:
- Decision table
- Decision tree
- When
- Map value
- Strategy
Recording the process flow of the rule and defining validations
In this process, you start recording the flow of the rule manually by providing the necessary inputs or parameters. When you reach the end of the process that is required to be tested as part of the test case, choose to save the recording as a test case and add any number of validations, such as Property, Expected runtime, List, Page, and so on to the unit test, and then save the test case. These validations verify the functionality of the rule that is being tested as part of the test case and mark the test case as pass or fail.
Follow the steps mentioned below to create a test case using this method
- Open the rule, and manually run the rule in the recording mode by selecting Actions > Record test case.
- When the flow reaches the required point, in the lower-right corner of the view, click Create test case button to open the Pega unit test case rule form.
You can create multiple test cases by clicking Create test case at different points during the run. - On the Pega unit test case rule form, fill the Description field by entering the purpose of the test.
- Add the validations that you want to configure for this test under the Expected results section. For example, if you want to add a property validation, select Property from the dropdown and configure the data for that step.
- Once all the required validations are configured, save the test case by selecting a ruleset to store the test case.
Use this method to create test cases for the following rule types:
- Flow
- Case type
Check your knowledge with the following interactions.
Adding validations for test cases
You must configure validations (assertions) for Pega unit test cases to verify the functionality of the rule that is being tested as part of the test case and mark the test case as pass or fail.
Every unit test case automatically provides the Expected runtime validation. You can either change the validation with a different value or delete the validation.
- In the Pega unit rule form, click the Definition tab.
- In the Expected results section, click , as shown in the following figure.
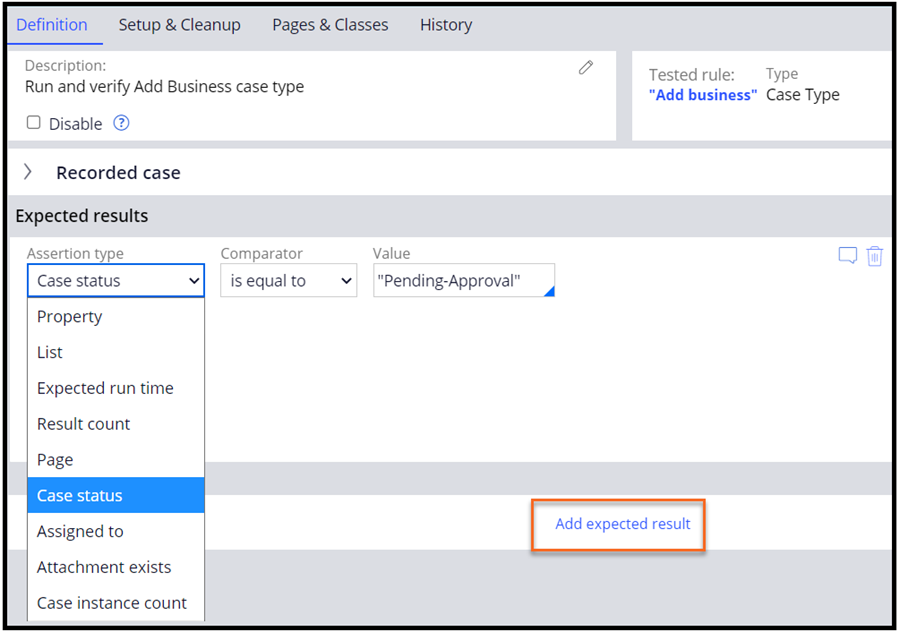
- In the Assertion type list, select the required validation.
You can add multiple validations for a test case anytime. - Optional: To add a comment for the validation, click the icon, and enter an explanation.
- This validation gets saved when the test case is saved.
Configuring input or output combinations for Decision rule test cases
You can configure multiple input-output combinations in a single decision test case to verify the functionality of the decision rule with different input-output data combinations. This helps avoid creating multiple test cases, that is, the user will configure one test case for each input-output data combination.
- In the Pega unit rule form for a Decision rule, click the Definition tab.
- In the Expected results section, for a Decision Result assertion, select the Multiple input combinations checkbox, as shown in the following figure.
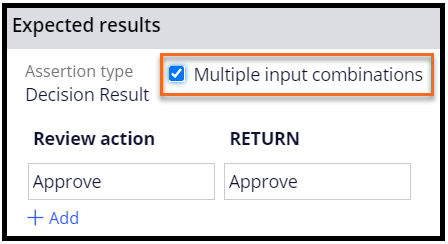
- Add rows for new input-output data combinations by clicking Add.
You can delete additional rows at any point when they are no longer relevant. - Enter the required data for input properties and the expected return values.
With this method, the Add expected result option is disabled, which prevents you from adding other validations. - These input-output data combinations gets saved when the test case is saved.
- If any Decision rule properties change, and you need to update the related test cases to reflect the change, click the Refresh icon on the Decision result validation.
This action adds or removes properties from the Decision Result validation according to the changes that you make to the Decision rule. - Optional: You can manually add or remove additional properties by clicking Manage properties. For any properties that are manually added, you need to add the test data required for these properties against each input-output combination configured for the decision result validation.
Storing and editing input data for Flow or Case type test cases
When you create unit test cases for Flow and Case type rules, you run the rules in the recording mode. While the system runs the rule, a data transform stores the input data that you enter.
To open the data transform rule and modify the data as required, perform the steps listed below:
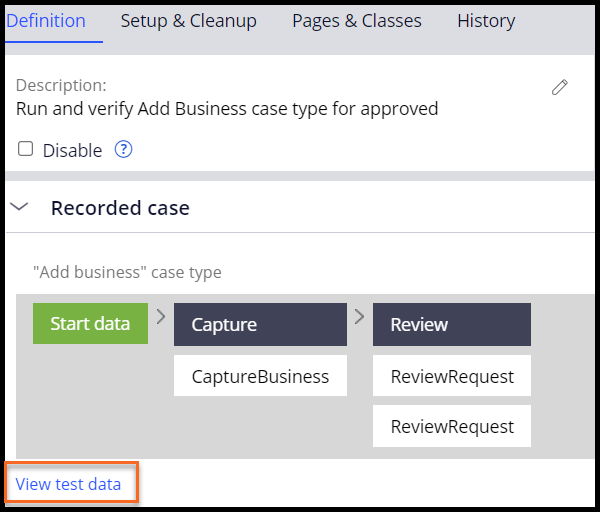
- Open the test case rule, and click on the View test data link to open the data transform that contains the test data stored for the rule.
- Modify the data in the data transform as required and save the data transform to run the test case with modified data.
- By using the Save As option for the Flow or Case type test case and modifying the data in the data transform this way, you can create additional test cases with different input-output data combinations. This is helpful when it is required to create test cases for same process flow of Case type or Flow with multiple input-output data combinations.
The following figure shows the flow of a sample recorded test case with a link to view the test data.
Check your knowledge with the following interactions.
This Topic is available in the following Module:
If you are having problems with your training, please review the Pega Academy Support FAQs.
Want to help us improve this content?