Creating a work group and a work queue
Creating a work group and a work queue
A work queue must be associated with a work group. Similarly, a work group must be associated with a work queue. In some situations, you must create both a new work queue and work group that are associated with each other. Follow these steps to create a work group and a work queue, and then associate the work queue with the work group.
- In the Records Explorer, select Organization > Work Group and click Create to display the Create Work Group form.
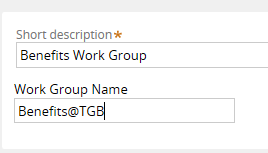
- In the Short description field, enter a description.
- In the Work Group Name field, enter a work group name. Remember to use the standard naming convention by adding an at symbol (@) and the organization name. In the following example, the Work Group Name is Benefits@TGB.
- Click Create and Open.
- In the Manager field, on the Work group tab, in the Work Group form, select a work group manager.
- In the Default work queue field, select a default work queue. In the following example, the work queue is the default for the organization, default@TGB.

- Click Save to create the new work group.
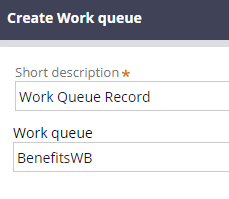
- In the Default work queue field, in the Work Group form, overwrite the value with the name of the new work queue. Use a naming convention that indicates the record is a work queue. In the following example, the new work queue is BenefitsWB. Later, you enter this name in the Create work queue form.

- Click the crosshairs icon to open the Create work queue form.
- In the Short description field, enter a description.
- In the Work queue field, enter the name you entered in the Work Group form.
- Click Create and Open.
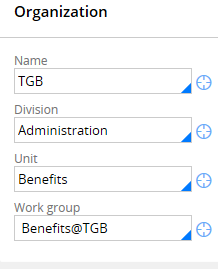
- On the work queue form, on the Work queue tab, select the required organization levels in the Name, Division, and Unit fields.
- In the Work group field, select the work group you created.
- Click Save to create the new work queue.
- Return to the Work Group record and click Save to associate the new work queue with the work group.