
Import data jobs
Streamline the data ingestion process with the Data Jobs in Pega Customer Decision Hub™. By using data jobs, you have a standardized and defined way to import data into Customer Decision Hub. You can also monitor the progress of data jobs with the Customer Profile Designer.
Video
Transcript
This demo shows you how to create a new data job to ingest customer data into Customer Decision Hub.
The U+ Bank technical team finished the data mapping workshop and is now ready to ingest customer data into Customer Decision Hub. You use data Jobs to ingest customer data into a target customer profile designer data source. This process is typically runs on a nightly basis or on demand when new data is available.
In this demo, the customer data is in a CSV format, located in the Amazon S3 file repository. The first row contains the customer properties, and the remaining 7,817 rows contain the actual values that are set for ingestion into the target data source. The file has a size of 4,032,193 bytes.
Along with the CSV file, the system uses a manifest file, which has details about the process type, total record count, and relative file path to the CustomerDataIngest.csv file.

To access a repository, you define a Repository rule in Pega platform. Note that the Root path defined in the repository is /DataJobs/. Ensure that the file path in the manifest file is relative to this path. In this case, the Customer files are in the /DataJobs/CustomerData/ folder of an Amazon S3 repository, pegaenablement-assets bucket.

To create a new data job, you need the CanUpdateJobConfiguration privilege in your access group.

In App Studio, you can define the general settings for the data import jobs. These settings define the retention duration of archived files and import runs, and import run wait time when the files are not available in the file repository.

To define a new data job, navigate to the Data Jobs landing page in Customer Decision Hub, and then create a new data job. When creating the data job for the first time, keep the manifest and data file in the repository as a best practice to help map columns in the CSV files to the properties in the data model.

There are nine steps that you follow to create a new data import job. Begin by selecting the target data source into which the data will be ingested to. A target data source is one of the data sources that are identified and configured during the data mapping workshop, for example, Customer or Account. You can define one or more data jobs for each data source.

In the second step, select the repository that contains the data to import.

Now, browse the repository to select the file or location that contains the data. You can import data with a manifest file (XML), compressed file (GZIP, ZIP), or data file (CSV, JSON). To import multiple files with similar names, you can use a wildcard character (*) to define a file name pattern. For example, Folder/File*.csv or a file path that might not exist in the repository.
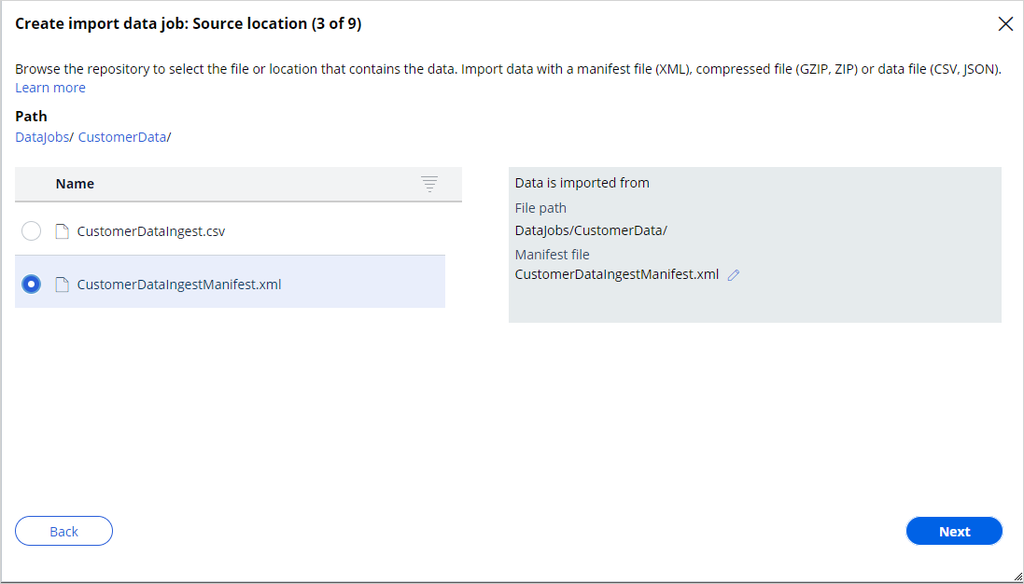
Next, define the structure of the data in CSV file ,and then configure additional details.

Once you configure the file details, you can view the information about the manifest and data file on the Data file tab.

Continue to map the columns that are defined in the CSV file to the fields in the data model of the target data source.

The import data jobs can automatically detect a token file in the file repository folder to begin the ingestion process or can follow a schedule to process the files at a given time and frequency.

For now, select a File detection trigger type.
Each run of a data job tracks and monitors the number of records that fail to process as a result of errors. The run fails when there are more failed records than the defined error threshold.

In the final step, confirm that all the settings are correct.

Now, you see the new Import job with the trigger file detection on the Data Jobs landing page. The data job begins once the system detects the token file.

Everything is ready, and the data job continuously monitors the Amazon S3 repository for the TOK file. For the purposes of this demo, the TOK file is created manually.
Now, the file listener detects the token file, and the data ingestion begins.
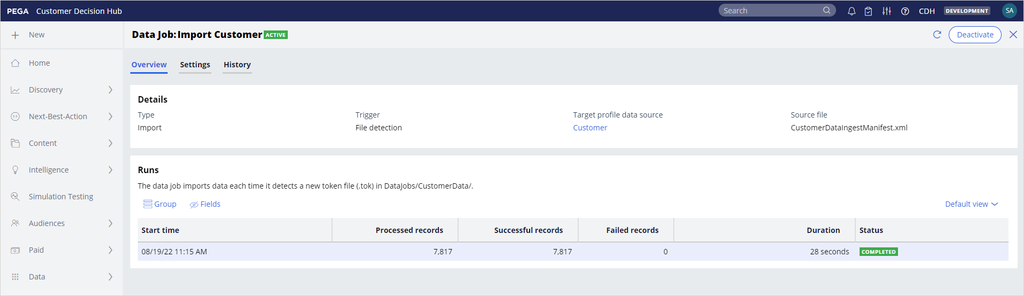
On the Overview of the data job, you can see the number of processed records, successful records, failed records, and the final status.
Navigate to the targeted profile data source. On the Records tab, you can see the ingested data.
The Data Jobs tab lists all active and inactive data jobs for this data source. An operator with the PegaMarketing_Core:DataJobsObservability access role can view the progress and status from the Data Jobs tab.
Double-click the data job to view its properties. The type of the data job, the trigger method, the target profile data source, and the manifest file details are displayed. Each run and its details are available in the Runs section. You can click a run to see an overview and a detailed audit history of the completed stages.

On the Settings tab, you can make changes to the configuration of a data job.

Once the process completes, the system stores the files in a dedicated Archive location along with the <Data> and <RunID>, and the processed data and manifest files move to this location.
The rules that the system generates for the data job are accessible in the Supporting Artifacts section.
The system generates the Source data set to access the data in the repository. It holds the file configuration details and, in the case of CSV files, the field mappings.
The Ingestion staging data flow is used for record validation. Records are parsed, optionally validated, and then immediately discarded. The system verifies the two following items once the data flow completes:
- Whether the number of failures exceeds the configured value.
- Whether total number of processed records matches the total record number in the manifest file.
You can create a pyRecordValidation activity in the class of the data job to add additional validations.
After the successful completion of the record validation, the system triggers the Ingestion data flow to process the data to the target destination.
Like the ingestion artifacts, the system creates the Deletion staging data flow and Deletion data flow if you want to delete records from the target data source. The manifest file determines which data flow to trigger. When the processType is DataDelete, the system uses the records in the CSV file to delete the records in the target data source.
Each data import job has one File Listener instance. The file listener is active as long as the data import job is active.
The system also creates a Service File and a Service Package that are associated with the file listener.
On the History tab, the audit history of the data job is displayed.

It is also possible to deactivate a data job at any time.
The system enables all data job alerts by default. To receive or opt-out of notifications about events in the data jobs, such as completed and failed runs that might require your action, use the Notification preferences in Customer Decision Hub.

You have reached the end of this video. What did it show you?
- How to create a new data job to ingest data.
- How to monitor the data job.
- How to modify data job settings.
- How to receive notifications.
Challenge
Tip: To practice what you have learned in this topic, consider taking the Setting up data ingestion challenge.
If you are having problems with your training, please review the Pega Academy Support FAQs.
Want to help us improve this content?