Sub-automations
When creating automations with Pega Robot Studio™, two essential development factors are readability and reusability. An automation developer should create short, modular automations focused on a specific task and reuse them in other areas of the project or other projects to achieve it.
If you analyze an automated process, a user may have multiple similar interactions with an application that often repeat across the business use cases.
The best approach for creating a coherent project is identifying specific, modular tasks and implementing the tasks as a set of sub-automations. For example, when automating the procedure of opening a claim in an insurance agency application, you can divide the process into several smaller tasks, such as searching for the customer, navigating to the customer's account details, and opening a claim form. After creating sub-automations for every small task, you may use them as building blocks of the project.
The sub-automations are strung together as nested automations into a larger automation. To nest a sub-automation within an automation, include it in the designer Palette and drag and drop the automation symbol to the design surface.
Using parameters and exit points
When creating a sub-automation, define the input and output parameters to operate on data while executing the automation. The parent automation should consider all required input parameters for a sub-automation to ensure they are available to pass. Any sub-automation output parameters, including data and error message details, can be passed up through the chain of parent automation. You should also define at least one Exit Point in your sub-automations that you can use to alter the automation flow.
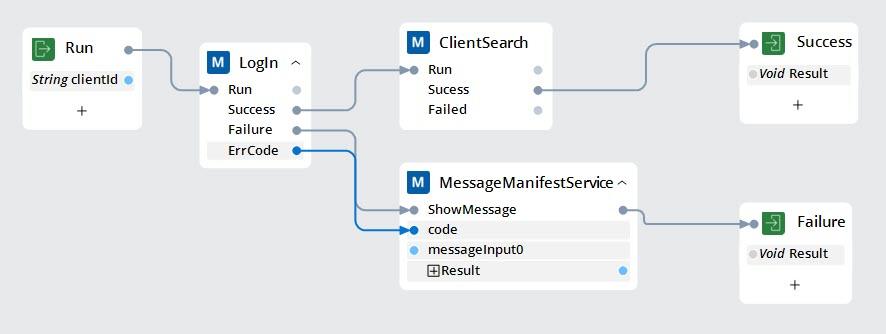
In the following example, LogIn is a sub-automation with two Exit Points: Success and Failure, and one output parameter, ErrCode, that tells the parent automation completes successfully. In the case of Success, the main automation continues with the client search sub-automation. In case of a Failure, the main automation sends the output parameter error code to the Message Manifest and finishes execution.
Best practices
- Give sub-automations a descriptive name that makes them easy to find and reuse.
- Provide sub-automations an entry point and at least one exit point. You must have all execution paths terminating at an Exit Point. You can add multiple exit points to terminate all potential endpoints in the execution path.
- Label exit points so that they make logical sense, for example, Success, Failure, and NoResults.
- Use Jump labels to consolidate some of the exit paths if they are related (for example, Success/Failure). For more information, see Label/Jump To components.
- Configure sub-automations to return any values that may be needed elsewhere in the automation with the exit point.
- Use exit point parameters to distinguish the execution paths for an automation. For example, if there is onle one Exit point, it is a best practice to use a Boolean parameter to distinguish when the run of the sub-automation completes.
In the following image, click the + icons to see details about a suggested method for using sub-automations and handling a common Exit Point scenario with Error/Exit parameters.
Check your knowledge with the following interaction.
This Topic is available in the following Module:
If you are having problems with your training, please review the Pega Academy Support FAQs.
Want to help us improve this content?