
Creating a data relationship
Archived
2 Tasks
15 mins
Beginner
Data Integration
English
Scenario
The mayor of MyTown asks you, the town project manager, to enable residents who report problems online to enter contact information and list any previous issues at the same site. You must add an embedded data field to the Service Request case type.
The following table provides the credentials you need to complete the challenge.
| Role | User name | Password |
|---|---|---|
| Application Developer | author@mytown | pega123! |
Challenge Walkthrough
Detailed Tasks
1 Create the Person data object
- In the App Studio navigation pane, click Case types > Service Request to display the Service Request case life cycle.
- In the Service Request case type, click the Identify submitter step to open the Step properties pane on the right.
- In the Step properties pane, click Configure view to configure the view of the step.
- In the view configuration dialog box, on the Fields tab, click Add field to add a field to the Identify submitter view.
- In the field configuration window, in the Field name field, enter Submitter information to name the field.
- In the Type list, select Embedded data.
- In the Data object list, select Define new data object.
- In the Data object name field, enter Person to name the data object, and then click OK.
- Click Submit to close the field configuration window.
- In the Options list, select Create default view.

- To the right of Create default view, click Open to create fields within the Submitter information data relationship.
- Click Add field.
- In the Field name field, enter First name. The Type list defaults to Text (single line).
- Click Submit & add another.
- Create three additional fields by using the information in the following table.
Field Name
Field Type
Last name
Text (single line)
Address
Text (paragraph)
Phone
Phone
Note: The address is captured in one Text (paragraph) field to keep this challenge brief. In a real-world application, an address is captured in separate fields, such as street, city, state/province, and ZIP/postal code to automate data analysis in the application. - Click Submit to dismiss the view configuration dialog box.
- In the upper right, click Save to save your work.
2 Create the Previous issues at this location embedded data list
- In the Service Request case type, click the Identify location step.
- In the Step property pane to the right, click Configure view to configure the view of the step.
- In the view configuration dialog box, on the Fields tab, click Add field.
- In the field configuration window, in the Field name field, enter Previous issues at this location to name the field.
- In the Type list, select Embedded data.
- In the Data object list, select Define new data object.
- In the Data object name field, enter Issues to name the data object.
- Click OK to close the dialog box.
- In the Options field, select List of records.
- Click Submit to close the field configuration window.
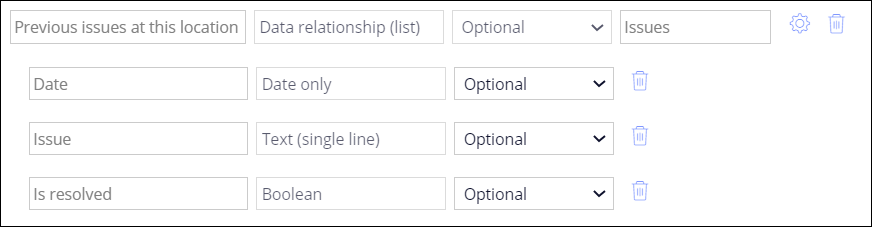
- In the Fields tab, click Add field to Previous issues at this location > Add new field to add a new field to the data relationship.
- In the field configuration window, in the Field name field, enter Date to name the first field.
- In the Type list, select Date only.
- Click Submit & add another.
- Create two additional fields by using the information in the following table.
Field Name Field Type Issue Text (single line) Is resolved Boolean - To the right of the blank row, click the Delete icon to remove the row.
- Click Submit to dismiss the view configuration dialog box.
- In the upper right, click Save to save your work.