UBank-start_1.zip
(241.19 KB)
Integrating an unattended RPA project with a Pega application
6 Tasks
15 mins
Beginner
Robotic Process Automation
English
Scenario
U+ Bank has developed a Customer Support application to process credit card transaction disputes. The goal of the application is to streamline the time of the client and the CSR by automating communication with the BankerInsight application.
Complete the following tasks:
- Create a ProcessDisputeTxn automation that logs in to the BankerInsight application and searches for a customer.
- Create a subautomation that opens the Dispute tab in the BankerInsight application, searches for the concerning transaction, and gives it a DISPUTE label.
- Create an automation that displays the result of dispute processing.
- Create a robot activity automation that incorporates the other automations to complete the request.
- Debug automations locally.
Detailed Tasks
1 Add message definitions
- Download the UBank project:
- Save the file to your desktop and unzip the file to extract the project folder to your C:\Users\<username>\Documents\Pega Robot Studio\Projects\.
- On the Home screen in Pega Robot Studio, click Open Project, and then navigate to the projects folder and open UBank.pegaProject.
Note: The starter project includes a configured BankerInsight application. The value of the Path field must match the location of BankerInsight on your local computer for the project to function properly. In the BankerInsight application, change the value of the Path to the location of your BankerInsight application.
- In Project Explorer, click the Information icon next to the UBank label to display the properties grid.

- In the Runtime section of the properties grid, click the More icon to open the dialog box.

- Click the button to open the dialog box.
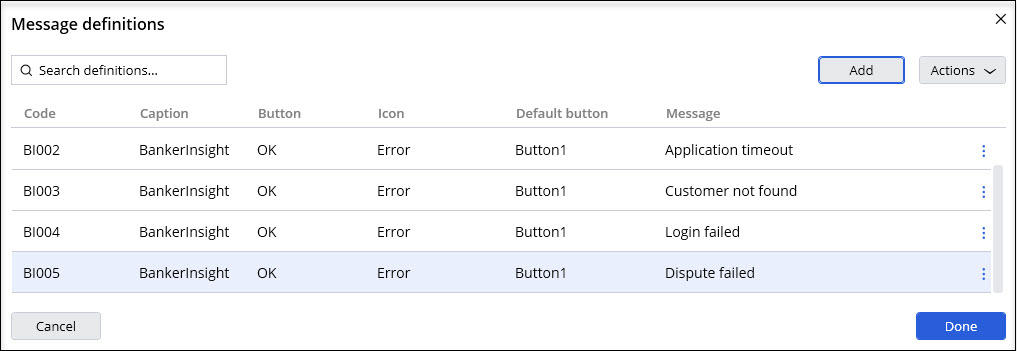
- In the dialog box, add the following message definitions to the project:
Code Caption Icon Button Message BI001 BankerInsight Error OK Application starting failed BI002 BankerInsight Error OK Application timeout BI003 BankerInsight Error OK Customer not found BI004 BankerInsight Error OK Login failed BI005 BankerInsight Error OK Dispute failed - On the dialog box, click . The message definitions should look as shown in the following figure:
2 Create the ProcesDisputeTxn automation
- In Project Explorer, add a new automation:
- On the Project tab, click Add > Automation to open Add new automation dialog box.
- In the Add new automation dialog box, enter ProcessDisputeTx, and then click .
- On the Automation tab, in the Palette, click to open the Include in palette dialog box.
- In the Include in palette dialog box, click the Application tab, and then click the icon to add the BankerInsight application to the automation, then click .
- On the Palette tab, expand the Applications section and drag the BankerInsight control to the automation surface to open the Select Action dialog box.
- In the Select Action dialog box, click More and in the search field, enter LogIn.
- Select the LogIn application method, and then click to add it to the design surface.
- On the LogIn design block, update the parameters:
- In the username field, enter pega.
- In the password field, enter pega.
- Repeat steps 4-6 to add the CustomerSearch application method to the design surface.
- On the automation surface, add an Entry Point, Exit Points, Labels, and error handling:
-
Design block name Actions Entry Point Right-click the automation surface, and then select Add > Entry point.
Success Exit Point- On the automation surface, right-click, and then select Add > Exit Point.
- Click the name of the Exit Point, and then enter Success.
- On the Exit Point, click the Add icon to add an output parameter.
- In the first Type list, select String, click param1, and then enter msgDetails.
Failed Exit Point - On the automation surface, right-click, and then select Add > Exit Point.
- Click the name of the Exit Point, and then enter Failed.
Success Label - On the automation surface, right-click, and then select Add > Label.
- On the Label, click Label1, and then enter Success.
Failed Label - On the automation surface, right-click, and then select Add > Label.
- On the Label, click Label1, and then enter Failed.
- On the Label, click the Add icon to add a parameter.
- In the Type list, select String, click param1, and then enter msgDetails.
Jump to Failed (two times) - On the automation surface, right-click, and then select Jump To > Failed to add a Jump To design block.
- Connect the design blocks as shown in the following figure:

- On the toolbar, click Save to save the automation.
3 Create the AddTransactionAsDispute automation
- In Project Explorer, add new automation and name it AddTransactionAsDispute to open the automation tab:
- On the Project tab, select Add > Automation to open Add new automation dialog box.
- In the Add new automation dialog box, enter AddTransactionAsDispute, and then click .
- On the automation surface, right-click, and then select Add > Entry Point to add the component to the surface.
- On the Entry Point, click the Add icon three times, to add three input parameters.
- Update the input parameters:
- In the first Type list, select String, click param1, and then enter transactionId.
- In the second Type list, select Float, click param2, and then enter txnAmount.
- In the third Type list, select String, click param3, and then enter txnDescription.
- On the Automation tab, in the Palette, click to open the Include dialog box.
- In the Include dialog box, click the Application tab, and then click the button to add the BankerInsight application to the automation, then click Done.
- Add the following design blocks to the automation surface:
Design block name Actions tabAccountMgmt.SelectedIndex property - On the Palette tab, click Applications > BankerInsight > frmBankerInsight, and then drag the tabAccountMgmt control to the automation surface.
- In the Select action dialog box, click More.
- In the search field, enter selectedIndex.
- On the Property tab, select the checkbox for the SelectedIndex property and then click .
- On the design block, click SelectedIndex parameter and enter 2.
tabDispute.PerformClick method - On the Palette tab, click BankerInsight > frmBankerInsight > tabAccountMgmt, and then drag the tabDispute control to the automation surface.
- In the Select action dialog box, click More.
- In the search field, enter PerformClick.
- On the Method tab, select the PerformClick (no parameters) method, and then click .
txtTxnID.Text property - On the Palette tab, click BankerInsight > frmBankerInsight > tabAccountMgmt > tabDispute, and then drag the txtTxnID control to the automation surface.
- In the Select action dialog box, click More.
- In the search field, enter Text.
- On the Property tab, select the property, and then click .
txtDisputeAmount.Text property - On the Palette tab, click BankerInsight > frmBankerInsight > tabAccountMgmt > tabDispute, and then drag the txtDisputeAmount control to the automation surface.
- In the Select action dialog box, click More.
- In the search field, enter Text.
- On the Property tab, select the property, and then click .
txtDisputeDescription.Text property - On the Palette tab, click BankerInsight > frmBankerInsight > tabAccountMgmt > tabDispute, and then drag the txtDisputeDescription control to the automation surface.
- In the Select action dialog box, click More.
- In the search field, enter Text.
- On the Property tab, select the property, and then click .
btnDisputeSearch.PerformClick method - On the Palette tab, click BankerInsight > frmBankerInsight > tabAccountMgmt > tabDispute, and then drag the btnDisputeSearch control to the automation surface.
- In the Select action dialog box, click More.
- In the search field, enter PerformClick.
- On the Method tab, select the PerformClick (no parameters) method, and then click
btnDisputeSubmit.PerformClick method - On the Palette tab, click BankerInsight > frmBankerInsight > tabAccountMgmt > tabDispute, and then drag the btnDisputeSubmit control to the automation surface.
- In the Select action dialog box, click More.
- In the search field, enter PerformClick.
- On the Method tab, select the method, and then click
- On the Palette tab, click Locals > Run, and then drag the following local variables to the automation surface:
- transactionId
- txtAmount
- txtDescription
- On the automation surface, connect design blocks and input parameters with corresponding input fields in the dispute form of the BankerInsight.

- On the Palette tab, drag labelDisputeResultMsg control to the automation surface.
- In the Select action dialog box, select the Text Changed event and then click the icon to add it to the automation surface.
- Right-click on the TextChanged design block and select Wait for this event.

- On the Palette tab, click BankerInsight > frmBankerInsight > tabAccountMgmt > tabDispute, and then drag labelDisputeResultMsg to the automation surface.
- In the Select action dialog box, select the Text property, and then click the Add icon to add it to the automation surface.
- On the Toolbox tab, click Data handling > Strings > Compare, and then double-click Equals to add the method to the automation surface.
- On the Equals design block, update the input parameters to check the dispute result:
- Drag the labelDisputeResultMsg output data link to the string1 parameter data connector.
- Click string2, and then enter Transaction Not Found.
- In the stringComparisonTypelist, select CurrentCultureIgnoreCase.
- In the automation, click and draw automation and data links that resemble the following image:

- In the automation, right-click the labelDisputeResultMsg.WaitForEvent design block.
- Click Copy.
- Right-click the automation surface and click Paste.
- Repeat step 19 a-b for the labelDisputeResult.Text property and the String.Equals method design blocks.
- On the second Equals design block, update the input parameters to check the dispute result:
- Drag the labelDisputeResultMsg output data link to the string1 parameter data connector.
- Click string2, and then enter Success.
- In the stringComparisonTypelist, select CurrentCultureIgnoreCase.

- On the automation surface, add an Exit Points, Labels, and error handling:
Design block name Actions Success Exit Point - On the automation surface, right-click, and then select Add > Exit Point.
- Click Exit1, and then enter Success.
- On the Exit Point, click the Add icon to add an output parameter.
- In the first Type list, select String, click on param1, and then enter msgDetails.
- In the second Type list, select Boolean.
Failure Exit Point - On the automation surface, right-click, and then select Add > Exit Point.
- Click the name Exit1, and then enter Failed.
Failed Label - On the automation surface, right-click, and then select Add > Label.
- Click Label1, and then enter Failed.
- On the Label, click the Add icon to add a parameter.
- In the Type list, select String, click param1, and then enter msgDetails.
Success Label - On the automation surface, right-click, and then select Add > Label.
- Click the name Label1, and then enter Success.
Jump To Failed - On the automation surface, right-click, and then select Jump To > Failed.
- Click msgResult parameter, and then enter BI005.
- On the Jump To block, click Result, and then select False.
Jump To Failed - On the automation surface, right-click, and then select Jump To > Failed.
- Click msgResult parameter, and then enter BI005.
- On the Jump To block, click Result, and then select False.
Jump To Success - Right-click the automation surface, and then select Jump To > Success.
- On the Jump To block, click result, and then select True.
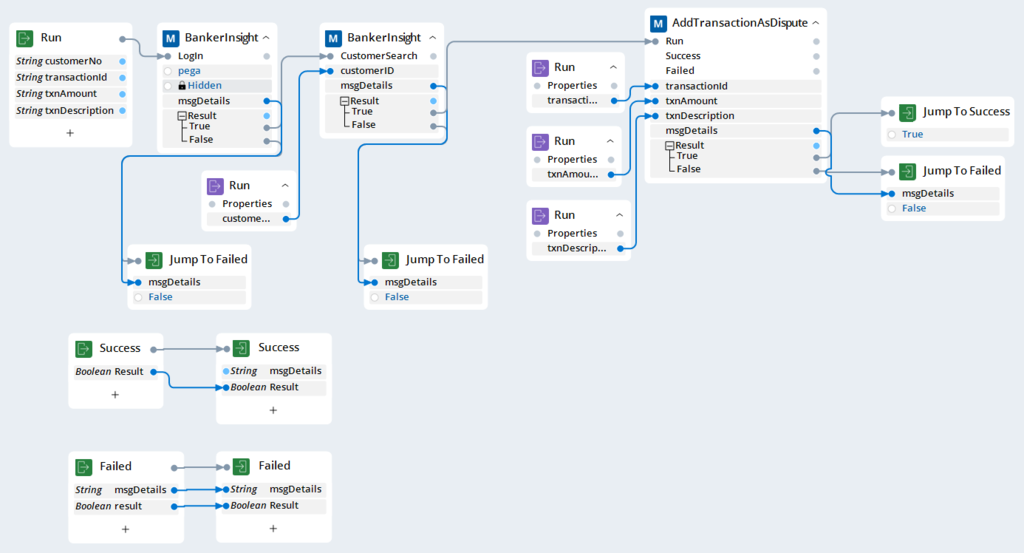
- Connect the design blocks as shown in the following figure:

- On the toolbar, click Save to save the automation.
- Debug the automation and modify the automation for each debugging run to validate all logical paths:
- Right-click the first automation link, and then select Toggle Breakpoint to add a breakpoint to the automation.
- On the automation toolbar, click .
- If prompted in the Test debug dialog box, enter any necessary input parameters and ensure the selection of the Start applications before testing to start or not start the application automatically.
- On the automation toolbar, click the buttons to step through the automation.
- Repeat steps 24a-d to run the debug process and test other logical paths on the automation by changing input parameters or changing the starting of the application.
4 Use the AddTransactionAsDispute subautomation
Note: Input parameters of this automation will be retrieved from the Customer Support application in the 'Deploying a robotic project' challenge.
- In Project Explorer, click ProcessDisputeTx to open the automation.
- On the entry point, click the Add icon four times to add input parameters:
- In the first Type list, select String, click on param1, and then enter customerNo.
- In the second Type list, select String, click on param2, and then enter transactionId.
- In the third Type list, select String, click on param3, and then enter txnAmount.
- In the fourth Type list, select String, click on param4, and then enter txnDescription.
- On the Palette tab, expand Locals > Run, then drag customerNo, transactionId, txnAmount, and txnDescription variables to the automation surface.
- On the Automation tab, in the Palette, click to open the Include in Palette dialog box.
- In the Include in palette dialog box, click the Automation tab, and then click the button to add the AddTransactionAsDispute automation, then click .
- Double click the automation surface to open the Quick add dialog box.
- In the Quick add dialog box, click Automations, and then double-click the AddTransactionAsDispute automation to open the Select Action dialog box.
- In the Select Action dialog box, click the Run method, and then click to add it to the automation surface.
-
- In the username field, enter pega.
- In the password field, enter pega.
-
- On the automation surface, right-click, and then select Jump To > Success.
- On the Jump To design block, click Result > True.
- On the automation surface, right-click, and then select Jump To > Failed.
- On the Jump To design block, click Result > False.
- Connect the design blocks as shown in the following figure:
- On the toolbar, click Save all.
- Debug the automation and modify the automation for each debugging run to validate all logical paths:
- Right-click the first automation link, and then select Toggle Breakpoint to add a breakpoint to the automation.
- On the automation toolbar, click .
- If prompted in the Test debug dialog box, enter any necessary input parameters and ensure the selection of the Start applications before testing to start or not start the application automatically.
- On the automation toolbar, click the buttons to step through the automation.
- Repeat steps 13a-d to run the debug process and test other logical paths on the automation by changing input parameters or changing the starting of the application.
5 Create an automation that sends a dispute confirmation to the Customer Support application
- In Project Explorer, add an automation to open the automation tab:
- On the Project tab, select Add > Automation to open the Add new automation dialog box.
- In the Add new automation dialog box, in the Automation name input field enter SendDisputeConfirmation, and then click .
- On the automation surface, right-click, and then select Add > Entry Point to add an Entry Point component to the surface.
- On the new entry point, click the Add icon twice to add two input parameters.
- Update the input parameters:
- In the first row, in the Type list, select String, click param1, and then enter customerNo.
- In the second row, in the Type list, select String, click param2, and then enter transactionId.
- On the Toolbox tab in the search field, enter concat, and then add the Concat method to the automation surface.
- On the Concat design block, update the input parameters to create a confirmation message:
- Click the list0 parameter, and then enter: Dispute confirmed for the customerNo:
- Drag the customerNo output data link to the list1 parameter data connector.
- Click the list2 parameter, and enter ", for transactionId:"
- Drag the transactionId output data link to the list3 parameter data connector.
- In the Toolbox tab in the search field, enter MessageBox, drag the ShowMessageBox method to the automation surface, then click .
- On the automation surface, right-click, and then select Add > Exit Point to add an Exit Point component to the surface.
- Click Exit1, and then enter Success.
- Connect the design blocks as shown in the following figure:

- In Project Explorer, click the ProcessDisputeTx automation.
- On the Automation tab, in the Palette, click to open the Include in palette dialog box.
- In the Include in palette dialog box, on the Automation tab, click the button to add the SendDisputeConfirmation automation, and then click .
- On the Palette tab, expand the Automations section and drag the SendDisputeConfirmation automation to the automation surface to open the Select action dialog box.
- In the Select action dialog box, select the Run method, and then click .
- On the Palette tab, expand Locals > Run, and then drag customerNo and transactionId variables to the automation surface.
- On the automation surface, select the input automation link of the Jump To Success design block, and then press the Delete key.
- Connect the design blocks as shown in the following figure:

- On the toolbar, click Save all.
6 Add message manifest for error handling
- In Project Explorer, click ProcessDisputeTx to open the automation.
- On the Toolbox tab, in the search box, enter ShowMessage to filter the results.
- In the Toolbox search results, in the MessageManifest folder, click and drag the ShowMessage method to the automation surface to display the dialog box.
- In the dialog box, keep the default selection, and then click .
- Connect the message manifest method to the exit point, as shown in the following figure:

- On the toolbar, click to save the changes to the automation.
This Challenge is to practice what you learned in the following Module:
Available in the following mission:
If you are having problems with your training, please review the Pega Academy Support FAQs.
Want to help us improve this content?