Refactoring an existing service request type with a parallel flow
4 Tasks
15 mins
Pega Customer Service 8.7
Advanced
English
Scenario
U+ Insurance wants to update their File a Complaint service request to be DX compliant. The update allows a regional team of CSRs to submit DX-compliant complaints service requests in a non-Pega CRM application. U+ Insurance also wants to remove one section in the view that captures complaint details, Complaint questionnaire, from the process of submitting a service request in the non-Pega CRM application. However, they want to leave the questionnaire in the original Pega Customer Service application process. Since the business scenario only requires a minor modification to the existing flow, the Customer Service System Administrator is going to duplicate and modify it, instead of building it from scratch.
Use the following credentials to log in to the exercise system:
| Role | User name | Password |
|---|---|---|
| Customer Service System Administrator | Csinsurancesysadmin | install12345! |
| Customer Service Representative | BillCarter | install12345! |
Your assignment consists of the following tasks:
Task 1: Duplicate existing rules for collecting complaint details and save them as new, non-Pega CRM application rules.
As a Customer Service System Administrator, duplicate the existing Collect complaint details process flow of the Intake stage in the File a Complaint case type. This task includes duplicating the records of the Collect complaint details flow rule, Capture complaint details flow action, and the corresponding Capture complaint details view.
Task 2: Make the changes to the view for capturing complaints in the non-Pega CRM application.
Remove the complaint questionnaire section from the newly created Capture complaint details view.
Task 3: Combine the non-Pega CRM application process elements that you created in task 1.
Associate the Capture complaint details for external desktop view with the Capture complaint details for external desktop flow action and the Capture complaint details for external desktop flow action with the Collect complaint details for external desktop flow rule.
Task 4: Add the parallel process for collecting complaint details in the non-Pega CRM application to the File a Complaint case type.
In the Intake stage of the File a Complaint case life cycle, add the parallel flow that you created in the previous tasks (Collect complaint details for external desktop) and set it to begin whenever the case instance initiates from a non-Pega CRM application.
Task 5: Confirm your work.
Run the File a Complaint case type in the non-Pega CRM application.
Challenge Walkthrough
Detailed Tasks
1 Duplicate existing rules for collecting complaint details and save them as new, non-Pega CRM application rules
- On the exercise system landing page, click Pega CRM suite to log in to Dev Studio.
- Log in as a Customer Service for Insurance Administrator with User name Csinsurancesysadmin and Password install12345!
- In the navigation pane of Dev Studio, click Case types to open the Case Type Explorer.
- Click File a Complaint to open the respective case type.
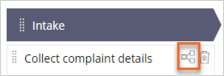
- On the Workflow tab of the case type, in the Intake stage, hover over the Collect complaint details process, and then click the Configure process icon.
- On the toolbar, click Open process to display the editable process flow diagram.

- Click Save as to create a new version of the process.
- On the Save As Flow page, in the Label field, enter Collect complaint details for external desktop.
- Click Create and open to create the separate process flow for collecting complaint details in a non-Pega CRM application.
- Click Check out to modify the new process flow.
- On the canvas of the process flow, double-click the Complaint details assignment shape.
- In the Assignment properties dialog box, in the Actions section, next to the Flow action field, click the Open icon to open the CaptureComplaintDetails flow action.
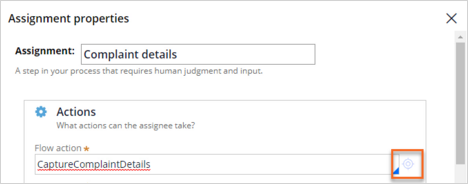
- In the upper right of the Capture complaint details flow action, click Save as.
- On the Flow Action Record Configuration page, in the Label field, enter Capture complaint details for external desktop.
- Click Create and open.
The newly created flow action is still associated with the CaptureComplaintDetails section associated. - On the Layout tab, next to the section field, click the Open icon to create a new section for the non-Pega CRM application.
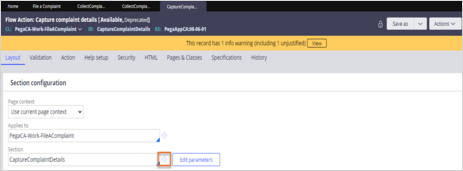
- In the upper right of the section configuration view, click Save as.
- On the Section Record Configuration page, in the Label field, enter Capture complaint details for external desktop.
- Click Create and open.
You now have a new flow rule, flow action, and view for collecting complaint details in a non-Pega application.
2 Make the changes to the view for capturing complaints in the non-Pega CRM application
- In the new Capture complaint details for external desktop section configuration view, click Check out to begin editing.
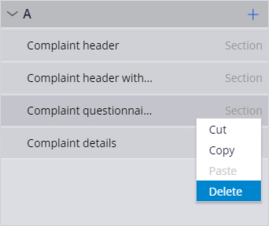
- On the Design tab, in the properties pane on the right, hover over the Complaint questionnaire tile.
- On the tile, click More > Delete.
- Click Save.
- Click Check In.
- In the Check In dialog box, in the Check-in comments text box, enter Checking in after external desktop section modification.
3 Combine the non-Pega CRM application process elements you created in task 1
- Click the CaptureComplaintDetails tab to return to the configuration screen of the Capture complaint details for external desktop flow action that you created in steps 13-15 of task 1.

- Click Check out.
- On the Layout tab, in Section configuration section, in the Section field, enter or select CaptureComplaintDetailsForExternalDesktop.
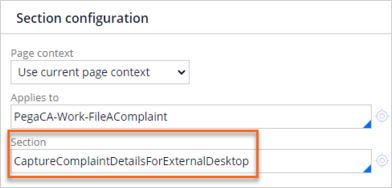
- Click Save.
- Click Check in.
- In the Check In dialog box, in the Check-in comments text box, enter Checking in after external desktop section modification.
- Go back to the configuration screen of the Collect complaint details for external desktop flow rule that you created in steps 7-9 of task 1.

- In the Assignment properties dialog box, in the Actions section, in the Flow action field, enter or select CaptureComplaintDetailsForExternalDesktop.

- Click Submit to accept the changes to the Collect details flow shape.
- In the header of the Collect complaint details process view, click Save.
- Click Check In to check in the rule.
- In the Check In dialog box, in the Check-in comments dialog box, enter Checking in after external desktop section modification.
- Click Actions > Mark as relevant record so that you can add the process flow to the Intake stage of the File a Complaint case type .

4 Add the parallel process for collecting complaint details in the non-Pega CRM application to the File a Complaint case type
- In Dev Studio, click the File a Complaint tab to return to the case type view.
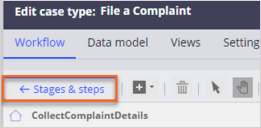
- On the Workflow tab, click Stages & steps to display the entire case life cycle.
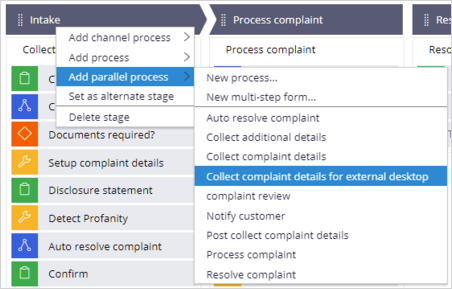
- In the Case life cycle section, hover over the Intake stage, and then click More > Add parallel process > Collect complaint details for external desktop to add the new process.
- Click the Collect complaint details for external desktop process to open the properties pane on the right.
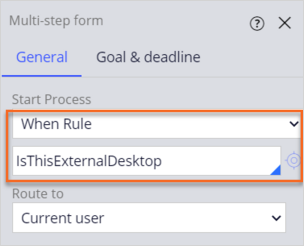
- In the properties pane, in the Start Process list, select When Rule.
- In the rule selection field, enter or select IsThisExternalDesktop.
- In the upper right, click Save.
If you are having problems with your training, please review the Pega Academy Support FAQs.
Want to help us improve this content?