Setting up data ingestion
8 Tasks
40 mins
Beginner
English
Scenario
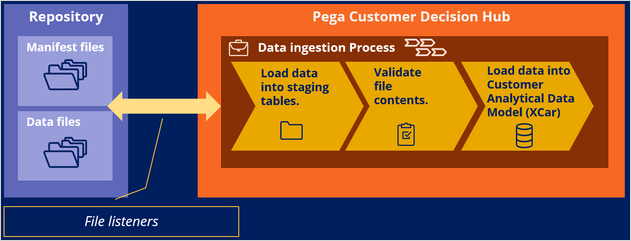
U+ Bank has decided to improve the experience of its customers with predictive and adaptive analytical models that drive personalized decisions. Following the Pega-recommended approach, the project team performed the data mapping workshop and mapped their existing data model to the financial services customer analytical data model. The U+ Bank data warehouse team prepared the customer and account data files along with the manifest files and developed the technical infrastructure to upload the data daily to a repository that Pega Customer Decision Hub™ can access.
The system architect prepared the following integration artifacts to process the data files from the repository:
| Rule type | Rule name | Description |
|---|---|---|
|
Case Type |
DataIngestion |
Case type to ingest data with a defined process |
|
Process flow |
UploadToStaging |
Process flow for loading data from repository to a staging table |
|
Process flow |
UploadToXCar |
Process flow for loading data from the staging tables to the customer data model |
|
Property |
ProcessType |
Process type property that is used in the process flow (CustomerDataIngestion or AccountDataIngestion) |
|
Property |
DataFlowClassName |
Property to hold the class of the data flow to execute (UBank-Data-Customer or UBank-Data-Accounts) |
|
Property |
DataFlowNameStaging |
Property that holds the name of the data flow to execute for Staging (UBank-Data-Customer or UBank-Data-Accounts) |
|
Property |
DataFlowNameXCar |
Property that holds the name of the data flow to execute for XCar (UBank-Data-Customer or UBank-Data-Accounts) |
|
Property |
ManifestDetails |
Single page property of the manifest class |
|
Activity |
ExecuteDataIngestion |
Activity that executes the data flows for each process type |
|
Parse XML |
XCarManifestParser |
Reads the manifest file and maps the nodes in the manifest file to properties in Pega Platform |
|
Service package |
UBankDataFileProcessing |
Service package that determines the security scheme and access for the services in the package |
|
Service file |
UBankProcessManifestFile |
Service file to use the Parse XML |
|
File listener |
CustomerDataFileListener |
File listener to process Customer record |
|
File listener |
AccountDataFileListener |
File listener to process Account record |
As a system architect, review the integration artifacts.
Note: The goal of this exercise is to demonstrate an end-to-end process to ingest data into Customer Decision Hub without creating technical artifacts. In a real-life scenario, the rules and configurations depend on the project requirements. The technical integration artifacts that system architects typically create are already configured for you in this exercise.
As a decisioning architect, your role is to prepare the data set and data flow artifacts required to populate customer and account tables in Customer Decision Hub.
After the creation of the artifacts, as a system architect, activate the file listeners to import the data into Customer Decision Hub.
Use the following credentials to log in to the exercise system:
| Role | User name | Password |
|---|---|---|
| System architect | SystemArchitect | rules |
| Decisioning architect | DecisioningArchitect | rules |
Your assignment consists of the following tasks:
Task 1: Confirm there is no data in the customer and account tables
As a decisioning architect, confirm that there is no customer or account data in Customer Decision Hub. Use the Customer and Account data sets to clear any test data from Customer Decision Hub.
Note: The exercise system contains customer and account data from a Monte Carlo data set.
Task 2: Review the integration artifacts and configure file listener
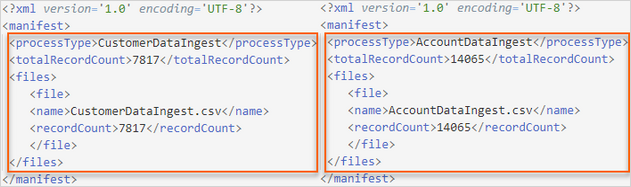
As a system architect, review the integration artifacts that are ready to ingest data from the repository. The manifest files uploaded to the repository have the following structure:
Note: For the purposes of the exercise, all files are uploaded to the defaultstore (a system-managed temporary file storage) repository. In a real-life scenario, all files are typically stored in a repository such as AWS S3.
Task 3: Configure the file listeners
As a system architect, review and configure the file listeners (CustomerDataFileListener and AccountDataFileListener).
Task 4: Review the data ingestion case type
As a system architect, review the prepared case design to understand the process for data ingestion.
Task 5: Create the data sets for data ingestion
As a decisioning architect, create the source data sets (file) to ingest the data files from the repository and destination data sets (Decision Data Store) to save the data to a staging table.
| Rule type | Rule name | Description |
|---|---|---|
|
Data set |
CustomerDataFile |
File dataset for importing customer data from the repository |
|
Data set |
CustomerStaging |
Cassandra data set to stage the data for verification |
|
Data set |
AccountDataFile |
File dataset for importing account data from the repository |
|
Data set |
AccountStaging |
Cassandra data set to stage the data for verification |
Note: For the purposes of this exercise, the AccountDataFile and AccountStaging data sets are preconfigured for you. You configure the artifacts to load the customer data.
Task 6: Create the data flows for data ingestion
As a decisioning architect, create the data flows that ingest the data from the repository to the staging data sets. Then, create the data flows to ingest the data from the staging data sets to the customer and account database tables.
| Rule type | Rule name | Description |
|---|---|---|
|
Data flow |
CustomerFromRepoToStaging |
Data flow for importing customer data from CustomerDataFile data set to CustomerStaging data set |
|
Data flow |
AccountFromRepoToStaging |
Data flow for importing account data from AccountDataFile data set to AccountStaging data set |
|
Data flow |
CustomerFromStagingToXCar |
Data flow for importing customer data from CustomerStaging data set to Customer table |
|
Data flow |
AccountFromStagingToXCar |
Data flow for importing account data from AccountStaging data set to Account table |
Note: For the purposes of this exercise, AccountFromRepoToStaging and AccountFromStagingToXCar data flows are preconfigured for you. You configure the artifacts to load the customer data.
Task 7: Enable the file listeners
As a system architect, start the customer and account file listeners to initiate the data ingestion process.
Task 8: Confirm the data is ingested
As a decisioning architect, confirm that customer and account data are populated in Customer Decision Hub.
Challenge Walkthrough
Detailed Tasks
1 Confirm there is no data in the customer and account tables
- On the exercise system landing page, click Pega CRM suite to log in to Customer Decision Hub.
- Log in as the decisioning architect with User name DecisioningArchitect and Password rules.
- In the header of Customer Decision Hub, in the search field, enter Customer, and then click the search icon.
- In the fourth filter list, select Exact Match.
- In the list of results, select the Customer data set with the Applies to class UBank-Data-Customer.

- In the upper-right corner, click the Run to truncate the data set.
- In the Run Data Set: Customer window, in the Operation list, select Truncate.
- In the upper-right, click Run to truncate the customer table.
- Close the Status Page window, and then close the Run Data Set: Customer window.
- In the lower-left corner, click Back to PM Marketing Studio Home to return to Customer Decision Hub.

- Repeat steps 3–8 to for the Account data set to truncate the data.

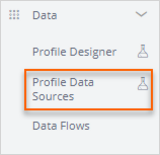
- In the navigation pane of Customer Decision Hub, click Data > Profile Data Sources to view data sources.
- On the Data sets tab of the Profile Data Sources page, click Customer to open the Customer data set.
- On the Data Set: Customer page, click the Records tab to confirm that there are no items.
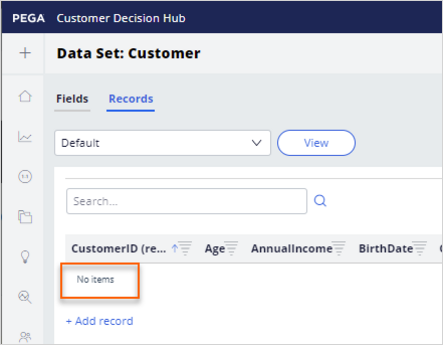
- Optional: Repeat steps 10–12 for the Account data set to confirm that there are no items.
- In the upper-right corner, click DA, and then click Log off to log out of Customer Decision Hub.
2 Review the integration artifacts and configure file listener
- Log in to Dev Studio as the system architect with User name SystemArchitect and Password rules.
- In the navigation pane of Dev Studio, click Records > Integration-Resources > Service Package to open the UBankDataFileProcessing service package.
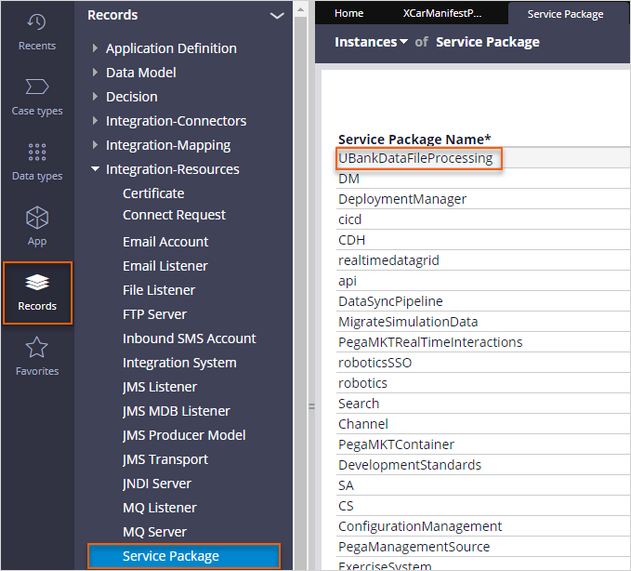 Tip: This rule defines the security scheme and access for the services defined within the service package.
- In the Edit Service Package : UBank Data File Processing service package rule, on the Context tab, review the following settings:
- In the Context section, in the Service access group field, confirm that the entry is CDH:CDHAdmins.
- In the Context section, confirm that the Requires authentication checkbox is clear.
- In the Methods section, in the Service type list, confirm that the value is Rule-Service-File.
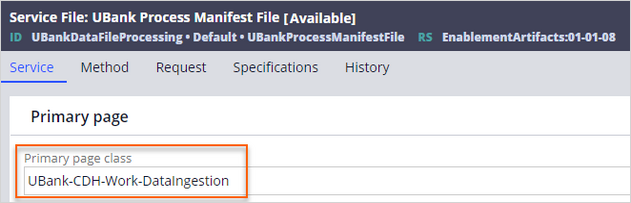
- In the Method name column, click UBankProcessManifestFile to open the service file rule used for processing the manifest files.

- In the Service File: UBank Process Manifest File service file rule, on the Service tab, in the Primary page section, confirm that the entry in the Primary page class field is UBank-CDH-Work-DataIngestion.
- On the Method tab, in the Processing options section, in the Processing method list, confirm that the selection is file at a time.

- On the Request tab, in the Parse segments section, configure the following settings:
- Confirm that the entry in the Map to field is XML ParseRule.
- Confirm that the entry in the Map to key field is XCarManifestParser manifest.

- On the Request tab, in the Processing epilog section, verify that the entry in the Final activity field is svcAddWorkObject, and then review the following parameters:
- Confirm that the entry in the FlowType field is pyStartCase.
- Confirm that the entry in the Organization field is to UBank.
- Confirm that the entry in the workPage field is to pyWorkPage.
- Confirm that the SkipCreateView checkbox is selected.

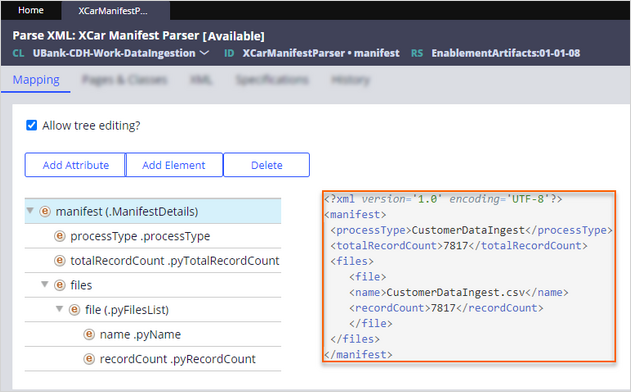
- On the Request tab, in the Parse segments section, in the Map to key field, click the Open icon to open the XCarManifestParser rule.
 Tip: The Parse XML rule map the manifest file attributes to Pega clipboard pages.
- In the Parse XML: XCar Manifest Parser rule form, on the Mapping tab, confirm that the defined elements match the XML tags in the manifest file.
Note: The sample manifest file is provided in the following screenshot for your convenience.
3 Configure the file listeners
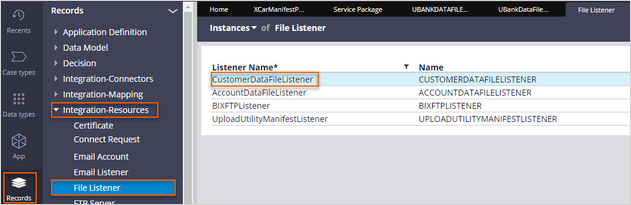
- In the navigation pane of Dev Studio, click Records > Integration-Resources > File Listener to list the file listeners.
- In the list of file listener instances, click CustomerDataFileListener to open the file listener that is used to process the CustomerDataIngest.csv file.
- In the Edit File Listener: Customer Data File Listener rule, on the Properties tab, configure the following settings:
- In the Listener nodes section, clear the Block startup checkbox.
- In the Startup option list, confirm that the selection is Run on all nodes.
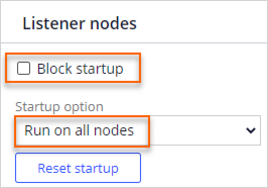 Caution: In a real-life scenario, in the Startup option list, NodeClassification based startup is selected, and the Node Type is BackgroundProcessing. In an actual environment, there are multiple nodes to complete different processes. File listeners typically run in the dedicated node that runs such background processes. The exercise system has a single node, so it is unnecessary to change this setting.
 - In the Source properties section, confirm that the entry in the Source location field is =D_EnvSettings.RepoURL.
- In the Source name mask field, confirm that the value is CustomerDataIngestManifest*.xml.
 Tip: As a best practice, use application settings or dynamic system settings for the Source location field. Setting the source location dynamically through parameters allows you to configure different paths for the location in different environments.
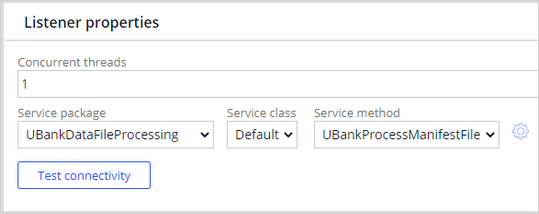
- In the Listener properties section, verify the following settings:
- In the Service package list, confirm that the selection is UBankDataFileProcessing.
- In the Service class list, confirm that the selection is Default.
- In the Service method list, confirm that the selection is UBankProcessManifestFile.
- In the upper-right corner, click Save.
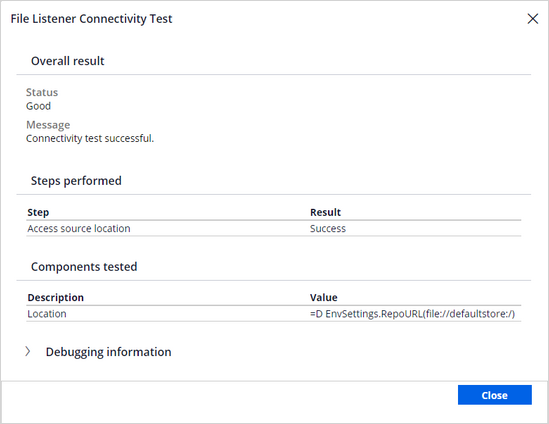
- Click Test connectivity to confirm that the file is accessible.
- In the File Listener Connectivity Test window, click Close.
- Repeat the step 2-5 for the AccountDataFileListener.
- In the Listener nodes section, clear the Block startup checkbox.
- In the Startup option list, select Run on all nodes.
- In the upper-right corner, click Save.
4 Review the data ingestion case type
- In the navigation pane of Dev Studio, click Case types > Data Ingestion to open the Data Ingestion case type.
 Note: The Data Ingestion case type exists for the purposes of this exercise and skips various important steps in validation and cleanup. In a real-life scenario, the processes and steps are different and ensure that the files are processed without any errors; staging tables are typically cleared. For more information, see the Pega Customer Decision Hub Implementation Guide.
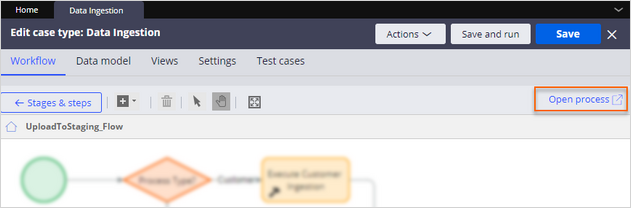
- In the Case life cycle section, in the Upload To Staging stage, click CONFIGURE PROCESS to edit the case type.
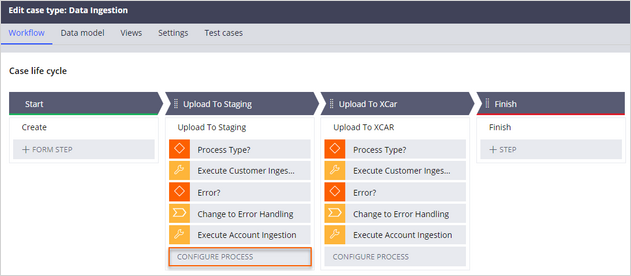
- In the toolbar of the Edit case type: Data Ingestion work area, click Open process to open the process details.
- On the flow diagram, right-click the Process Type? decision shape, and then select Open Decision to open the decision table that initiates the corresponding data flows.
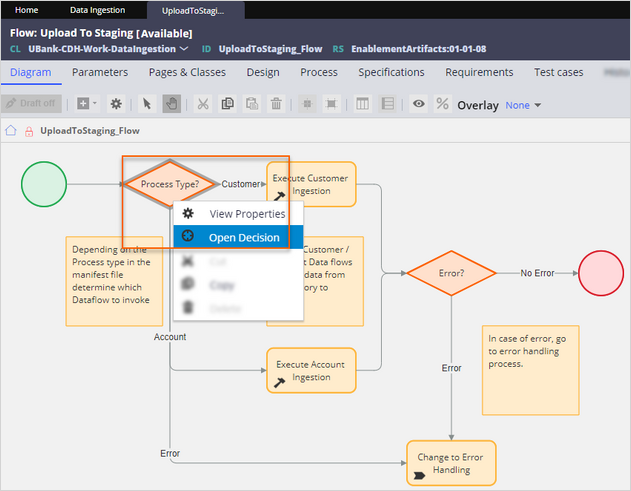
- In the DataIngestionProcessType decision table, review the values in the DataFlowNameStaging and DataFlowNameXCar columns.
 Note: These are the names of the data flows that are used to move data from the repository to staging tables and then to the customer and account database tables.
- In the lower-left corner, click the SA icon, and then select Log off to log out of Dev Studio.
5 Create the data sets for data ingestion
- Log in to Customer Decision Hub as the decisioning architect with User name DecisioningArchitect and Password rules.
- In the upper-right corner, click the DA > Switch apps > Customer Decision Hub to switch to Dev Studio.
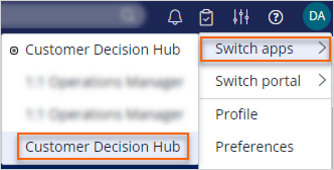 Caution: Ensure that you select the Customer Decision Hub that is not already selected to switch to Dev Studio.
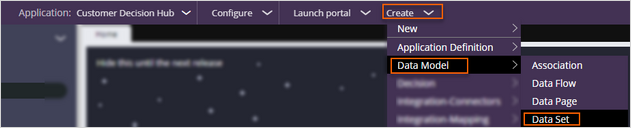
- In the header of Dev Studio, click Create > Data Model > Data Set to create a new data set.
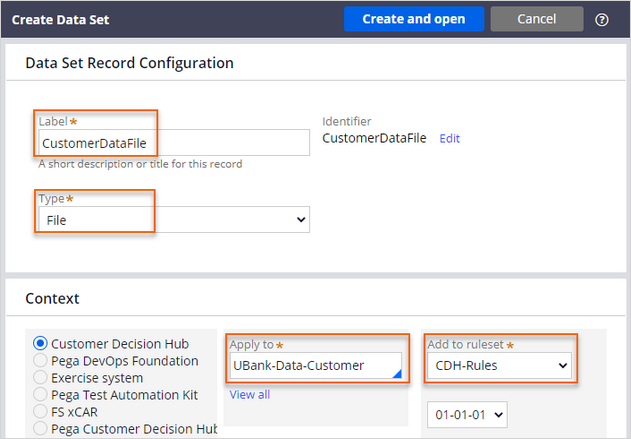
- On the Create Data Set tab, create a new data set:
- In the Label field, enter CustomerDataFile.
- In the Type list, select File.
- In the Apply to field, enter or select UBank-Data-Customer.
- In the Add to ruleset list, select CDH-Rules.
- In the upper-right corner, click Create and open.
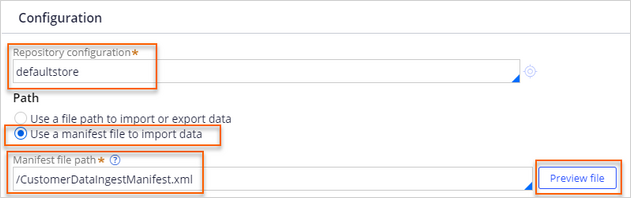
- In the Edit Data set : CustomerDataFile tab, in the Configuration section, set up the manifest file:
- In the Repository configuration field, enter or select defaultstore.
- In the Path section, select Use a manifest file to import data.
- In the Manifest file path field, enter or select /CustomerDataIngestManifest.xml.
- Click Preview file to preview the manifest file.
- In the File preview window, confirm that the content of the manifest file is visible.
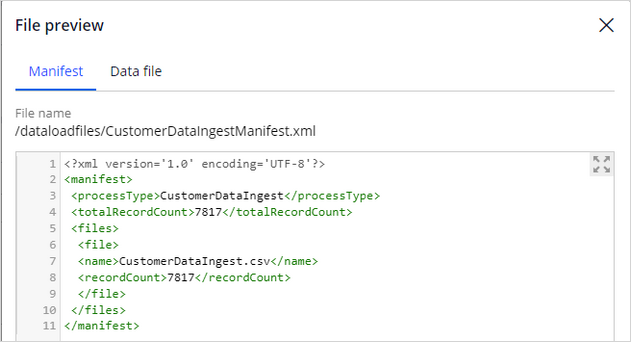 Note: The manifest and data files are already uploaded to the repository for this exercise. In a real-life scenario, the files are uploaded in regular intervals with proper naming conventions. File path in the manifest file must be set relative to the Repository configuration in the dataset.
- On the Data file tab, confirm that the CustomerDataIngest.csv contents are visible.
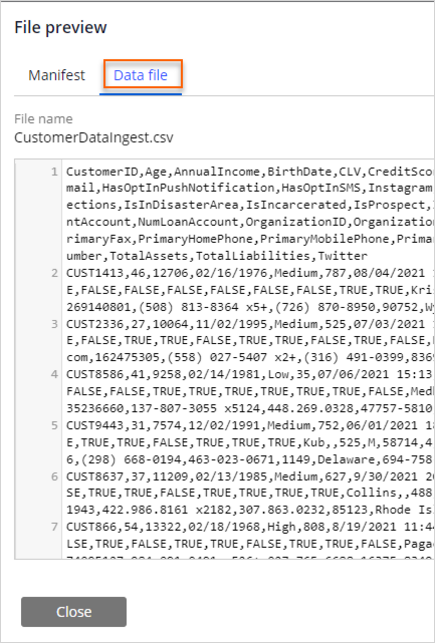
- Close the File preview window.
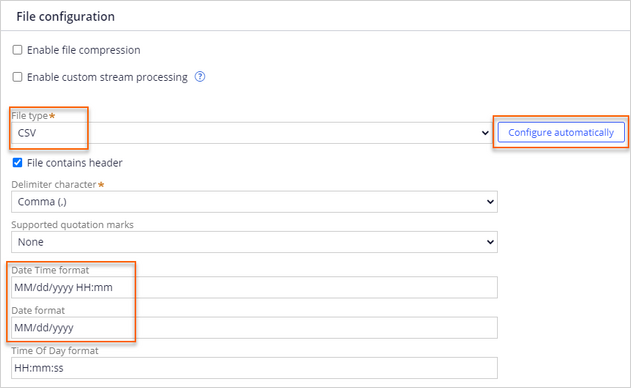
- In the File configuration section, in the File type list, select CSV, and then click Configure automatically to automatically complete the data mapping to the properties in the customer class.
- In the Date Time format field, enter MM/dd/yyyy HH:mm
- In the Date format field, enter MM/dd/yyyy
- In the upper-right corner, click Save.
- On the header of Dev Studio, click Create > Data Model > Data Set to create a new data set.
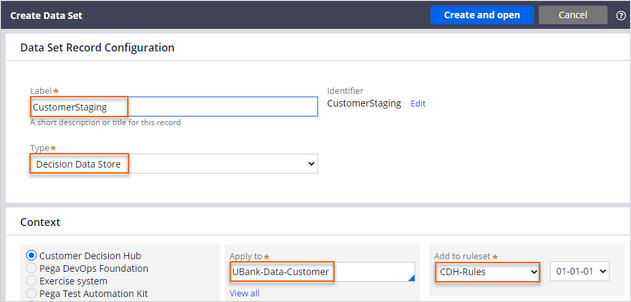
- In the Create Data Set tab, configure the new data set:
- In the Label field, enter CustomerStaging.
- In the Type list, select Decision Data Store.
- In the Apply to field, enter or select UBank-Data-Customer.
- In the Add to ruleset list, select CDH-Rules.
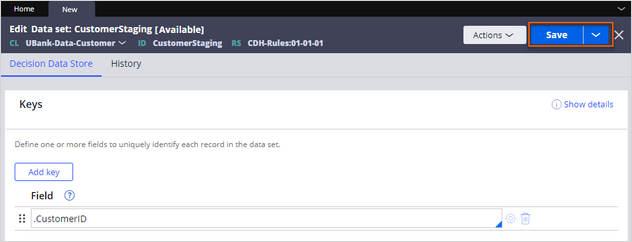
- In the upper-right corner, click Create and open.
- In the upper-right corner, click Save.
6 Create the data flows for data ingestion
- In the header of Dev Studio, click Create > Data Model > Data Flow to create a new data flow.
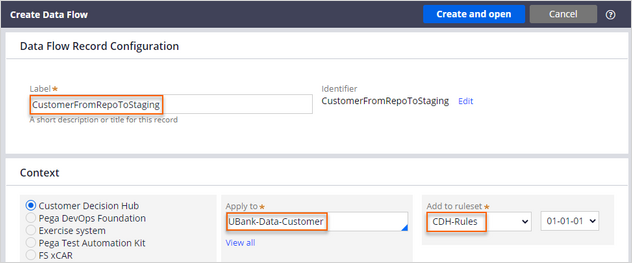
- In the Create Data Flow work space, configure the new data flow:
- In the Label field, enter CustomerFromRepoToStaging.
- In the Apply to field, enter or select UBank-Data-Customer.
- In the Add to ruleset list, select CDH-Rules.
- In the upper-right corner, click Create and open.
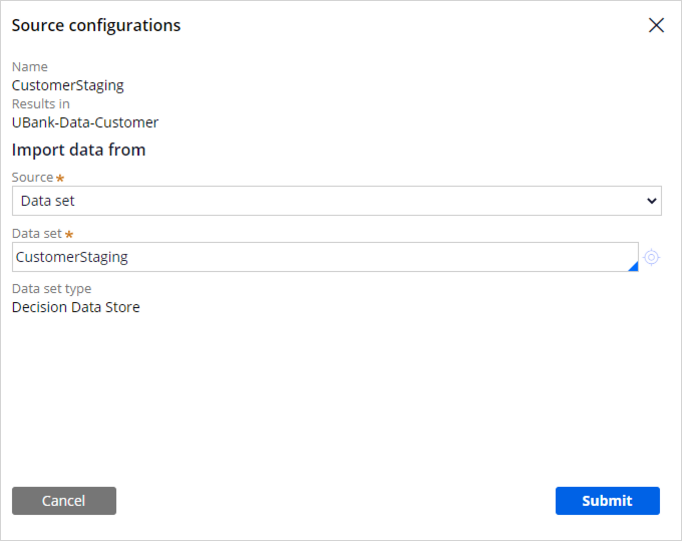
- On the canvas, double-click the first component to modify the source of the CustomerFromRepoToStaging data flow.
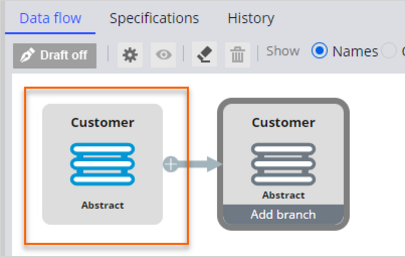
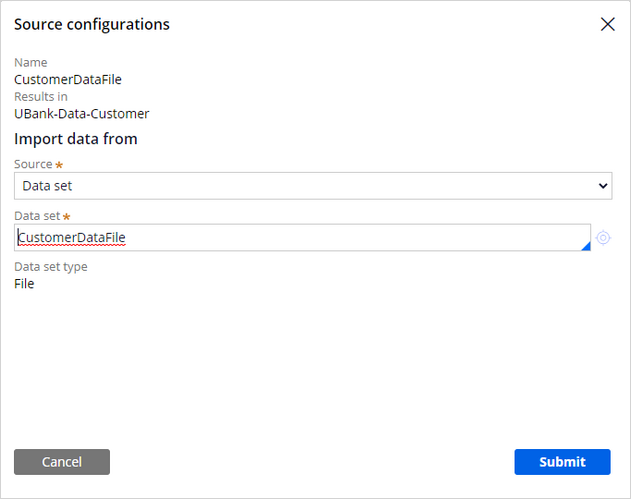
- In the Source configurations window, set up the input data:
- In the Source list, select Data set.
- In the Data set field, enter or select CustomerDataFile.
- Click Submit.
- On the canvas, double-click the second component to modify the destination of the CustomerFromRepoToStaging data flow.
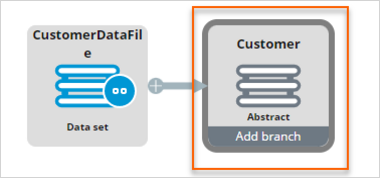
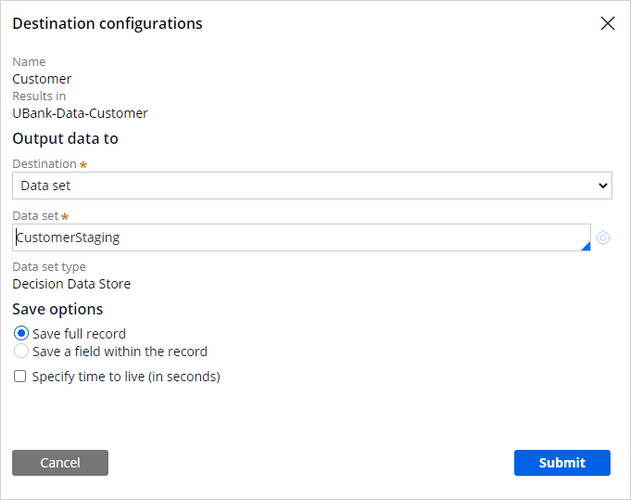
- In the Destination configurations window, set up the output data:
- In the Destination list, select Data set.
- In the Data set field, enter or select CustomerStaging.
- Click Submit.
- In the upper-right corner, click Save.
- In the header of Dev Studio, click Create > Data Model > Data Flow to create a new data flow.
- In the Create Data Flow tab, create a new data flow:
- In the Label field, enter CustomerFromStagingToXCar.
- In the Apply to field, enter or select UBank-Data-Customer.
- In the Add to ruleset list select CDH-Rules.
- In the upper-right corner, click Create and open.
- On the canvas, double-click the first component to modify the source of the CustomerFromStagingToXCar data flow.
- In the Source configurations window, set up the input data:
- In the Source list, select Data set.
- In the Data set field, enter or select CustomerStaging.
- Click Submit.
- On the canvas, double-click on second component to modify the CustomerFromStagingToXCar data flow.
- In the Destination configurations window, set up the output data:
- In the Destination list, select Data set.
- In the Data set field, enter or select Customer.
- In the Save options, select Insert new and overwrite existing records.
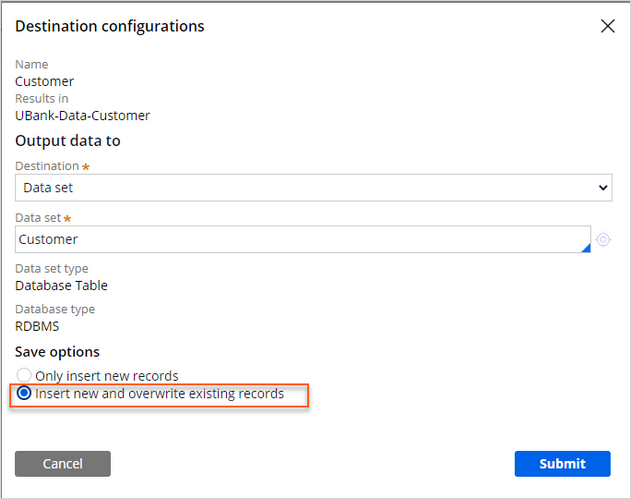
- Click Submit.
- In the upper-right corner, click Save.
- In the lower-left corner, click the DA icon, and then select Log off to log out of Dev Studio.
7 Enable the file listeners
- Log in to Dev Studio as the system architect with User name SystemArchitect and Password rules.
- In the header of Dev Studio, click Dev Studio > Admin Studio to switch workspaces.

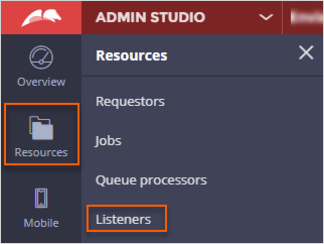
- In the navigation pane of Admin Studio, click Resources > Listeners to view listeners.
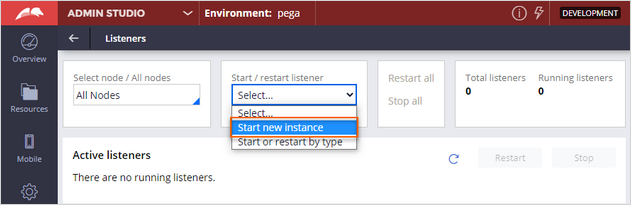
- On the Listeners page, in the Start / restart listener list, select Start new instance.
- In the empty field, enter or select CustomerDataFileListener.
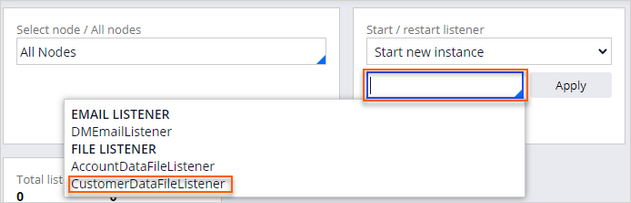
- Click Apply.
- In the empty field, enter or select CustomerDataFileListener.
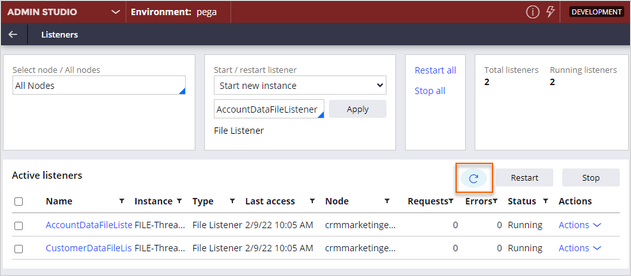
- Repeat step 4 a-b to enable the AccountDataFileListener.
- In the Active listeners section, click the Refresh icon.
- In the lower-left corner, click the SA icon, and then select Log off to log out of Admin Studio.
8 Confirm the data is ingested
- Log in as the decisioning architect with User name DecisioningArchitect and Password rules.
- In the navigation pane of Customer Decision Hub, click Data > Profile Data Sources to view data sources.
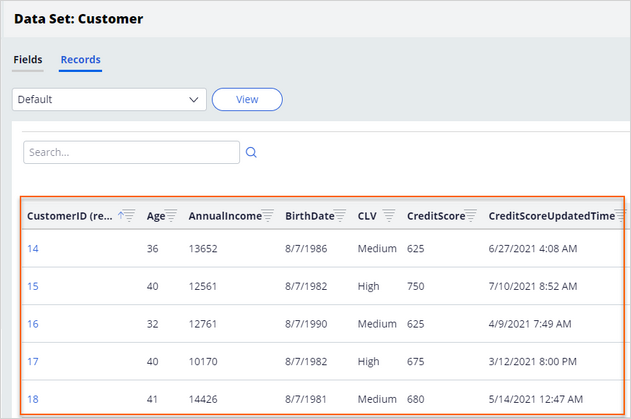
- On the Profile Data Sources page, on the Data sets tab, click Customer to open the customer data set.
- On the Data Set: Customer page, confirm that the records are imported.
- Optional: Follow the steps 3–5 for the Account data set to confirm that the system imported the account records.
If you are having problems with your training, please review the Pega Academy Support FAQs.
Want to help us improve this content?