Setting UseKeys and implementing ASO
Archived
5 Tasks
45 mins
Beginner
Robotic Process Automation
English
Scenario
Based on the business case, users may work with multiple customers simultaneously. Because the CRM application contains customer and account information, you must remember that users may open various customer windows to ensure data integrity.
According to the solution and architecture project documents, the solution requires that the applications log in automatically when called or when the project launches. Because the CRM is set to run when the project launches, but the ACME system is set to run only when called to do so, the applications require different configurations and automation adjustments to account for this.
Your assignment
In this part of the solution, complete the following tasks:
- Set the UseKeys property of the CRMChild control.
- Configure the CRM.os and ACMESystem.os to use the ASO settings based on the project documents in the following tables.
- Add a global container, _GC_ACME, to the ACMESearchPrj and add the ASOManager component to it.
- Adjust the CRM_E_frmLogin_Created and the ACME_P_SignIn automations to account for the ASO functionality.
| CRM.os Configuration | |
|---|---|
| Property | Value |
| AutoFill | True |
| Login Control | CRMbtnSignIn |
| Password Control | CRMtxtPassword |
| UserName Control | CRMtxtUserName |
| Application Key | CRM |
| ACMESystem.os Configuration | |
|---|---|
| Property | Value |
| AutoFill | True |
| Login Control | (Leave Blank) |
| Password Control | ACMEtxtPassword |
| UserName Control | ACMEtxtUserName |
| Application Key | ACME |
Detailed Tasks
1 Set the UseKeys property
- In the Solution Explorer, double-click CRM.os to open the adapter in a designer window.
- On the CRM.os tab, click Start Interrogation to launch the CRM application and display the Interrogation Form window.
- On the Login window, click Login to display the main CRM window.
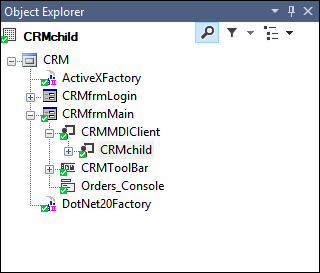
- On the CRM window, click New Call to display the CRMChild window and show the matched controls in the Object Hierarchy.
-
In the Object Hierarchy, click CRMChild to highlight the control.
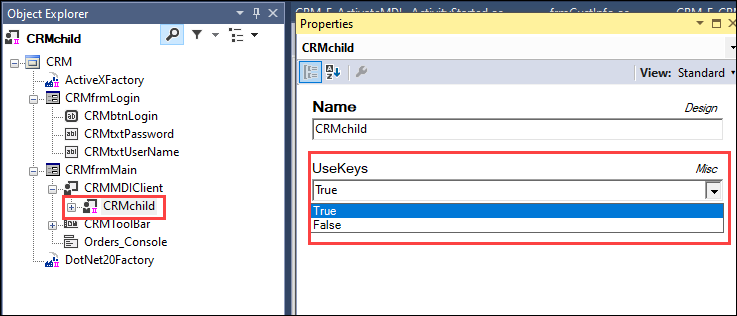
Note: You may need to expand the CRMMDIClient control in the Object Hierarchy. - In the Properties window, double-click the UseKeys property to change the valuefrom False to True. The CRMChild item in Object Explorer now has a pink pipe (II) symbol, indicating the enabled Key property for that control.
- On the CRM.os tab, click Stop interrogation to close the CRM application and the Interrogation Form window.
- From the menu bar, click File > Save to save the UseKeys property change.
2 Set Assisted Sign-On for CRM
- In the Solution Explorer, double-click CRM.os to open the adapter in the design area.
- In the Properties window under the Assisted Sign-On section for CRM.os, click in the Credentials property to display an ellipsis button.
- In the Credentials property , click the ellipsis to display the Credentials Collection Editor window.

- In the Credentials Collection Editor window, click Add to create a new entry.
- In the Properties frame of the Credentials Collection Editor window, confirm AutoFillOnCreate property is True.
- In the Controls section of the Properties frame, click LoginControl to display a drop-down field.
- To the right of the LoginControl property, click the drop-down field to display the interrogated controls.
- In the drop-down list, expand CRM-1 to display the interrogated button controls from the CRM application.
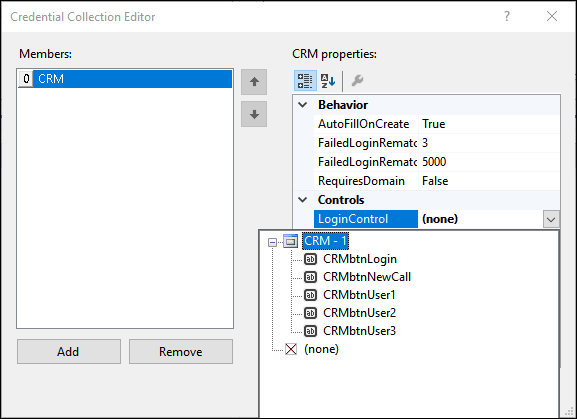
- In the drop-down list, select CRMbtnLogin to associate the Login button to the LoginControl.
- In the Controls section, repeat steps 1-9 to associate the CRMtxtPassword control to the PasswordControl and the CRMtxtUserName control to the UserNameControl.
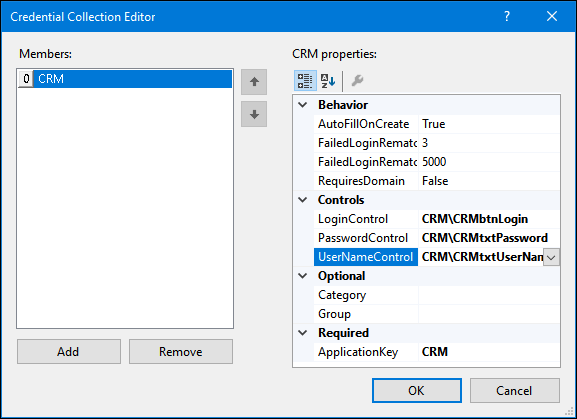
- On the Credential Collection Editor window, click OK to close the window.
- On the menu bar, click File > Save All to save the edits.
3 Adjust the CRM_E_frmLogin_Created automation for ASO
- In the Solution Explorer, double-click CRM_E_CRMfrmLogin_Created to open the automation in the design area.
- In the automation, delete all the automation links.
- In the Object Hierarchy, click CRMbtnUser1 to highlight the control.
- In the Object Inspector, click Show Events Only to display the events of the selected control.
- In the Object Inspector, drag and drop the Created event to the automation.
- In the automation, connect the CRMbtnUser1.Created output to the CRMbtnUser1.PerformClick input. Your automation should look like the following image.
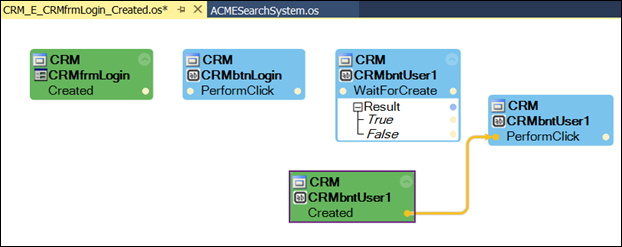
- From the menu bar, click File > Save All to save the automation edits.
4 Adjust the ACME_P_SignIn automation for ASO
- Using the ACMESystem.os configuration table in Assignment above, configure the ASO for the ACMESystem.os project item.
- In the Solution Explorer, right-click ACMESearchPrj to display the context menu.
- On the context menu, click Add > New Item to display the Add New Item window.
- On the Add New Item window, click Global Container to highlight the project item.
- In the Name field on the Add New Item window, enter _GC_ACME to rename the project item.
- On the Add New Item window, click Add to include the global container in the ACMESearchPrj and to open the global container in the design area.
- In the Search field of the Toolbox window, enter ASO to filter the components.
- In the Toolbox, drag and drop AsoManager to the _GC_ACME global container tab.
- From the menu bar, click File > Save All to save the edits.
- In the Solution Explorer, double-click ACME_P_SignIn to open the automation in the design area.
- In the automation, delete automation links as shown in the following image.

- In the automation, add the following design blocks to the automation.
Note: Use the Configure Type icon in the Object Inspector to locate properties, events, and methods.
Source project Items Design Name Description ASOManager1 asoManager1.IsPasswordSet method - Click applicationKey and enter ACME.
ASOManager1 asoManager1.ShowCredentialDialog (2 parameters) - Click applicationKey and enter ACME.
ASOManager1 asoManager1.PerformLogin - Click applicationKey and enter ACME.
- In the automation, connect the components as shown in the following image.
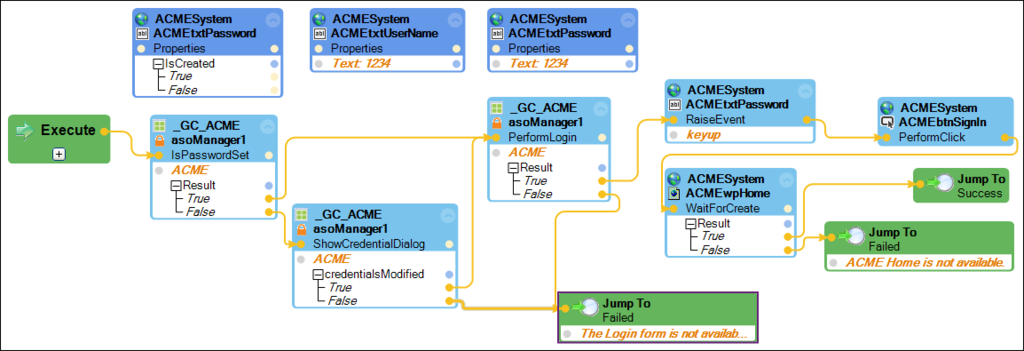
- From the menu bar, click File > Save All to save the automation edits.
5 Verify your work
Note: Be aware that you may need to access the PegaSystems folder in the appdata/roaming directory and delete the ASO.db file to get the first messages to display.
Follow these steps to test your automation:
- On the menu bar, click Debug > Start Debugging to launch the debugger and display the frmTest window.
- On the frmTest window, in the Zip Code field, enter 30030.
- On the frmTest window, click Test to launch the web browser and display the Enter Credentials window.
- In the Enter Credentials window, in the User Name and Password fields enter 1234 for both.

- In the Enter Credentials window, click OK to close the window and continue the log in process.
- On the menu bar, click Debug > Stop Debugging to close the frmTest, debugger, and the browser.
- In the Solution Explorer, right-click CRMPrj and click Set as StartUp Project.
- On the menu bar, click Debug > Start Debugging to launch the debugger and the CRM Log In window. The Failed to automatically login message is displayed.
- In the Failed to automatically login window, in the User Name and Password fields, enter 1234 .

- In the Failed to automatically login window, click OK to close the window and continue log in process.
- On the menu bar, click Debug > Stop Debugging to close the debugger and the CRM application.