Case-Life-Cycle entwerfen
Die Pega-Plattform unterstützt die Modellierungstechnik des Case-Life-Cycle-Designs. Dieses Modell ermöglicht es Business-Anwendern, einen Case auf die gleiche Weise zu sehen und mit ihm zu interagieren, wie sie ihn sich vorstellen. Jeder Case-Life-Cycle besteht aus Stufen (Stages), Prozessen und Schritten (Steps).
So ermöglicht es der Case-Life-Cycle für einen Onboarding-Case-Typ den HR-, Facility- und IT-Teams, einen neuen Mitarbeiter auf dessen ersten Tag vorzubereiten.
Um der Komplexität und den besonderen Anforderungen Ihres Unternehmens gerecht zu werden, unterstützt die Pega-Plattform verschiedene Typen und Konfigurationen für Stages, Prozesse und Steps.
Klicken Sie auf die Pluszeichen (+) in der Abbildung, um mehr über den Onboarding-Case-Life-Cycle zu erfahren.
In der folgenden Tabelle werden die verschiedenen Komponenten eines Case-Life-Cycle beschrieben:
| Komponente | Zweck |
|---|---|
| Stage „Create“ (Erstellen) |
Die erste Stage im Case-Life-Cycle ist die „Create Stage“, die durch einen grünen Balken gekennzeichnet ist. Die Create-Stage sollte dabei Prozesse und Steps für Benutzer enthalten, damit diese bei der Case-Erstellung erste Daten eingeben können. Die Stage „Create“ kann nicht gelöscht oder im Case-Life-Cycle neu positioniert werden. Die Stage „Create“ kann umbenannt werden. Cases, die die Stage „Create“ enthalten, erhalten bei der Case-Erstellung eine Case-ID. |
| Create Process (Prozess erstellen) |
Die Stage „Create“ enthält standardmäßig einen Create-Prozess, den Sie an Ihre Business-Anforderungen anpassen können. Create-Prozesse, die nicht Channel-spezifisch sind, können lediglich Steps zum Erfassen von Informationen enthalten. Create-Prozesse lassen sich so konfigurieren, dass sie nur unter bestimmten Bedingungen starten. Sie erstellen beispielsweise einen digitalen Messenger-Kanal und konfigurieren einen kanalspezifischen Erstellungsprozess. Sie konfigurieren den Prozess so, dass er nur gestartet wird, wenn der Benutzer die Digital Messenger-App verwendet. |
| Primäre Stages |
Primäre Stages sind Stages, die zu einem erwarteten Ergebnis führen. Um die primären Stages eines Case-Typs zu identifizieren, sollten Sie Folgendes beachten:
Der Weg, den ein Case durch den Case-Life-Cycle nimmt und ohne von den primären Stages abzuweichen, wird als Primärpfad – oder auch „Primary Path“ – bezeichnet. Die Haupt-Stages im Onboarding-Beispiel sind Verification, Pre-arrival Setup, Setup und Onboarding. |
| Step zum Erfassen von Informationen |
Steps zum Sammeln von Informationen (Collect Information) gehören zu jenen, die eine Benutzeraktion oder Input erfordern. Steps zum Sammeln von Informationen sind im Case-Life-Cycle mit grünen Icons versehen. „Collect information“-Steps werden oft als Assignments oder Aufgaben bezeichnet. |
| Paralleler Prozess |
In einer Stage mit zwei oder mehr Prozessen werden die Prozesse normalerweise in sequentieller Reihenfolge ausgeführt. Wenn zwei oder mehr Prozesse unabhängig voneinander gestartet und abgeschlossen werden können, können Sie sie als parallele Prozesse konfigurieren. Während der Case-Bearbeitung kann das aktive Assignment in einem der beiden Prozesse ausgeführt werden. Das Onboarding-Beispiel enthält einen Prozess „Create IT Setup“, um dem neuen Mitarbeiter einen konfigurierten Laptop zur Verfügung zu stellen, und einen Einrichtungsprozess zum Erstellen von Einrichtungen, um dem neuen Mitarbeiter ein Büro zuzuweisen. Diese Prozesse können in beliebiger Reihenfolge ausgeführt werden, und die Stage wird fortgesetzt, wenn beide abgeschlossen sind. Tipp: Standardprozesse lassen sich auch in der Stage „Create“ als parallele Prozesse konfigurieren. |
| Automation Step |
Automation Steps werden vom System ausgeführt und sind im Case-Life-Cycle mit gelben Symbolen gekennzeichnet. Automation Steps kann E-Mails versenden, PDF-Dateien erstellen, eine bestimmte Zeit warten oder die Stage eines Case ändern. Das Onboarding-Beispiel verwendet Automatisierungs-Steps, um abgelehnte IT-Setups auf den primären Pfad zurückzugeben, eine Willkommenspaket-E-Mail an den neuen Mitarbeiter zu senden und verschiedene Arten von Benachrichtigungen an den neuen Vorgesetzten und das Team des Mitarbeiters zu senden. |
| Alternate Stage |
Alternate Stages sind Stages, die bei Abweichungen vom Primärpfad zum Tragen kommen. Die Alternate Stages sind optional und stellen eine negative Resolution Stage dar oder werden für die Bearbeitung von Ausnahmen verwendet, damit der Case wieder in den primären Pfad eintreten kann. Entsprechend des Primärpfads des Onboarding-Case-Beispiels geht der Case, wenn die Auswahl im Prozess „IT Setup“ genehmigt wurde, in die Stage „Verification“ über. Wird die Auswahl beim IT-Setup stattdessen abgelehnt, geht der Case in die Alternate Stage „Approval Rejection“ über, die bei Ablehnung der Genehmigung aktiv wird. In dieser Stage kann die Auswahl für das IT-Setup geändert werden. |
| Resolution Stage |
Die Resolution Stage, gekennzeichnet durch einen roten Balken, definiert das Case-Verhalten am Ende des Case-Life-Cycle. Die Resolution Stage zeigen an, dass der Case seinen Life-Cycle mit dem Abschluss der Stage beendet hat. Jeder Case-Typ sollte mindestens eine Resolution Stage haben. Ein Case-Typ kann mehr als eine Resolution Stage aufweisen, wenn ein alternativer Pfad für Ihren Business-Prozess definiert wurde. In diesem Beispiel hat der Onboarding-Case-Life-Cycle zwei Resolution Stages: die Stages „Verification“ und „Approval Rejection“. |
Übergänge zwischen Stages
Wenn Sie einen Case-Life-Cycle entwerfen, sollten Sie dabei berücksichtigen, wie der Case von einer Stage zum nächsten übergeht.
Klicken Sie in der folgenden Abbildung auf die Pluszeichen (+), um mehr über die Übergangsoptionen zu erfahren, die im Kontexteigenschaften-Panel der Stage verfügbar sind:
Hinweis: Bei der Create-Stage gibt es keine Möglichkeit, Übergänge zwischen Stages zu konfigurieren.
Übergänge zwischen Stages mit Automatisierungen
Verwenden Sie Automatisierungs-Steps zur Stage-Änderung, um den Case-Verlauf automatisch an eine bestimmte Stage zu übergeben. Diese Art der Konfiguration ist am nützlichsten für automatisierte Übergänge zu und von Alternate Stages.
Im Onboarding-Case fügen Sie eine Automatisierung der Stage „Change“ zur Alternate Stage „Approval Rejection“ hinzu. Konfigurieren Sie den Step „Change stage“ so, dass der Case in die Stage „Verification“ übergeht, sobald die Auswahl für das IT-Setup geändert sind.
Übergänge zwischen Steps
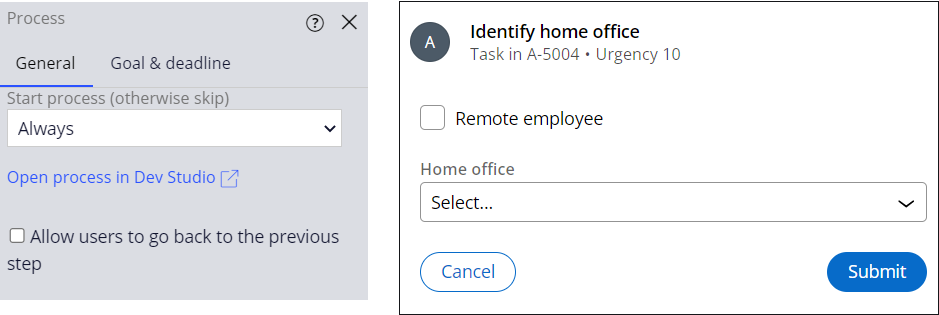
Wenn Sie einen Case-Life-Cycle entwerfen, sollten Sie dabei berücksichtigen, wie der Case von einem Step zum nächsten übergeht. Standardmäßig klicken Sie zur Laufzeit auf Submit, um den Case zum nächsten Step fortzuführen. Die folgende Abbildung zeigt links die Prozesseinstellungen in App Studio und rechts den Laufzeitschritt:
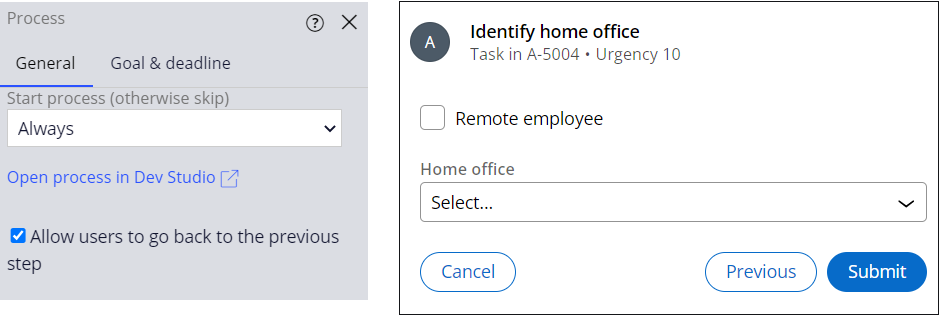
In einem Prozess in App Studio können Sie die Option Allow users to go back to the previous Step aktivieren, um die Schaltfläche Previous zur Laufzeit anzuzeigen. Die folgende Abbildung zeigt links die Prozesseinstellungen in App Studio und rechts den Step zur Laufzeit:
Prüfen Sie mit der folgenden Interaktion Ihr Wissen:
Dieses Thema ist im folgenden Modul verfügbar:
Wenn Probleme mit den Lerninhalten auftreten, lesen Sie bitte die Pega Academy Support FAQs.
Möchten Sie uns dabei helfen, diesen Inhalt zu verbessern?