Creating and setting application variables
Archived
2 Tareas
15 minutos
Intermedio
Data Integration
Inglés
Escenario
The Candidate case type assigns a case to the RecruitingWB work queue for final management approval. Hiring some positions can become a high priority, and the business would like to expedite approvals for priority positions. The business needs to specify a high-priority position and route the approval for these positions to the PriorityPositionWB work queue. The position priority should be configurable without application code updates.
Create a Configuration set and Configuration setting for designating priority position and update the flow to use the new settings for routing candidates.
The following table provides the credentials you need to complete the challenge.
| Role | User name | Password |
|---|---|---|
| Senior System Architect | SSA@TGB | rules |
Nota: Your practice environment may support the completion of multiple challenges. As a result, the configuration shown in the challenge walkthrough may not match your environment exactly.
Recorrido del Reto
Tareas detalladas
1 Create Configuration set and Configuration setting
- In the navigation pane of App Studio, click Settings > Configurations to open the Configurations landing page.
- On the Configurations landing page, click Manage configuration sets.
- Click Add.
- In the Configuration set name field, enter HRProcessing.
- Click OK and close the modal.
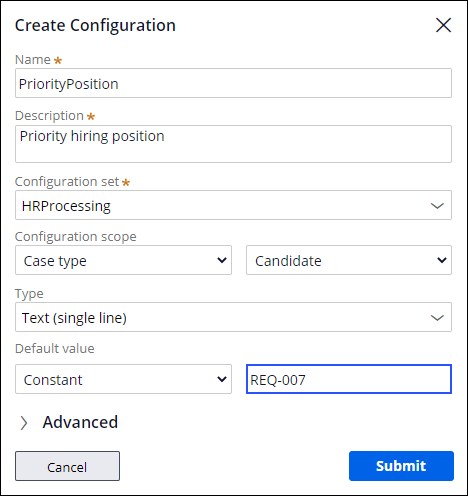
- On the Configurations landing page, click Add Configuration to open the Create Configuration dialog box.
- In the Create Configuration dialog box, complete the following details:
- In the Name field, enter PriorityPosition.
- In the Description field, enter Priority hiring position.
- In the Configuration set list, select HRProcessing.
- In the Configuration scope lists, select Case type and Candidate.
- In the Type field, enter Text (single line).
- In the Default value list, select Constant.
- In the Default value field, enter REQ-007.
-
Click Submit to close the dialog box.
2 Update routing for the Manager Approval step
- On the Candidate case type, click the Manager Approval step.
- In the configuration pane on the right, in the Route to list, select Use business logic.
- To the right of the Route to list, click Configure business logic.
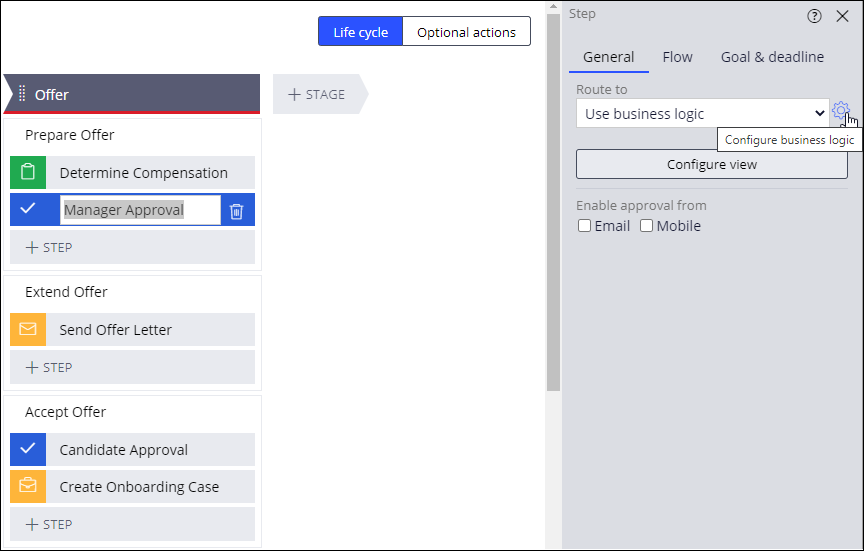
- In the Business logic dialog box, complete the following details:
- In the Route work based on these conditions section, in the Route to list, select Work queue.
- In the Value field, enter PriorityPositionWB.
- In the Field list, select Configurations > HRProcessing > PriorityPosition (HRProcessing).
- In the Comparator list, select is equal to.
- In the Value field, enter .PositionAppliedFor.
- In the otherwise section, in the Route to field, select Work queue.
- In the Value field, enter RecruitingWB.

- Click Submit to close the Business logic dialog box.
- Click Save to update the routing for the Manager Approval step.