Définition du cycle de vie d’un dossier
Pega Platform™ prend en charge une technique de modélisation appelée conception du cycle de vie d’un dossier (Case Life Cycle design). Ce modèle permet aux utilisateurs métier d'afficher un dossier et d’interagir avec celui-ci de manière intuitive. Chaque cycle de vie de dossier se décompose en phases (Stage), processus (Process) et étapes (Step).
Par exemple, le cycle de vie d’un dossier de type Onboarding permet aux équipes RH, Facilities et IT de préparer le premier jour de travail d’une nouvelle recrue.
Pour s’adapter à la complexité et aux besoins spécifiques de votre entreprise, Pega Platform prend en charge différents types et configurations de processus (Process), phases (Stage) et étapes (Step).
Dans l’image suivante, cliquez sur les icônes + pour en savoir plus sur le cycle de vie du dossier Onboarding :
Le tableau suivant décrit les différentes composantes du cycle de vie d'un dossier (Case Life Cycle) :
| Composant | Objectif |
|---|---|
| Phase de création |
La première phase du cycle de vie du dossier est la phase de création (Create Stage), indiquée par une barre verte. La phase de création doit contenir des processus et étapes permettant aux utilisateurs de saisir leurs données initiales au moment de créer le dossier. La phase de création ne peut pas être supprimée ou déplacée au cours du cycle de vie du dossier. La phase Create peut être renommée. Un ID de dossier est attribué aux dossiers qui incluent la phase Create dès leur création. |
| Processus de création |
Par défaut, la phase de création contient un processus de création (Create Process), que vous pouvez modifier pour répondre à vos besoins métier. Les processus de création qui ne sont pas spécifiques à un canal peuvent uniquement comprendre des étapes de collecte d’informations. Vous pouvez configurer des processus de création à démarrer sous certaines conditions. Par exemple, vous créez un canal (Channel) Digital Messaging et configurez un processus de création spécifique à ce canal. Vous configurez le processus pour qu'il ne démarre que si l'utilisateur utilise l'application Digital Messenger. |
| Phases principales |
Les phases principales (Primary Stages) sont celles qui amènent au résultat attendu. Pour identifier les phases principales d’un type de dossier, déterminez si :
Le chemin principal (primary path) est le chemin que suit un dossier dans son cycle de vie lorsqu’il ne s’écarte pas des phases principales (Primary Stages). Dans le cas du dossier Onboarding, les phases principales sont Verification, Pre-arrival Setup, Setup et Onboarding. |
| Étape de collecte d’informations |
Les étapes de collecte d’informations (Collect Information Steps) nécessitent une action de la part de l’utilisateur. Les étapes de collecte d’informations sont indiquées par des icônes de couleur verte dans le cycle de vie du dossier. Elles sont également appelées tâches (Assignments). |
| Processus parallèle |
Dans une phase comportant deux processus ou plus, les processus s'exécutent normalement dans l'ordre séquentiel. Si deux processus ou plus peuvent être lancés et achevés indépendamment les uns des autres, vous pouvez les configurer en tant que processus parallèles. Pendant le traitement du dossier, il est possible d'effectuer l'affectation active dans l'un ou l'autre des processus. L’exemple d’onboarding comporte un processus Create IT Setup visant à fournir un ordinateur portable configuré au nouvel employé, ainsi qu’un processus Create Facilities Setup dont le but est de lui affecter un bureau. Ces processus peuvent être exécutés dans n'importe quel ordre et la phase progressera lorsqu'ils seront tous deux terminés. Conseil : Vous pouvez également configurer des processus standard en tant que processus parallèles dans la phase de création. |
| Étape d’automatisation |
Les étapes d'automatisation (Automation Step) sont des étapes réalisées par le système, signalées par des icônes jaunes dans le cycle de vie du dossier. Les étapes d'automatisation (Automation Step) peuvent envoyer des e-mails, créer des fichiers PDF, attendre un certain temps ou modifier la phase d'un dossier. L'exemple d’onboarding utilise des étapes d'automatisation pour renvoyer les « IT Setup » rejetés au chemin principal, envoyer un e-mail de bienvenue au nouvel employé et envoyer divers types de notifications au nouveau superviseur et à l'équipe concernée. |
| Phase alternative |
Les phases alternatives (Alternate Stage) sont celles qui gèrent les écarts par rapport au chemin principal. Les phases alternatives sont facultatives et représentent une phase de résolution négative ou sont utilisées pour gérer les exceptions afin de permettre au dossier de réintégrer le chemin principal (primary path). Selon le chemin principal de l’exemple Onboarding, si les choix de « IT Setup » sont approuvés, le dossier passe en phase Verification. En revanche, s’ils sont rejetés, le dossier passe en phase alternative (Alternate Stage) Approval Rejection, qui permet de modifier ces choix. |
| Phase de résolution |
La phase de résolution (Resolution Stage), indiquée par une barre rouge, définit le comportement d’un dossier en fin de cycle de vie. Les phases de résolution indiquent que le dossier termine son cycle de vie à la fin de la phase. Chaque type de dossier (Case Type) doit avoir au moins une phase de résolution. Un type de dossier peut comporter plus d’une phase de résolution si vous définissez un chemin alternatif (alternate path) pour votre processus métier. Dans cet exemple, le cycle de vie du dossier (Case Life Cycle) Onboarding a deux phases de résolution : Verification et Approval Rejection. |
Transitions d’une phase à l’autre
Pour concevoir le cycle de vie d’un dossier, vous devez envisager la façon dont un dossier évolue d’une phase à l’autre.
Dans l’image suivante, cliquez sur les icônes + pour en savoir plus sur les options de transition qui sont disponibles dans le volet des propriétés contextuelles de la phase (Stage contextual properties pane) :
Note: Vous ne pouvez pas configurer les transitions de phase au cours de la phase de création.
Automatisation des transitions de phase
Utilisez les étapes d'automatisation Change Stage pour faire passer automatiquement le dossier à une phase spécifique. Ce type de configuration est utile pour automatiser les transitions vers et depuis des phases alternatives (Alternate Stages).
Dans le type de dossier Onboarding, vous ajoutez une automatisation Change Stage à la phase alternative Approval Rejection. Configurez l’étape Change Stage pour passer le dossier en phase Verification une fois les choix « IT Setup » modifiés.
Transitions d’une étape à l’autre
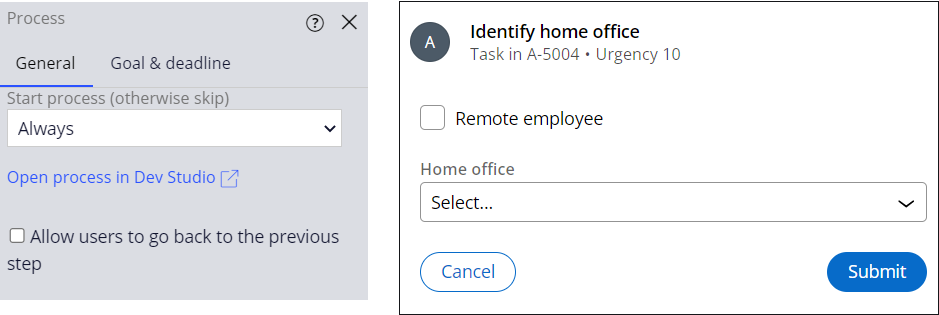
Lorsque vous concevez le cycle de vie d’un dossier, tenez compte de la manière dont le dossier (Case) passe d’une étape à l’autre. Par défaut, au moment de l’exécution, vous cliquez sur Submit pour faire passer le dossier à l’étape suivante. La figure suivante affiche les paramètres de processus dans App Studio sur la gauche et l’étape au moment de l’exécution sur la droite :
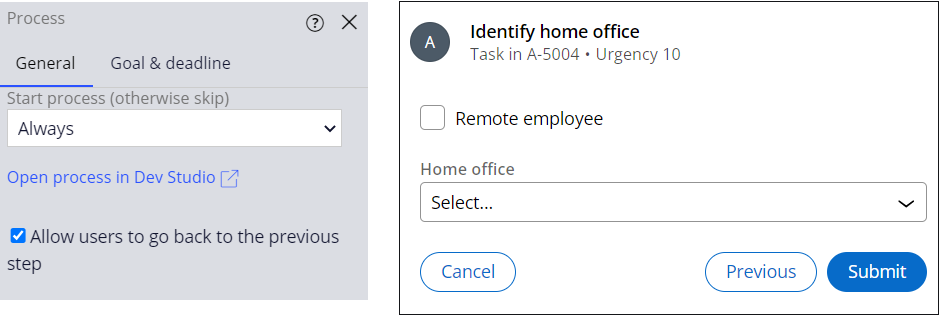
Dans un processus d’App Studio, vous pouvez activer l’option Allow users to go back to the previous Step permettant d’afficher le bouton Previous au moment de l’exécution. La figure suivante montre les paramètres de processus dans App Studio sur la gauche et l’étape au moment de l’exécution sur la droite :
Vérifiez vos connaissances avec l’interaction suivante :
This Topic is available in the following Module:
If you are having problems with your training, please review the Pega Academy Support FAQs.
Want to help us improve this content?