Validate case properties, attachments, and conditions to determine whether a case can enter a specific stage as it moves through the case life cycle.
For example, you can check whether a vehicle loan case has an attached credit score before sending the case to a finance manager for approval.Use the following techniques to define entrance criteria for a stage:
Setting required attachments for stage entry
Maximize efficiency and speed up the case resolution process by verifying that the user provides required, relevant documentation and correspondence before a case enters the next stage.
For example, in a case for a car insurance claim, you can verify that the policyholder attaches photographs of their damaged car before the case enters the stage in which the insurance company validates the policyholder's claim.
- In the navigation pane of Dev Studio, click Case types, and then click the case type that you want to open.
- On the Workflow tab, click a stage name.
- In the Stage property pane, click Validation.
- In the Attachments required for stage entry section, click Add required attachment to display the list of attachment categories that your case type supports.
-
Select an attachment category from the list.
For example: The following figure shows a design-time configuration of a stage with a required
attachment. Users that process a case have to provide an attachment of the selected
category to submit the case.
Setting a required attachment for stage entry 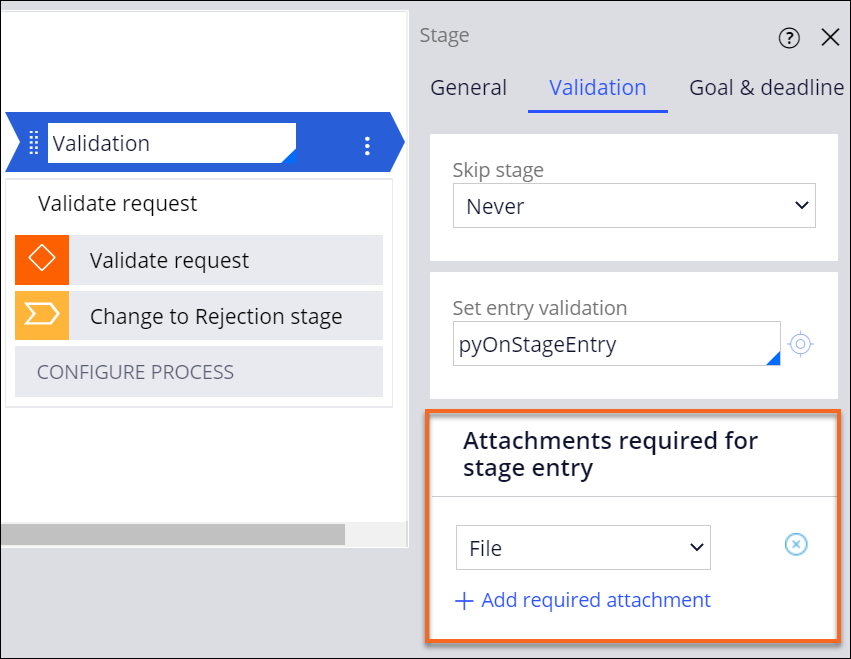
- Click Save.
Validating field values for stage entry
Ensure that a case contains relevant data before it enters a specific stage by validating the field values that users provide. By validating field values for a stage entry, you prevent the case from proceeding to the next stage without the relevant information. If the value that the user enters into a form at run time meets the condition in a validate rule, the application displays an error message.
For example, you can ensure that a job applicant provides their work experience before the job application case enters a Decision stage in which a manager approves or rejects the application. If the work experience fields are empty when the case reaches the Decision stage, the application displays an error message and the case stays in the current stage until the job applicant completes the necessary fields.- In the navigation pane of App Studio, click Case types, and then click the case type that you want to open.
- On the Data model tab, click Validations.
-
Select the cell that corresponds to the row of the field and the column of the stage
for which you want to perform validation:
- To define validation for a single-value field, click Add entry validation.
- To define validation for a data relationship field, click Click to configure, and then click Add entry validation.
-
In the Stage entry validation dialog box, define the validation
conditions:
For example: To ensure that the birth date is not set in the future, select the birth date field from the list, set the is after comparator, and then select Today from the calendar control. When the user tries to submit the form with a birth date that is set in the future, the application displays an error message.Choices Actions Define a validation condition for a field -
In the list of values, select Fields, and then select
the name of the field that you want to validate.
By default, the system provides the field that you select in step 3.
- In the comparator list, select the test that you want to perform on the field.
- In the value field, enter or select a value to compare against the user input.
Apply an existing when condition as a validation condition - In the list of values, select When conditions, and then select the name of the when condition that you want to apply.
- In the comparator list, select the test that you want to perform on the when condition.
-
In the list of values, select Fields, and then select
the name of the field that you want to validate.
- Optional:
To create a condition with multiple validation parameters, add a logical operator to
the condition:
For example: In a recruitment form, the user indicates the time of employment at a specific company by entering dates in the From and To date type fields. To ensure that the start date is before the end date, and that the end date is after the start date, you can configure a validation condition with the AND logical operator.Choices Actions The condition passes when all properties meet the criteria - Click Add a row.
- In the operator list, select and.
- In the list of fields, select the name of the field that you want to validate or the name of the when condition that you want to apply.
- In the comparator list, select the test that you want to perform on the field or on the when condition.
-
In the value field, enter or select a value to compare against the user
input.
The Select values option lists the fields and values that you can use in the condition.
The condition passes when any of the properties meet the criteria - Click Add a row.
- In the operator list, select or.
- In the list of fields, select the name of the field that you want to validate.
- In the comparator list, select the test that you want to perform on the field or on the when condition.
-
In the value field, enter or select a value to compare against the user
input.
The Select values option lists the fields and values that you can use in the condition.
- In the Stage entry validation window, in the Then display error message as field, enter the text to display when user input meets the validation conditions at run time.
- Optional:
To select additional stages for which you want to perform the validation, in the
To validate stage entry for the stages parameter, select
the stages.
By default, the system selects the check box for the stage that you select in step 3.
- Click Submit.
- Optional: To define more validation conditions, in the cell in which you want to add more conditions, click Add another validation, and then repeat steps 4 through 8.
- Click Save.