Adding departments and users
Departments and users
Departments and users determine the assignment of packages as well as run-time configurations. Deployed packages are assigned to specific departments. Users belong to a specific department that determines the assigned packages. Departments are configured within a three- (or higher) level hierarchy structure that allows for package assignment inheritance. It is a best practice to configure your department hierarchy to match your organizational hierarchy.
Pega Robot Manager™ allows you to create and manage both departments and users as well as associate users to departments.
Note: You can also configure departments and users by using Dev Studio . As a best practice, use a single tool to establish and maintain departments and users.
Adding a department
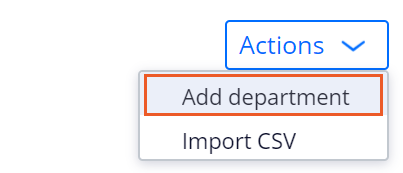
Use the following steps to add a department from the Actions menu.
- In the Robot Manager portal dashboard, click Users to display Users landing page.
- In the Departments tab, click Actions > Add department to open the Add Department dialog box
- From the Parent department drop-down, select the parent department.
 Note: When adding a sub-department, you can select any hierarchy level as the new department parent and enter the department name.
 - In the Name field, enter the name of the department.
- In the Description field, enter the description of the department.
- Click Submit to save the configuration.
Adding sub-departments
You can also add a sub-department from the Departments list.
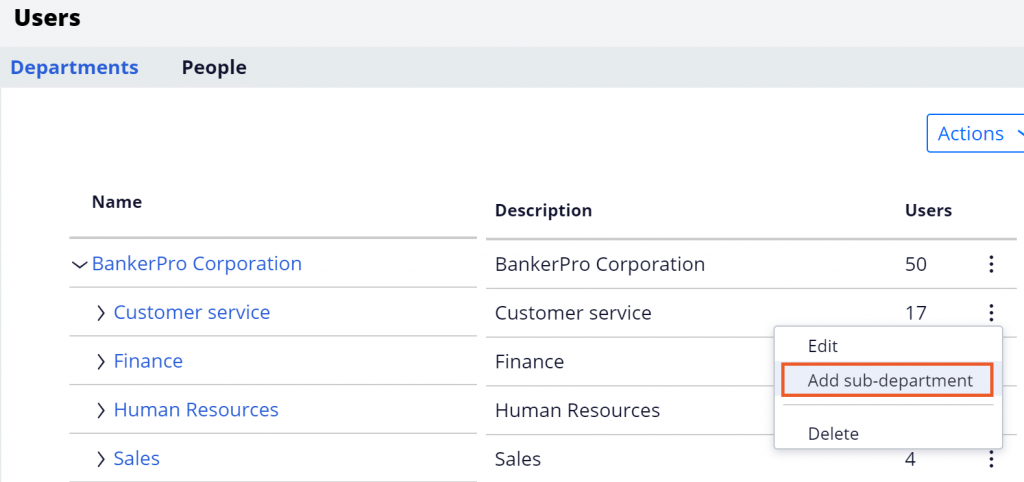
Use the following steps to add a sub-department.
- In the Robot Manager portal dashboard, click Users to display the Users landing page.
- In the Departments tab, select the parent department.
- To the right of the parent department, click the More icon to view the options list.
- From the list, click Add sub-department to open the Add new department dialog box.
- In the Name field, enter the name of the department.
- In the Description field, enter the description of the department. The description field is optional but helps differentiate between departments.
- Click Submit to save the configuration.
User roles
Each role in Pega Robot Manager is associated with an access group that determines the functionality and access. For more information, see the Pega Community article Configuring Pega Robot Manager 8.3.1.
Before you create users in Pega Robot Manager, you must configure authentication requirements for user roles.
Pega Robot Manager has four predefined user roles:
|
Role |
Description |
|
Admin |
Perform all actions in Pega Robot Manager. Admin is the only role that can deploy a package to a Production deployment stage. |
|
Developer |
Publish and manage automation packages |
|
Runtime user |
Fetches the automation package assignment from Pega Robot Manager. Typically a caseworker. Robots are also classified as Runtime users. Runtime users cannot log in to Pega Robot Manager. |
|
User Admin |
Manage Runtimes users and the organizational hierarchy. |
Pega Robot Manager supports basic authentication and single sign-on (SSO) by using either OAuth 2.0 with SAML bearer assertion or Kerberos. Pega Robot Runtime users authenticate with Pega Robot Manager by using single sign-on authentication while users of other roles authenticate by using basic authentication.
Note: Robots are not added through the Pega Robot Manager application. The robots are automatically registered through Pega Robot Runtime on the robot’s desktop.
When you create user accounts in Pega Robot Manager, the authentication method assigned to each user is determined by the role specified and the dynamic system setting associated with the role.
For more information about authentication mechanisms, see the Pega Community articles Pega Robot Manager authentication mechanisms and Configuring authentication for Pega Robot Manager 8.3.1.
For users who log in to Pega Robot Manager with basic authentication, the system generates a default password pega. Users must change their passwords by clicking the Forgot password? link on the Pega Robot Manager login page. An extensible activity pyGetGeneratedPassword is also available to set the password per organization security policies.
Adding users
Follow these steps to add users from the Actions menu:
- In the Pega Robot Manager portal dashboard, click Users to display the Users landing page.
- In the People tab, click Actions > Add user to open the New user dialog box.
- In the First Name field, enter the user first name of the user.
- In the Last Name field, enter the user last name of the user.
- In the Email address field, enter the user email address.
- From the Department drop-down, select the department.
- From the Role drop-down, select the user role.
- From the Status drop-down, select the user status.
- Required for single sign-on roles: in the UPN field, enter the single sign on user name.
- Click Submit to save the configuration.
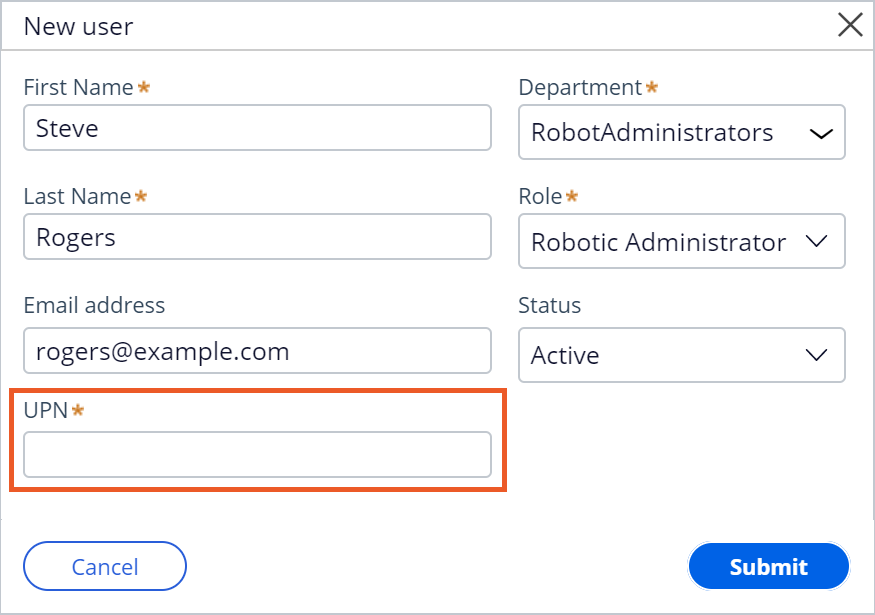
Note: The default user status is Active. If the selected Role has Single Sign-On (SSO) enabled, then Pega Robot Manager requires a UPN value, which should be the single sign-on user name.
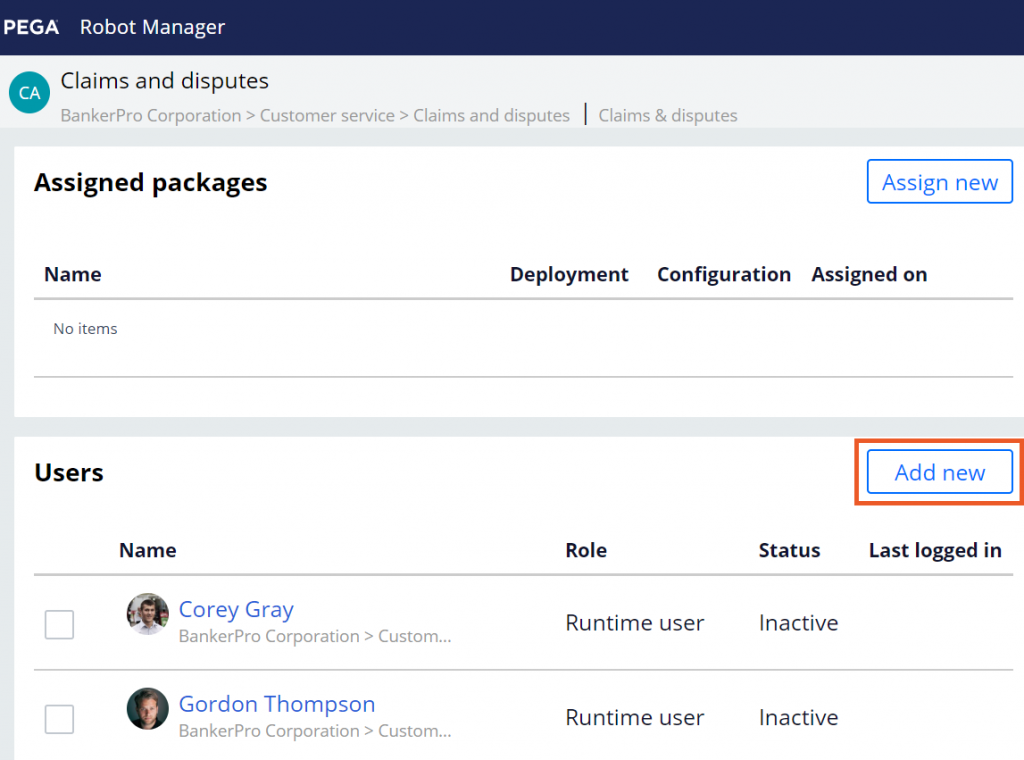
You can also add users from the Department details window. Use the following steps to add a user from the Department details window.
- In the Pega Robot Manager portal, click Users to display the Users landing page.
- In the Departments tab, click the department to open the department details window.
- In the Users pane, click Add new to add a new user.
- Enter the details and click Submit to save the configuration.
If you are having problems with your training, please review the Pega Academy Support FAQs.
Want to help us improve this content?