Capturing data
For the Creative Content team, each new Creative Request case begins with a request to create a brochure, slide deck, or video.
Ren outlines the information the team needs to get with each new request.
Each request includes the following information:
- The name of the individual submitting the request.
- The requester's email address (for the confirmation email).
- The requester's department (for reporting purposes).
- The content request type: brochure, slide deck, or video.
- A description of the project.
Ren's task is to design a form inside the application that captures this information and stores it for reference during project development and review.
Creating a form
Ren creates a form by performing the following steps:
- In the navigation pane of App Studio, click Case types, and then click the Creative Request case type.
- On the Workflow tab, click Life cycle.
- In the Case life cycle section, on the Create stage, click the Content Request Form step.
- In the Step properties pane, click .
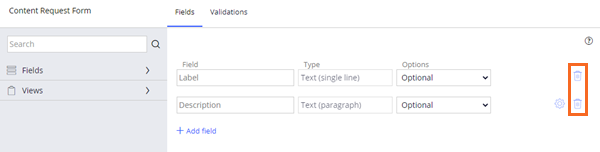
This action opens the Content Request Form dialog box. - In the Content Request Form dialog box, click Add field.
Adding fields
In Pega Platform™, a field stores a piece of information that is relevant to a case.
Pega Platform automatically provides access to some fields. Fields such as Label, Description, Case ID and Create operator name are standard with the Pega Platform and are displayed as choices for every case type.
Field name and type
Custom fields are created by defining a Field name and a Type. The field type identifies the type of information stored in the system. Assigning a field type helps ensure that users provide valid data for that field. For example, the input for an Email field requires an @ symbol in the value.
Pega field types used in this application include:
- Text (single line): Allows input to a single line of text.
- Text (paragraph): Allows input to multiple lines of text.
- Email: Validates for correct email format, including an @ symbol.
- Picklist: Provides a short, predefined set of values.
- Attachment: Allows the addition of a document or file to a case.
Note: Once a case type includes a custom field, that field is available for reuse in the Fields list for all forms that users build inside the application.
Additional fields
Pega Platform offers many additional steps beyond those that Ren uses in this application. They include:
- Integer: Allows input of positive and negative whole numbers including the value zero (0).
- Currency: Allows for input of currency codes and values.
- Date only: The calendar date displayed in a localized format.
- Phone: Digits of a phone number displayed in a localized format.
Tip: An integer field stores only the value that begins at the first non-zero digit. For values that do not require arithmetic calculations, use a text field type.
For more information on the different field types that are available in Pega Platform, see the Pega Academy topic Fields.
Field options
Once you add a field, you can configure the display mode of the field in the Options list. The following display modes are available:
- Optional: Users are not required to enter a value in the field.
- Required: Users input a value as they are critical to case processing. Validation for the entry is provided on the user input form.
- Read-Only: Users can view only the field value.
- Calculated (Read-only): Users can view but not update the field value. The application calculates the field value.
Content Request Form fields
Ren adds the following fields to the Content Request Form.
| Field name | Custom or Pega-supplied | Field Type | Options |
|---|---|---|---|
| Create operator name | Pega-supplied field | Read-only | |
| Requester email | Custom | Required | |
| Requester department | Custom | Picklist | Required |
| Request type | Custom | Picklist | Required |
| Request details | Custom | Text (paragraph) | Required |
Note: In Pega Platform version 8.7, the Label and Description fields are automatically included with the initial Create step (renamed Content Request Form). Ren deleted the Label and Description fields from his Content Request Form using the Trash icon found on the right-side of each field row.
In the center of the following image, slide the vertical line to compare the completed Content Request Form's view dialogue box to the display of the Content Request Form that is displayed to the requester in the user portal.
Note: The User Portal is the environment in which the user interacts with the application. In development, Ren simulates the behavior of his application by running test cases in the user portal.
Ren follows the same procedure to create the custom fields for the Content Submission step of the Processing stage. The new fields are as shown in the following table:
| Field name | Custom or Pega-supplied | Field Type | Options |
|---|---|---|---|
| Completed project | Custom | Attachment | Required |
| Project notes | Custom | Text (paragraph) | Optional |
Review the following video to see Ren add the fields to the Content Submission form.
Note: The following video has no audio and no closed captions.
Check your knowledge with the following interaction:
In your environment
In your own Pega environment, add fields to each Collect information step.
Tip: A green clipboard icon indicates whether a step is a Collect information step.
Be sure to flag the critical fields as Required.
You can recreate the fields that Ren added to his application or add fields that are necessary to collect data for your own process.
If you are having problems with your training, please review the Pega Academy Support FAQs.
Want to help us improve this content?