Creating Alternate Stages
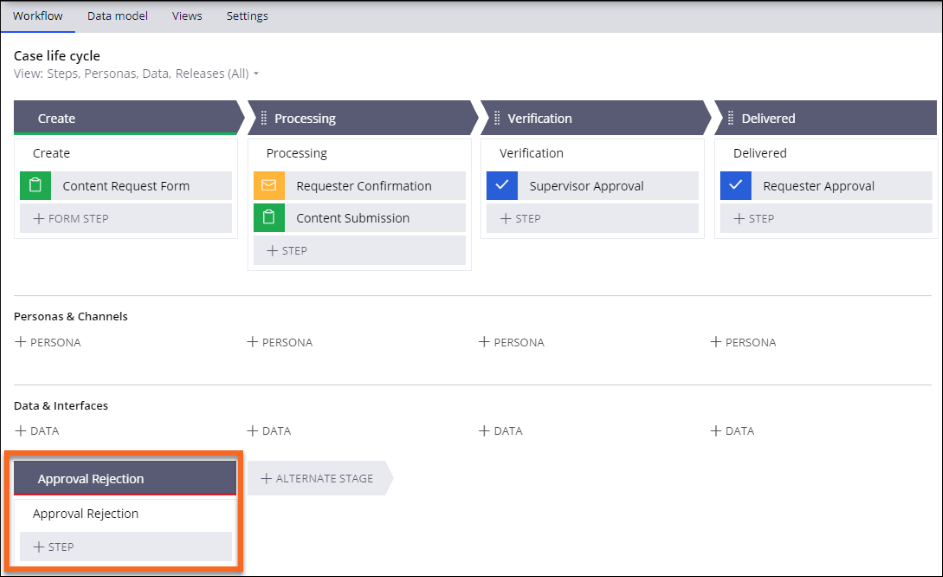
Use alternate stages when a case type deviates from the primary stages associated with the ideal process flow. Alternate stages are configured below the Data & Interfaces section in the case life cycle window. When an Approve/Reject step is added to a case type, Pega PlatformTM automatically adds an alternate stage called Approval Rejection.
In Ren’s Content Request case type, the ideal process flow occurs when both the supervisor and requester approve the project. The case type deviates from the ideal flow into an alternate flow if either the supervisor or the requester rejects the project during their respective approval steps.
Ren designs an alternate flow to handle rejections, starting with the appropriate routing.
Routing rejections
When Ren first adds the Supervisor Approval step, he notices that Pega Platform™ also adds an Approval Rejection stage to the Alternate Stage section of his case type.
If Gab rejects a project during the Supervisor Approval step, the case is routed to the Approval Rejection stage. To accomplish this, Ren completes the following steps:
- Click the Supervisor Approval step, and then open the contextual property pane.
- At the top of the contextual property pane, click the Flow tab.
- In the section, in the first dropdown list, click .
- In the section, in the first dropdown list, click .
- In the To dropdown list, verify that the Approval Rejection stage is selected.
- In the Set status field, enter Processing-Revisions.
- Click .
Ren ensures that the same routing is in place for the Requester Approval step, with one difference. In the section, Ren updates the Set status field to Resolved-completed.
With routing in place, Ren turns his attention to defining the steps associated with the Approval Rejection stage.
The Approval Rejection stage
If either Gab or the requester rejects a project, the same two actions occur:
- The Creative Content team revises and re-submits the project.
- The project is routed back to Gab for review, via the Verification stage, and the case continues along with its ideal process flow.
Creating Approval Rejection steps
Ren creates two steps in the Approval Rejection stage to match his business process.
- In the Approval Rejection stage, click in the dialogue that is displayed.
- Update the label Step label to Content Resubmission.
- To add a second step, click and in the dialogue that is displayed click .
- In the dialogue that is displayed, open the Automations dropdown list.
- In the Automations dropdown list, select Change to a stage and then click
- Update the label for the Step to Change to Verification.
- Click
Once Ren adds the steps associated with the Approval Rejection stage, he needs to configure each step.
Configuring Approval Rejection steps
To accomplish this task, Ren will add routing using business logic and configure the view using fields created when configuring the views for Content Submission, Supervisor Approval, and Requestor Approval steps.
- Click the Content Resubmission step to open the contextual property pane.
- Select Use business logic as the routing choice. Click the gear icon to the right of the box.
- Create the business logic that routes new content requests to the Operator Eli@abctech when the field Request type is equal to Video, and to Operator Ana@abctech when the field Request type is equal to Brochure, and to Operator Ren's email in all other cases.
- Click
- In the Content Resubmission contextual property pane, click and add the following fields from the Fields list:
- Completed project
- Supervisor review
- Requester review
- For the Completed Project field only, update to Required
- Click .
- Click the Change to Verification step.
- In the Change to Verification contextual property pane, in the Stage drop-down list, select Verification.
- Click .
Ren has completed the flow associated with the Alternate stage of the Content Request case type.
Review the following video to see Ren execute the steps associated with the alternate process flow for the Content Request case type.
Note: The following video has no audio and no closed captions.
More on Alternate stages
Although it was not applicable to Ren’s application, it is possible to resolve or close a case from the alternate stage.
To learn more about primary and alternate stages as they relate to a case life cycle, see the Pega Documentation pages for Stages in a case life cycle.
Check your knowledge with the following interaction:
In your environment
Determine whether your application has an alternate process that should be included alongside the ideal process flow. Design the appropriate routing to move the case from the primary stages into the alternate stage. Identify the steps associated with the alternate stage and define any associated routing and views. As always, you can mirror the process Ren follows to define the alternate stage operation associated with the Content Request case type.
If you are having problems with your training, please review the Pega Academy Support FAQs.
Want to help us improve this content?