Developing in parallel by branching rulesets
Developing in parallel by branching rulesets
To manage the independent development of features that share rulesets, each Pega development team creates its own branch and branch rulesets.
For example, two development teams are building features for a new application. Changes made by each team impact the same application rulesets. To develop rules in parallel using branched rulesets, each team follows these steps:
- Creates a team application built on the main application
- Creates one or more development branches in the team application
- Grants access to the team application
- Creates or configures rules using the branch
- Merges each branch into the application rulesets when development in branches is complete and stable
When the work is done, the team resolves conflicts the system detects between its branch and the application. After resolving any conflicts, the team merges the contents of the branch into the main application rulesets.
Create a team application
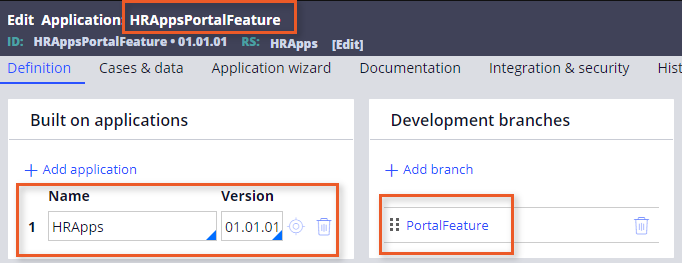
First, Team A and Team B each create a development team application built on the main application. Team application names typically reflect the base application, team name, or the focus of the team. For example, for a base application named HRApps, the development team working on the layout of the user portal might name the team application HRAppsPortalFeature.
Open the main application rule and perform a Save As to create the team application. Under the list of Built on applications, configure the team application to reference the main application.
The following image displays a team application rule with a branch.
Create branches in the team application
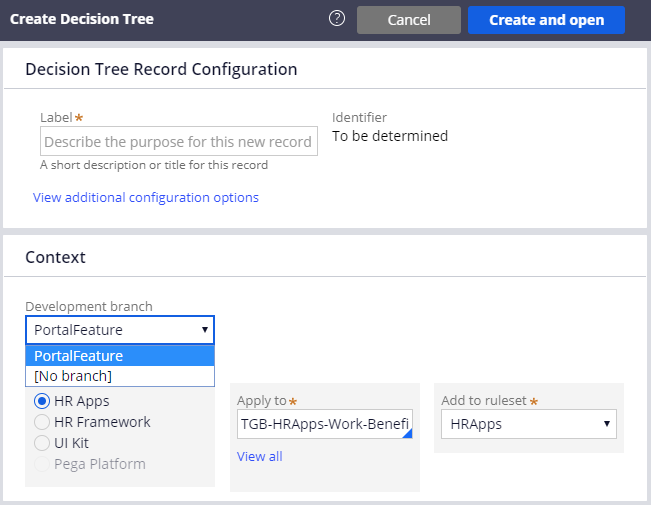
After you create the team application, you define branches in the application and add them to the application record for the team application. Specify a unique name for the branch that identifies the feature being configured. Pega limits the name of each branch to 16 characters.
Branch names are visible across all the applications on a system. When creating a branch, use a name that identifies the appropriate application, such as Expense[Feature]. This avoids confusion when development teams attempt to add branches to their applications.
Note: When using multiple branches in your application, ensure that the order of the branches in the application definition rule form matches the order in which rules should be resolved for this application.
Grant access to the team application
Create an access group that references the team application. To name the access group, include the application name plus the standard user type, such as HRAppsPOAdmn. When you create the access group:
- Verify that the access roles are sufficient to develop and test the application.
- Reference the work pool for the main application.
- Specify the correct portal, such as the Developer portal for application developers.
Tip: When creating access groups for each team, start by copying the access groups for the original application.
Configure rules using branches
You have created:
- A team development application, built on the main application
- Branches defined in that team development application
The development team members can now implement the planned enhancements in the branches.
To update an existing rule, save a copy of the base rule into the same ruleset, but select the desired branch and work on that copy. When selecting a branch, Pega stores the rule in a branch ruleset created automatically for you.
Tip: If a ruleset is configured to support check out, you can check out a record directly to the branch. Checking out a record to a branch copies the rule in its current state to the branch and checks out the new record for configuration.
To create new rules, save them directly into a branch and select a ruleset where the new rule will be merged into once development is complete. You must check in all rules to the branch ruleset before merging.