HTML table interrogation
Tables are one of the most common ways to display data in a web application. While the HTML Table Designer is only available for use within Internet Explorer or Edge in IE Mode, you can use other methods to interrogate a table within Google Chrome or Microsoft Edge. Static tables - tables in which the data and structure are constant and do not ever change - present few barriers to interrogation. If the table displays dynamic data, however, such as a table that displays all open invoices for an account, the best way to interrogate the table is to use containers and the UseKeys property.
Interrogation of a table
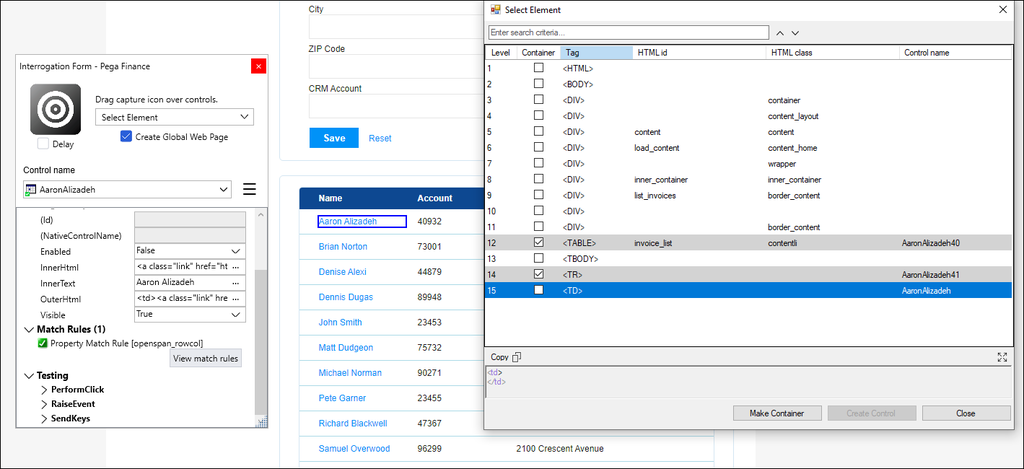
To interrogate a table for use in an automation using Chrome or Edge, you create the <table> control and <tr> (HTML table row) control as containers. Containers are controls that act as the parents for other controls. You create the <td> (HTML table data) control as a regular control. Using the Select Element tool allows you to complete all three steps at once.
In the above image, the Name field of the first row was selected using the Select Element tool. Then, the <table> and <tr> elements were marked as containers, and the <td> element was created as a regular control. After interrogation, you can rename the controls to fit your organization's standards, for example, tblAccounts, trAccounts, and tdName.
Note: If the table is created using
<div> elements instead of HTML table elements, the process for interrogation is the same. You create a container for the <div> that contains the whole table, a container for the <div> that contains the row, and a regular control for the <div> that represents the cell data.Once you’ve completed interrogation, you must make some edits to the controls and match rules in the application designer. Select the checkbox for the row container. Tables contain multiple rows and by using UseKeys,you can automate cloned controls. To learn more about UseKeys, see The UseKeys property.

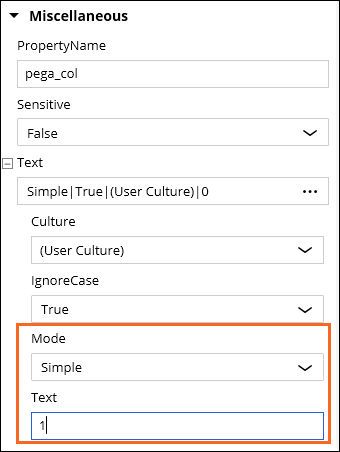
When interrogating a data cell in a table, the default match rule applied by Pega Robot Studio matches only the specific cell that you interrogate. Because you interrogated a specific data cell, you must adjust the match rules for the table data control. The default match rule is pega_rowcol. Sometimes, the cell will have an identifier, such as an HTML class, that you can use to match the cell. If the cell does not have an identifier, you can change the match rule to pega_col. After changing the match rule, update the match rule properties to match the column that the data cell resides in, with 0 being the first column. For example, in the following image the pega_col match rule is using a value of 1 to match cells in the second column.
Once the controls are interrogated and properly configured, the table can be used in an automation.
Table controls in an automation
To incorporate table controls in an automation, you use the GetClones method on the parent row container, then loop through rows to retrieve the data for each individual data cell. In the following image, click the + icons to learn more about incorporating table data into a robotic automation:
Check your knowledge with the following interaction:
This Topic is available in the following Modules:
If you are having problems with your training, please review the Pega Academy Support FAQs.
Want to help us improve this content?