Setting up Patient 360 features
You can configure features on the Patient 360 profile to meet your business needs, client type, and specialty. For example, a health plan might want to display the hospital discharge status of a member at the top of a banner while a provider might have specific vital signs and lab values that they want to show at the top of the page.
You use the Care Management application configuration page to configure a number of features such as:
- Modifying the patient to-do list.
- Setting the categories of Social Determinants of Health for tracking.
Extending the header status in the member profile in Patient 360
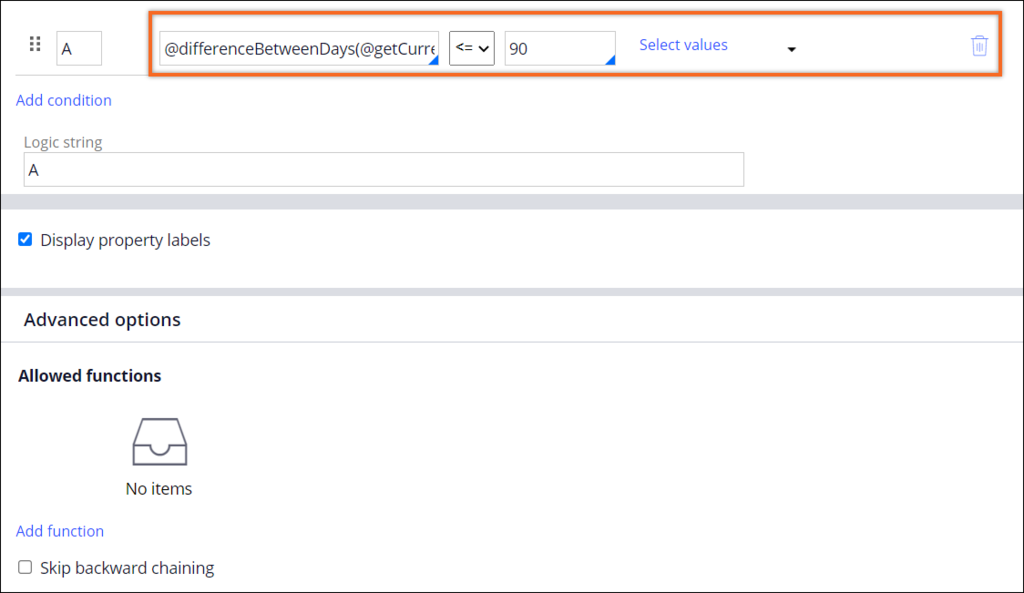
You can modify the When rule to change the number of days that a patient's discharge status from the hospital is displayed on the Patient 360 header. As shown in the following figure, the default value is 90 days.
For more information about when rules, see When condition rules.
- In the header of Dev Studio, enter IsDischargeDuration.
- Open the when rule in the PegaHC-Care-Work class.
- Change the numeric value to equal the number of days for the patient status to display in the header.
- Click Save as.
Patient header data pages
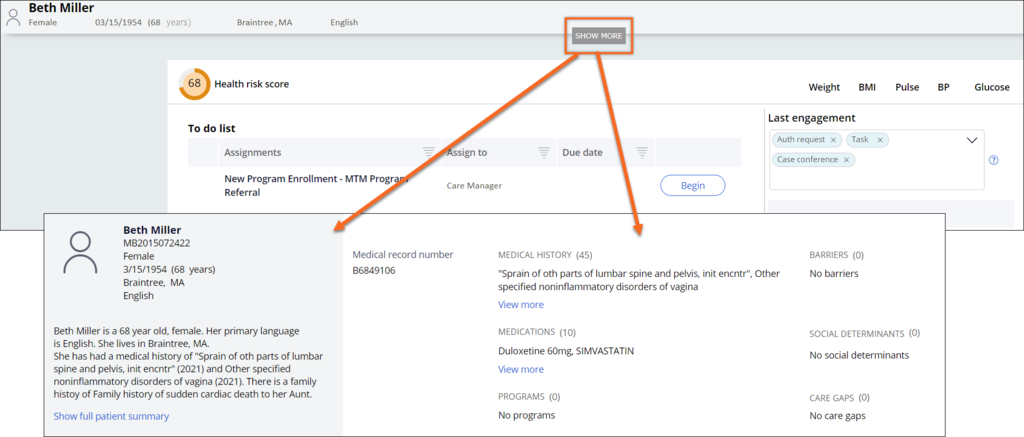
The patient header is an introductory section of the Patient 360 view and contains preliminary information about the patient such as name, gender, date of birth, age, address, and spoken language. As shown in the following figure, there is a SHOW MORE link at the bottom of the patient header which expands the patient header with more information on it. You can use these data pages to customize the patient header.
Data page rules for the patient header
| Rule Name | Purpose | Parameters |
|---|---|---|
|
D_MemberRecentBarriers |
Patient active barrier list | MemberID |
| D_GetSocialDeterminantsListByMember | Patient social determinants of health list | MemberID, SDOHCategory, Status |
| D_GetMedicationList | Patient medication list; Retrieves the PegaHC-Data-Prescription instances | MemberID |
| D_MemberMedications | Patient medication list; Retrieves the FHIR-compliant PegaHC-Data-PatientMedications entities, the default data model for medications from Pega Care Management version 8.4 | MemberID |
| D_GetRecentDiagnosisConditions | Patient medical history and claim data | CustomerID |
| D_GetNonClaimMedicalHistory | Patient medical history and diagnosis information from authorization and admission cases | MemberID, Source |
D_GetMemberClaims |
Patient claims | MemberID |
D_DisplayFamilyHistory |
Patient family history | MemberID |
| D_MemberNotes | Patient notes added by a caregiver in the Patient summary | MemberID |
| D_MemberNotesEdit | Update the Patient notes | MemberID |
Configuring the timeline for editing a patient summary
You can edit the patient notes in the patient summary in the header of the Patient 360 view. The steps are listed and captured in the figures below.
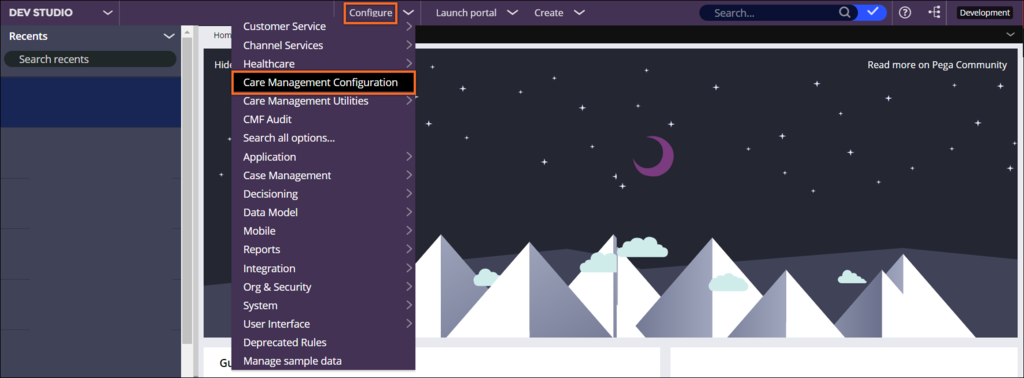
To begin, in the header of Dev Studio, click Configure > Care Management Configuration.
- On the Care Management Application configuration page, click the Other settings tab.
- In the Timeline to edit the patient summary (in days) field, enter the number of days in which you can update the patient summary note.
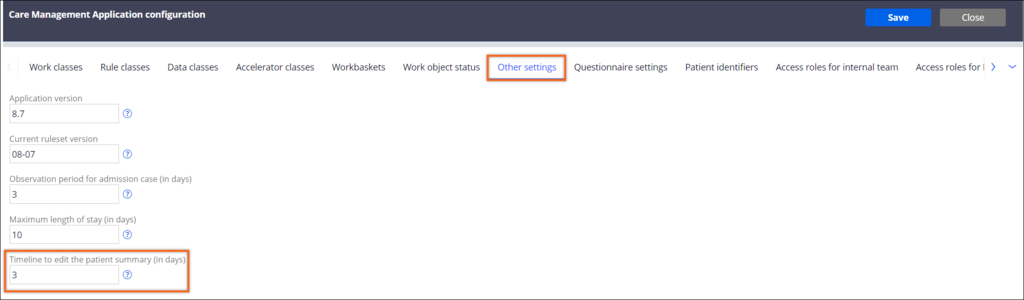
- Click Save.
Locking patient notes in Patient 360
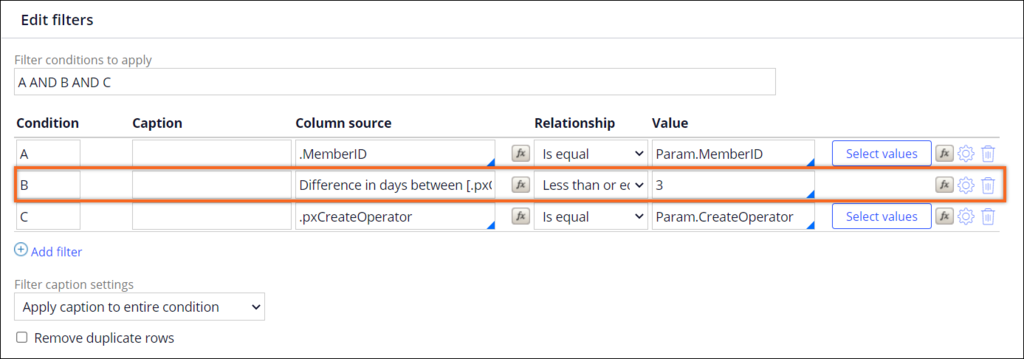
As shown in the following figure, you can change the default number of days of 3 to allow a care team member to edit patient notes. After the specified number of days, the notes are locked and unavailable for editing. For example, your organization might update records for a period up to seven days.
- In the header of Dev Studio, enter MemberNotesEdit, and then press the Enter key.
- Open the report definition rule in the PegaHC-Data-MemberNotes class where the patient notes are captured and saved.
- Click Save As > Specialize by class or ruleset to save the report definition to your implementation layer ruleset.
- Click the Query tab.
- In the Edit filters section, in the Condition B row, in the Relationship list, click a relationship.
- In the Value field, enter the number that meets the needs of your organization.
- Click Save, and then click Check in.
Changing the source on the Patient Risk Score data page in the Patient 360
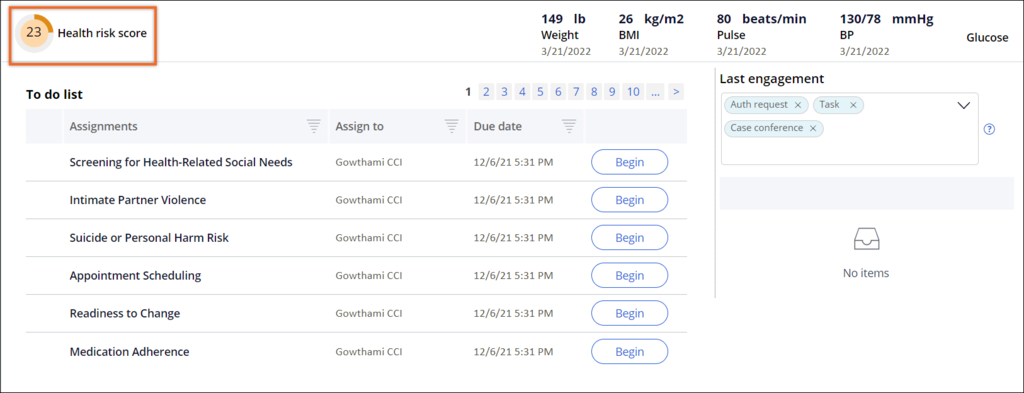
The Patient Risk Score is a health risk score value for the patient which is calculated based on client-defined methodology. The following figure shows the health risk score. Different organizations might choose to have different ways of storing and displaying the patient score. Modify the source on the PatientRiskScore data page to indicate how your organization calculates patient risk scores.
Patient risk scores are calculations that are used to identify the risk levels of patients. Typically, patients are classified as high-, medium-, or low-risk. Additionally, risk scores are created to review risks in various areas such as readmission risk or future risk of an event happening in a certain time period, for example, three, six, or twelve months.
By consistently using the patient risk score, you segment the patient population into manageable categories. Low- and medium-risk members might be managed by using email, tests, or electronic coaching. High-risk members need person-to-person interaction with a care manager. Risk scores are dynamic and case managers can measure patient progress through the decrease or increase in their risk score.
- In the navigation pane of Dev Studio, click the App icon on the left side of the screen.
- Enter and search for the PegaHC-Data-RiskScore class.
- Click Data Model > Data PageD_PatientRiskScore.
- Save the data page to your implementation-layer ruleset.
Note: For more information, see Creating a data page.
- In the Data sources section, in the Source list shown in the following figure, select how to populate the patient risk score.
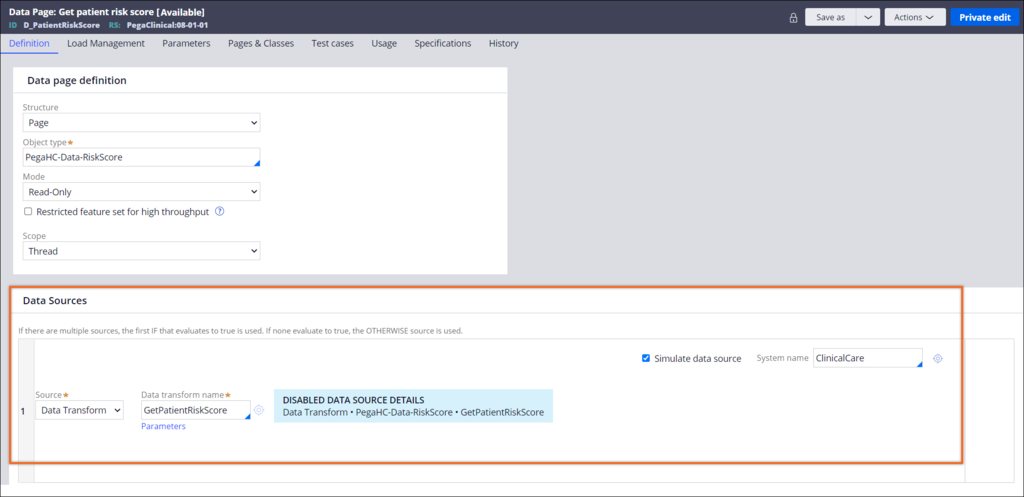
- Based on the Source method that you select, update the fields to describe how you are getting information or calculating information for the patient risk score.
- Click Save, and then click Check in.
Configuring recent vital items for display in the Patient 360 banner
In Pega Care Management, you can configure the items that you want to display as recent vital readings in the banner of the Patient 360.
Because look-up data pages do not support dynamic class referencing, you need to save the D_RecentVitals rule in the appropriate implementation-layer class context so that the data page can fetch the implementation-layer specific data. Otherwise, the look-up fails and the data page does not return any data.
1.In the header of Dev Studio, click Configure >Care Management Configuration.
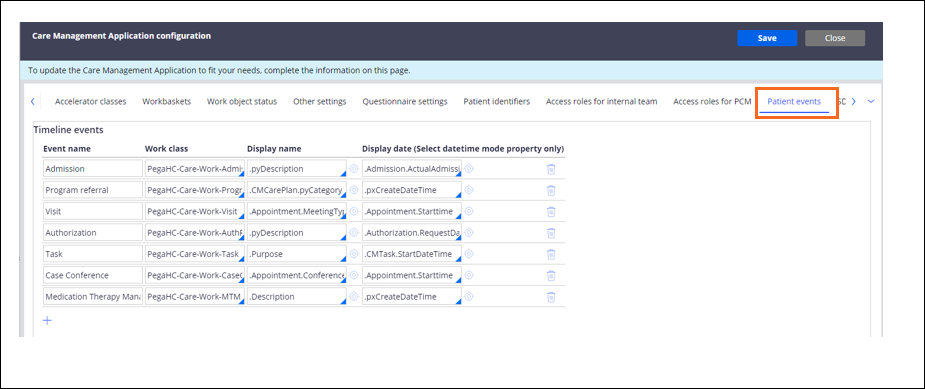
2.Click the Patient events tab.
1.In the Recent vitals section, click the plus sign icon to add a row.
2.In the Vital column, enter a value for a vital sign and then select it from the list that appears.
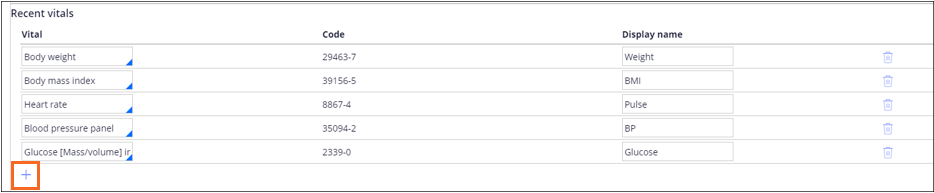
5.In the Display name column, enter the name that you want to display for the vital sign.
The value in the Code column is filled in.
6.Click Save and Close.
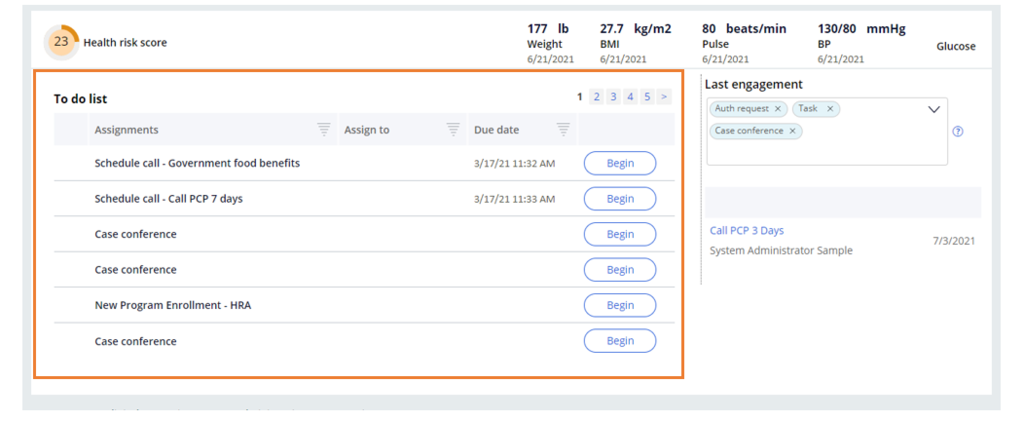
Configuring the to-do list in the Patient 360
To meet your organization's business needs, you can define additional cases that you want to display in the patient to-do list. For example, you might want to add the Discharge worksheet case.
As shown in the following figure, the patient to-do list includes a list of the tasks (cases) that are associated with the patient. Each record has a Begin button to start the task. If you leave the task without finishing it, the button label changes to Continue, which allows you to resume the work where you left it. Along with the other cases, task cases that occur with a start date in the next 7 days are also displayed in the to-do list.
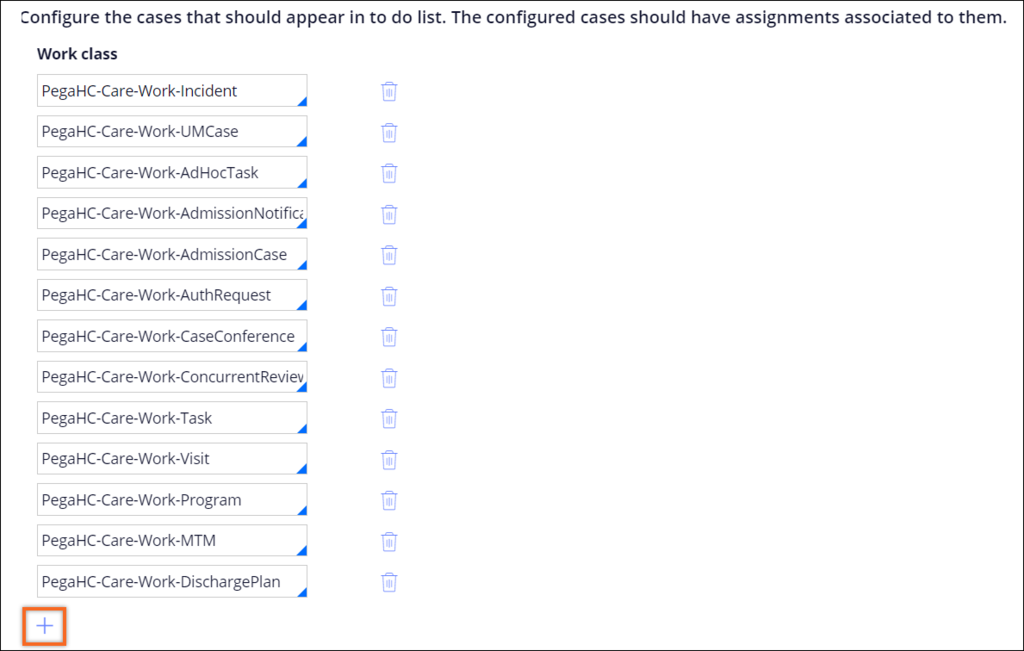
By default, Pega Care Management displays the following cases in the patient to-do list:
- Prior authorization
- Admission
- Admission notification
- Program referral
- Task
- Case conference
- Visit
- Discharge Plan
- Concurrent review
- UM Case
- Incident
- MTM
- In the header of Dev Studio, click Configure > Care Management Configuration.
- On the Care Management Application configuration page, click the drop-down arrow at the right of the tabs, and then select Patient events.
- In the To do list cases section, click the Add a row icon.
- In the new field, click and press the Down arrow to display a list of class names for case types.
For example: If you are adding a Discharge worksheet case, select the PegaHC-Care-Work-DischargeWorksheet class to display the discharge worksheet cases on the patient to-do list.
- Click Save.
- Optional: To fetch the cases that are related to a patient, use the D_MemberToDoListCases data page. For more information, see Creating a data page.
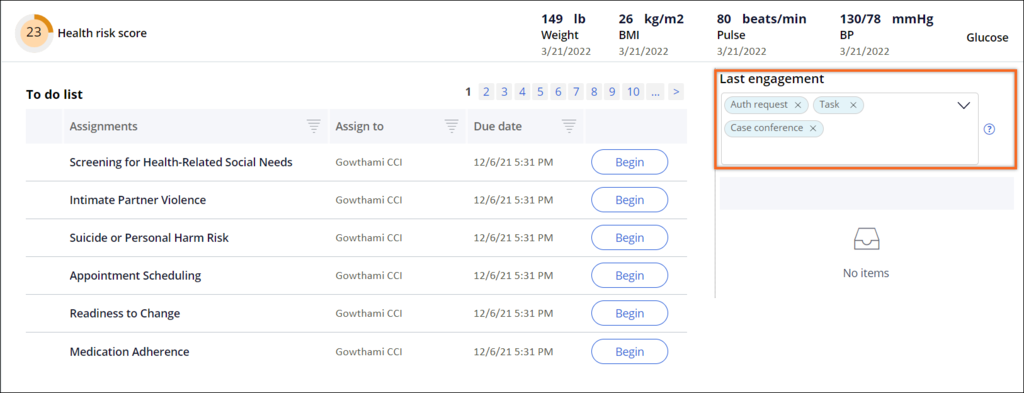
Configuring Recent Activity/Last Engagement in Patient 360
You can configure the recent activities, also known as the last engagement, of patients. For example, this section might contain events such as out-of-range lab results, phone visits, patient notes updated, home visit follow-up, incidents, and authorizations. As shown in the following figure, a care manager can view the list of activities and quickly understand the patient interactions.
Configuring the default settings for Recent Activity
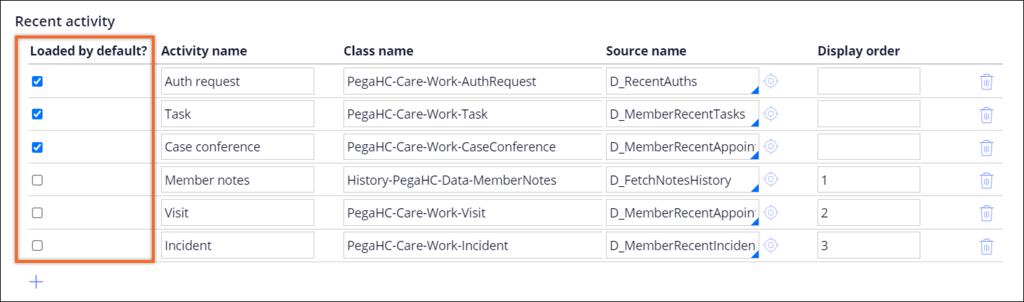
You can choose the items that automatically appear in the Recent activity section of the Patient 360 profile. This section provides an overview to help the care manager understand recent interactions with the patient.
For example, you might choose to display visits and incidents.
- In the header of Dev Studio, click Configure > Care Management Configuration.
- Click the Patient events tab.
- In the Recent activity section, select the checkboxes in the Loaded by default? column (as shown in the following figure) to represent the items that you want to automatically display in the patient Recent activity section of the Patient 360 profile.
- Click Save and then close.
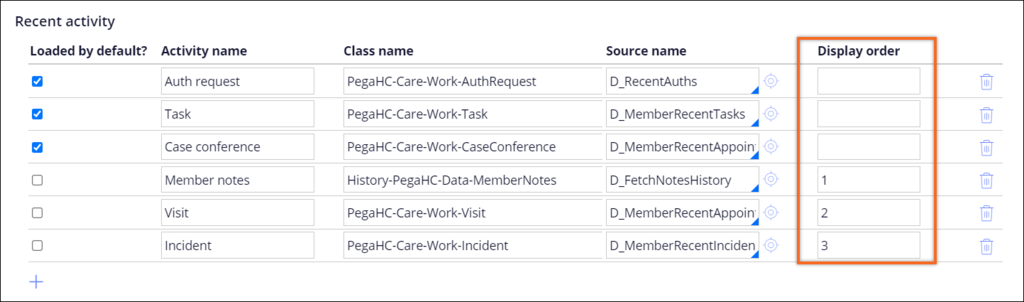
Changing the event order in the Recent Activity section
Based on the priorities of your organization, you can change the order of the events in the Recent activity section in the CM Care Manager Portal. The Recent activity section contains events such as out-of-range lab results, phone visits, patient notes updated, home visit follow-up, and authorization.
- In the header of Dev Studio, click Configure>Care Management Configuration.
- Click the Patient events tab.
- In the Recent Activity section, in the Display order column, modify the numbers to reflect the order of events for display, as shown in the following figure.
- Click Save.
- Optional: To fetch the last engagement filters, use the D_GetDefaultLoadRecents data page. For more information, see Creating a data page.
Check your knowledge with the following interactions:
This Topic is available in the following Module:
If you are having problems with your training, please review the Pega Academy Support FAQs.
Want to help us improve this content?