Adding and configuring adapters
Archived
2 Tasks
15 mins
Beginner
Robotic Process Automation
English
Scenario
With the addition of the Customer Relationship Management and ACME Search System projects to the TrainingCertificationSln, the next step is to add the applications associated with each project. After reading the project documentation, the CRMPrj stores the Windows-based CRM application, and the ACMESearchPrj stores the ACME Search System web application. The ACME Search System operates within the Google Chrome browser. The project documentation also states that the ACME Search System application only starts when the location inquiry is requested. Any tabs or applications running within Chrome stay open when the ACME Search System application terminates.
The TrainingCertificationSln requires the addition and configuration of the Customer Relationship Management and ACME Search System applications.
Complete the following items:
- Add a Windows adapter to the CRMPrj
- Configure the Windows adapter
- Add a universal web adapter to the ACMESearchPrj
- Configure the universal web adapter
The following table provides the information you need to complete the exercise.
| Item | Name | Properties |
|---|---|---|
| Customer Relationship Management application | CRM | Path = C:\Program Files (x86)\Openspan\CRM Setup\. (This is the default installation path for the CRM Setup.msi) |
| ACME Search System application | ACMESystem |
StartPage = https://training.openspan.com StartOnProjectStart = False BrowserType = Chrome AcceptedDomains: Domain = training.openspan.com Mode = Contains BrowserStopMethod = StopTrackedDocuments |
Note: Prior to completing this challenge and all subsequent challenges for this Mission, you must install , located in
C:\Program Files (x86)\Pegasystems\Pega Robot Studio\Extras. For more assistance in installing the CRM application, see Completing the challenges in Pega Robot Studio.Note: To automate a web application using Google Chrome, you must have the Pega Robotic Automation extension for Google Chrome installed and enabled.
Detailed Tasks
1 Add and configure a Windows adapter
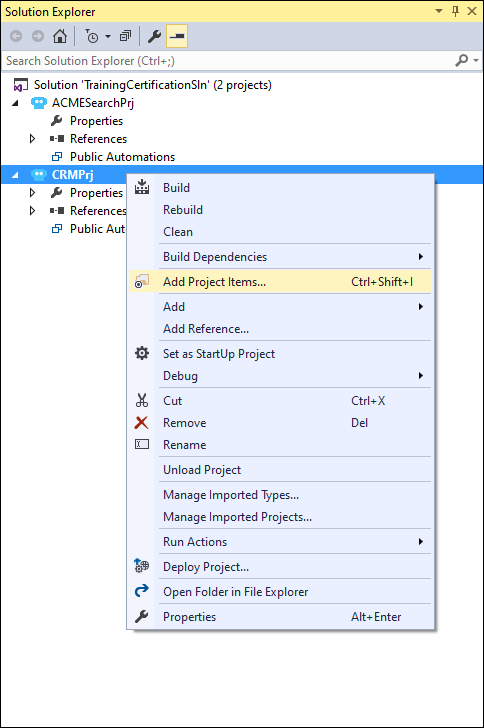
- In the Solution Explorer, right-click the CRMPrj to display a context menu.
- From the context menu, click Add Project Items to display the Add Project Items window.
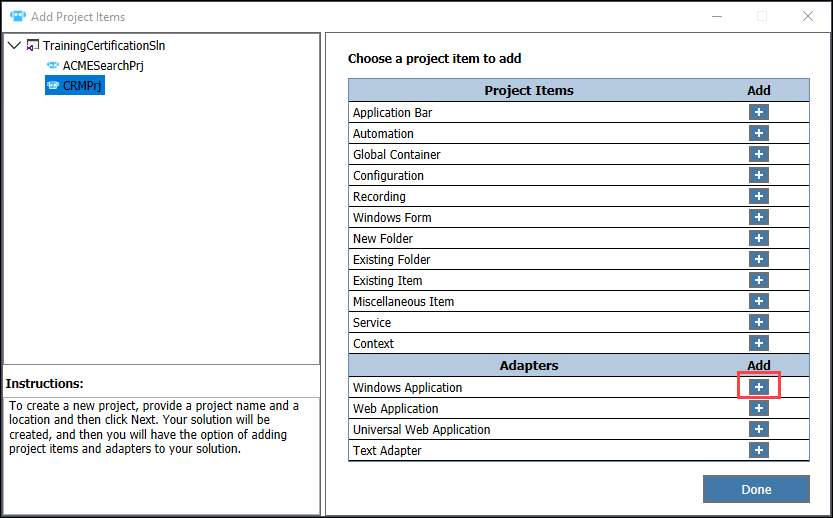
- In the Add Project Items window, in the Adapters section, in the Windows Application row, click the Add icon.
- In the Add Windows Adapter window, in the Name field, enter
CRM.os. - To the right of the Path field, click Browse.
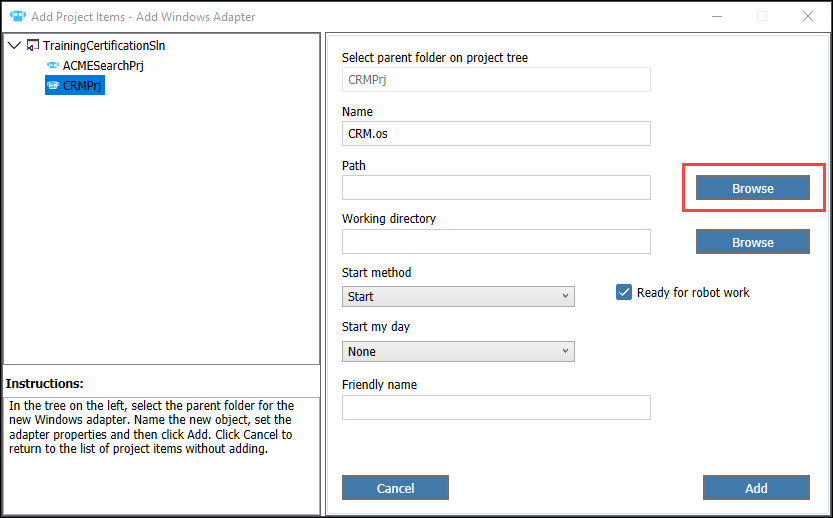
- Navigate to the location of CRM.exe, and then click Open to update the Path property.
- In the Add Windows Adapter window, click the Add icon to complete the Windows application configuration.
- In the Add Project Items window, click Done to finish adding items to the CRMprj project.
- From the menu bar, select File > Save All to save the application to the solution.
2 Add and configure a web adapter
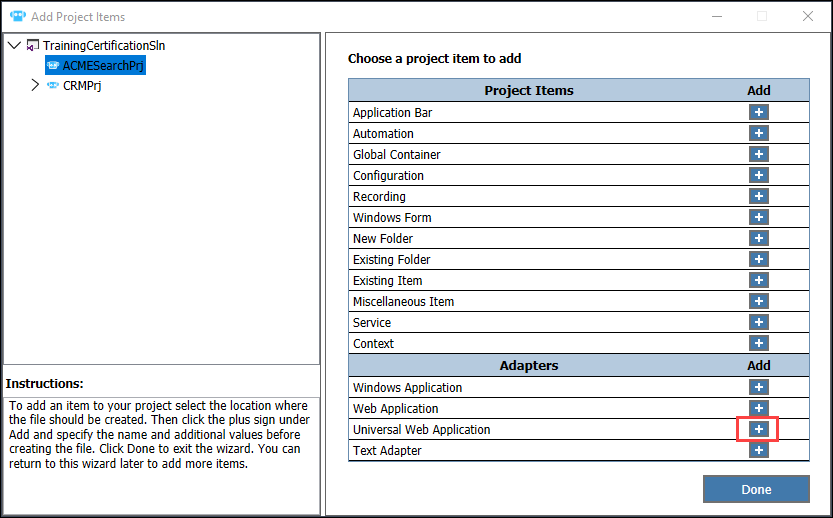
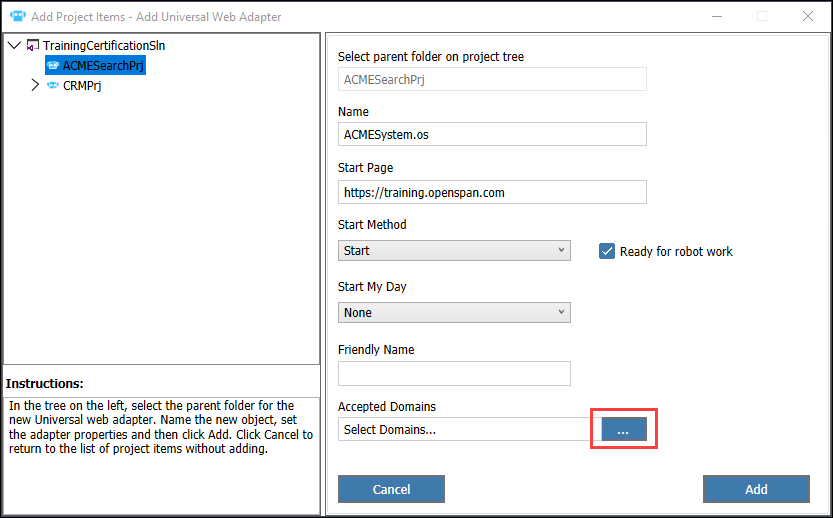
- In the Solution Explorer, right-click the ACMESearchPrj to display a context menu.
- On the context menu, click Add Project Items to display the Add Project Items window.
- In the Add Project Items window, in the Adapters section, in the Universal Web Application row, click the Add icon.
- In the Add Universal Web Adapter window, in the Name field, enter
ACMESystem.os. - In the Start Page field, enter
https://training.openspan.com. - To the right of the Accepted Domains field, click the ellipsis icon to display the AcceptedDomain Collection Editor window.
- In the AcceptedDomain Collection Editor window, click Add to add a new accepted domain.
- In the accepted domain properties pane, enter the following values:
Property Value Domain training.openspan.com Mode Contains 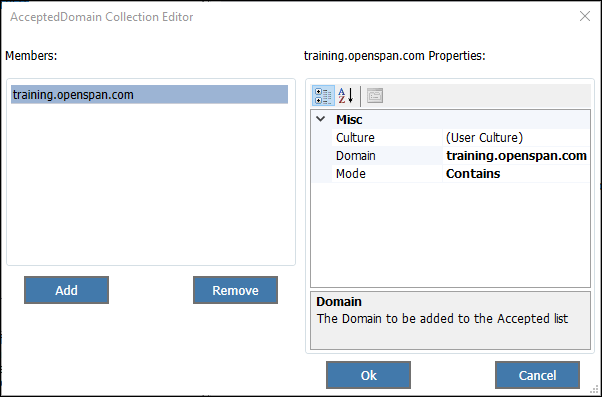
- Click Ok to save the accepted domain properties.
- In the Add Universal Web Adapter window, click Add to complete the Windows application configuration.
- In the Add Project Items window, click Done to finish adding items to the ACMESearchPrj project.
- In the Object Explorer, click the ACMESystem object to display the adapter properties in the Properties window.
- In the Properties window for ACMESystem, update the StartOnProjectStart property to
False.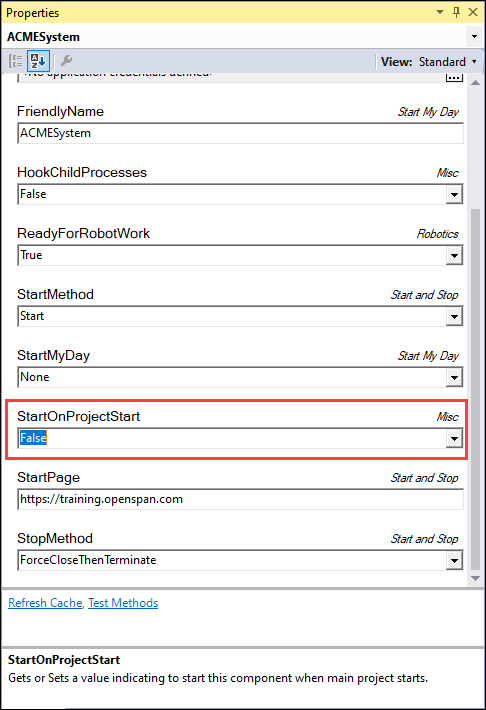
- From the menu bar, select File > Save All to save the changes.