Approving work for BAs
5 Tasks
20 mins
Scenario
In a Directly Capture Objectives (DCO) session, a GoGoRoad SME explained that they did not always require customers to be enrolled in their membership program to be eligible for service. As the GoGoRoad business grew, not requiring membership to receive service created problems during high call volume periods. For example, GoGoRoad could not provide timely assistance to GoGoRoad members during a recent winter storm because service providers were out responding to calls from non-member customers. As a result, GoGoRoad stakeholders have added a business requirement that a validation process be added to the Assistance Request workflow.
As a Pega Business Architect, you recognize that the Pega Approve/Reject Step can provide Managers with the ability to approve or reject requests for assistance as necessary, depending on business conditions.
User story
As a Manager at GoGoRoad, I want the ability to approve or reject Assistance Request Cases if the individual making the request is not enrolled with GoGoRoad, especially during high call volume periods, so that we can provide service to our membership.
Technical notes documented by the System Architect
- The Assistance Request Case Type includes a Validation Stage that includes an Approve/Reject Step.
- On entry into the Validation Stage, the Assistance Request Case status is updated to Pending-Approval.
- The Manager Persona is configured for the Validation Stage.
- In the Approval/Reject Step, if the Assistance Request Case instance is approved, the workflow continues; if it is rejected, the Case proceeds to the Approval Rejection Stage.
- The Assistance Request Case Type includes an Approval Rejection Stage.
- When the Approval-Rejection Stage is complete, the Assistance Request Case status is set to Resolved-Rejected.
The following table provides the credentials you need to complete the challenge:
| Role | User name | Password |
|---|---|---|
| Business Architect | author@gogoroad | pega123! |
Challenge Walkthrough
Detailed Tasks
1 Create the Validation Stage
- In the Pega instance for the challenge, enter the following credentials:
- In the User name field, enter author@gogoroad.
- In the Password field, enter pega123!.
- In the navigation pane of App Studio, click Case Types > Assistance Request to access the Assistance Request Case Type.
- In the Assistance Request Case Life Cycle, to the right of the Resolution Stage, click to add a new Stage to the Case Type.
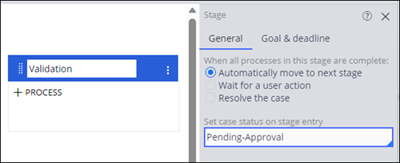
- In the Stage field, enter Validation.
- In the contextual properties pane on the right, select Automatically move to the next Stage.
- In the Set Case status on entry field, enter Pending-Approval.
- In the upper-right corner, click to save your work.
2 Configure the Validation Stage
- In the Assistance Request Case Life Cycle, drag the Validation Stage so it is between the Create and Service Stages.
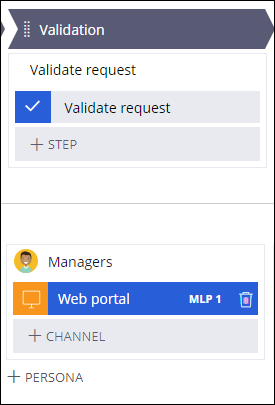
- In the Validation Stage, click .
- In the field for the Approve/Reject Step, enter Validate request.
- In the field for the Validation Process, enter Validate request.
- In the Validation Stage, click to add the Managers Persona to the Validation Stage.
- In the Managers Persona, click .
- In the contextual properties pane on the right, in the Release list, select MLP1.
- In the upper-right corner, click .
3 Configure the Validate request View
- In the Validation Stage, click the Validate requestStep.
- In the contextual properties pane on the right, click .
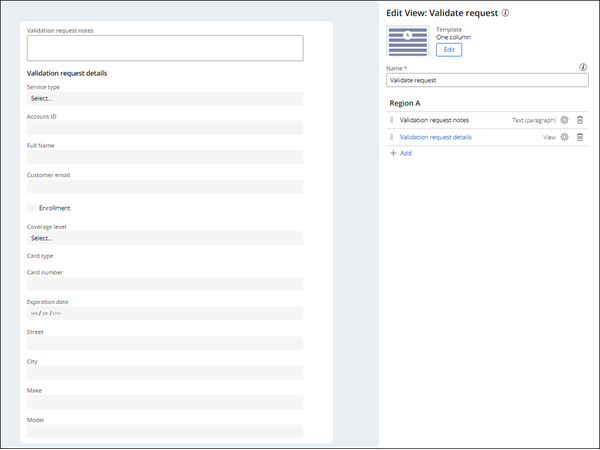
- In the Edit View: Validate request window, in Region A, remove the Notes field by clicking the icon.
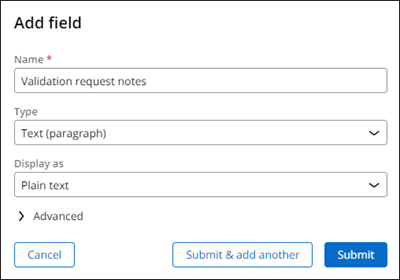
- In Region A, click Add > Fields > Create new field.
- In the Add field dialog box, in the Name field, enter Validation request notes.
- In the Type list, select Text (paragraph).
Note: The value of the Display as field is Plain text.
- Click .
- In the Edit View: Validate request window, in Region A, click Add > Views > Validation request details to add the previously-configured Validation request details View to the Validate request View.
- Click .
4 Configure the Validate request Step properties
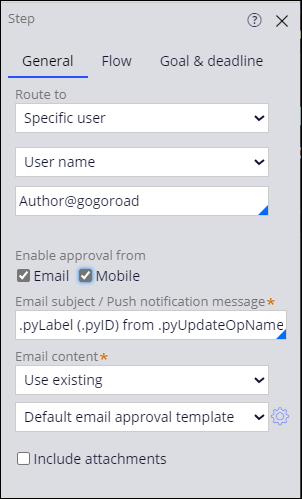
- In the contextual properties pane of the Validate request Step, click the General tab.
- In the Enable approval from field, select the following checkboxes:
- Mobile
- Click the Flow tab.
- In the If REJECTED then list, select Change Stage.
- In the To list, select Approval Rejection.
- In the upper-right corner, click to save your work.
5 Configure the Approval Rejection Alternate Stage
- In the Assistance Request Case Life Cycle, click the Approval Rejection Stage to open the contextual properties pane on the right.
- On the General tab, in the Resolution status field, select Resolved-Rejected.
- In the Approval Rejection Alternate Stage, click Step > More > Automations > Send email > Select.
- In the field for the Send email Step, enter Send rejection email.
- Click the Send rejection email Step to open the contextual properties pane on the right.
- In the contextual properties pane, in the Send to list, select Field.
- In the second Send to list, select .
- In the Subject field, enter Assistance request is rejected.
- Click Compose to access the rich text editor.
- In the rich text editor, enter the following text to compose the email message:
Dear <<.CustomerAR.FullName>>,
As a result of your not being enrolled with GoGoRoad, we are sorry to inform you that your request for assistance from GoGoRoad has been rejected.
Regards,
The GoGoRoad Service TeamTip: You can click the Insert property icon to select a property from a list. Select Customer (AR) > Full Name for .CustomerAR.FullName. If the Insert property icon is not displayed, log out and log back in. - Click to close the rich text editor.
- In the Approval Rejection (1) Process, enter Approval Rejection.
- In the upper right, click Save to save your work.
Confirm your work
- In App Studio, click to create a new Assistance Request Case.
- In the Identify issue Step, select a service type, and then click .
- In the Identify customer Step, select a Customer, then click .
- In the Identify location Step, add values to the Street, City, and State fields, then click .
- In the Identify vehicle Step, add values to at least the Make and Model fields, then click .
- In the Enter payment information Step, add values to the Card type, Card number, and Expiration date fields, and then click .
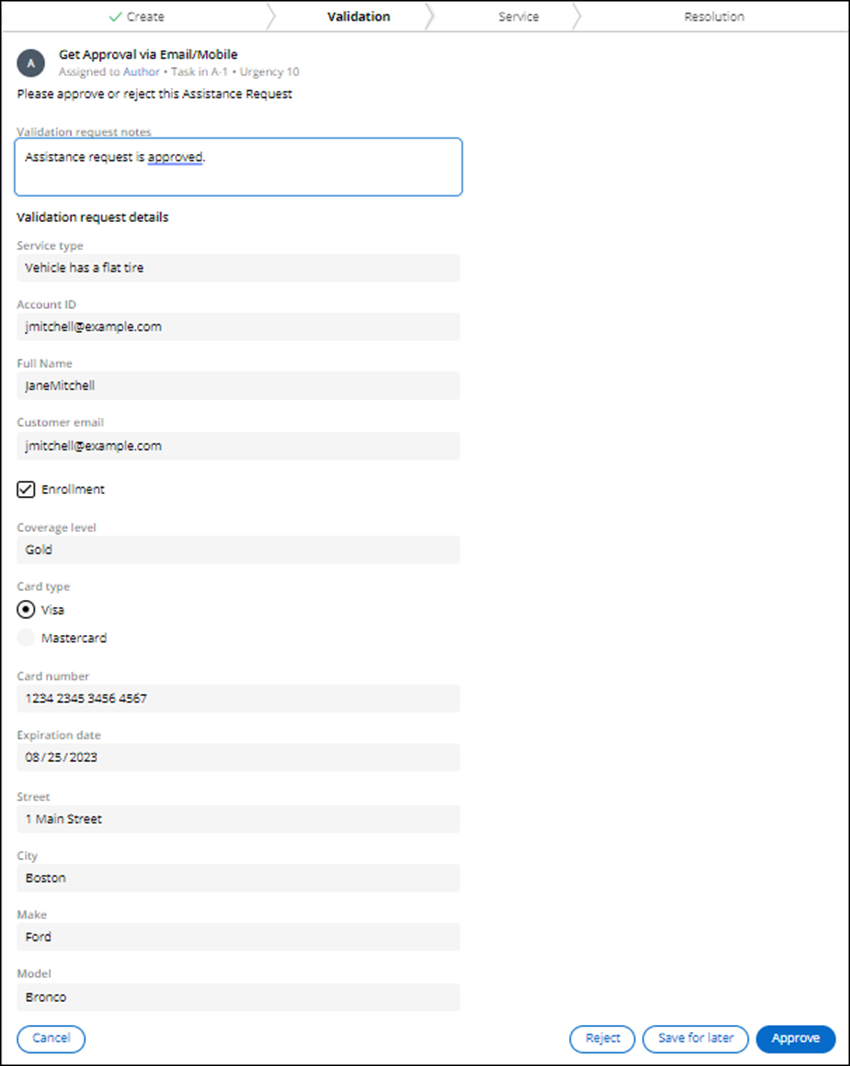
- Verify that the Work Status is PENDING-APPROVAL.
- In the Get Approval from Email/Mobile section, verify that the information you entered is displayed.
- Click ,and then confirm the Case progresses to the Select services performed Step.
- In the upper-left corner of the Web portal, click Create > Assistance Request to create a new Assistance Request Case, and then click when asked if you want to lose unsaved changes.
- Advance the Case to the Get Approval from Email/Mobile Step.
- In the Get Approval from Email/Mobile Step, click .
- Confirm the Work Status is RESOLVED-REJECTED.
- Expand the Utilities pane, and then confirm that an email entitled Assistance request is rejected is displayed.
This Challenge is to practice what you learned in the following Module:
Available in the following mission:
If you are having problems with your training, please review the Pega Academy Support FAQs.
Want to help us improve this content?

